class: title-slide, middle <img src="assets/img/pr.png" width="80px" style="padding-right:10px; border-right: 2px solid #FAFAFA;"></img> <img src="assets/img/UdeS_blanc.png" width="350px" ></img> # Spatial variogram modelling .instructors[ GSFE01 - F. Guillaume Blanchet & Steve Vissault ] --- class: clear, center, middle ## <i class="fab fa-slideshare "></i> Slides available at: https://steveviss.github.io/PR-GSFE01/sp_vario/index.html ## <i class="fas fa-tag "></i> Practical: https://steveviss.github.io/PR-GSFE01/sp_vario/practice.html --- # Generalities about variograms ## Definition .content-box-green[**Variogram** A variogram displays the variance of a variable measured at two different location in space.] --- # Variogram or semivariogram? In the litterature there are confusions about how to call a variogram. Some call it a **variogram** while other call it a **semivariogram**. The reason why **semivariogram** (or semivariance) is sometimes used stem from the fact that what is represented when plotting a variogram is *half* the variance. Bachmaier and Backes (2008) discussed this confusion and they showed that the term **variogram** should be used and that the terms *semivariance* and *semivariogram* should be avoided. --- # Types of variogram We will see different types of variograms today - Cloud variogram - Empirical variogram (sometimes referred to as *sample variogram*) - Model variogram - Directional variogram --- class: inverse, center, middle # Cloud variogram <html><div style='float:left'></div><hr color='#EB811B' size=1px width=720px></html> --- # Definition .content-box-green[.small[A **cloud variogram** displays the variance between all pairs of samples for a variable]] ## Mathematical definition `$$\begin{align} 2\gamma(\mathbf{s}_1, \mathbf{s}_2) =\gamma(\mathbf{h})=& \text{var}\left(Z(\mathbf{s}_1) - Z(\mathbf{s}_2)\right)\\ =& \text{var}\left(Z(\mathbf{s} + \mathbf{h}) - Z(\mathbf{s})\right) \end{align}$$` So `$$\begin{align} \gamma(\mathbf{h})= \frac{\text{var}\left(Z(\mathbf{s} + \mathbf{h}) - Z(\mathbf{s})\right)}{2} \end{align}$$` where .small[ - `\(\mathbf{s_1}\)` : Location of sample 1 - `\(\mathbf{s_2}\)` : Location of sample 2 - `\(Z(\mathbf{s_1})\)` : Value of variable sampled at sample 1 - `\(Z(\mathbf{s_2})\)` : Value of variable sampled at sample 2 - `\(\mathbf{h}\)` : Distance between sample 1 and sample 2 ] --- # Visualization of the cloud variogram <img src="index_files/figure-html/unnamed-chunk-1-1.png" width="864" /> ## Use of cloud variogram - Exploratory analysis - It is the basis to construct the empirical variogram --- # Directional variogram The variogram in the previous slide is constructed using all samples equally. This does not have to be the case. We can also construct a variogram using only samples in a cone in specific direction. These variograms are known as **directional variograms** 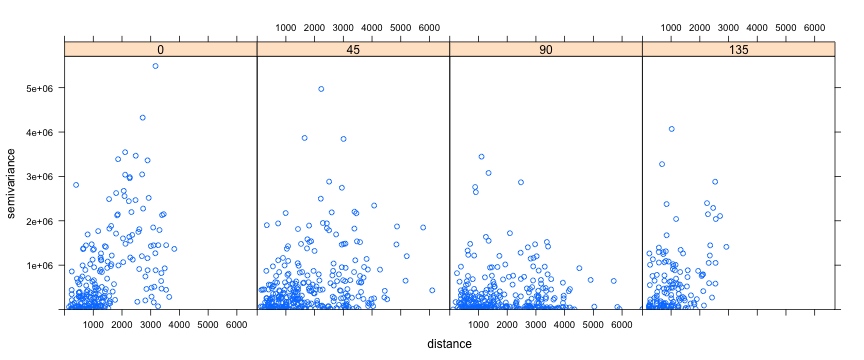<!-- --> --- class: inverse, center, middle # Empirical variogram <html><div style='float:left'></div><hr color='#EB811B' size=1px width=720px></html> --- # Definition .content-box-green[.small[An **empirical variogram** is derived by defining bins into a cloud variogram]] ## Mathematical definition The empirical variogram is constructed based on the following equation `$$\gamma(\mathbf{h}\pm\delta)=\frac{1}{2n_{\mathbf{h}\pm\delta}}\sum_{(i,j)}^{n_{\mathbf{h}\pm\delta}}\left(Z(\mathbf{s}_i) - Z(\mathbf{s}_j)\right)^2$$` where - `\(Z(\mathbf{s_i})\)` : Value of variable sampled at sample i - `\(Z(\mathbf{s_j})\)` : Value of variable sampled at sample j - `\(\mathbf{h}\pm \delta\)` : bin of size `\(2\delta\)` at distance `\(\mathbf{h}\)` - `\(n_{\mathbf{h}\pm\delta}\)` : Number of samples within the bin --- # .small[Visualization of the empirical variogram] 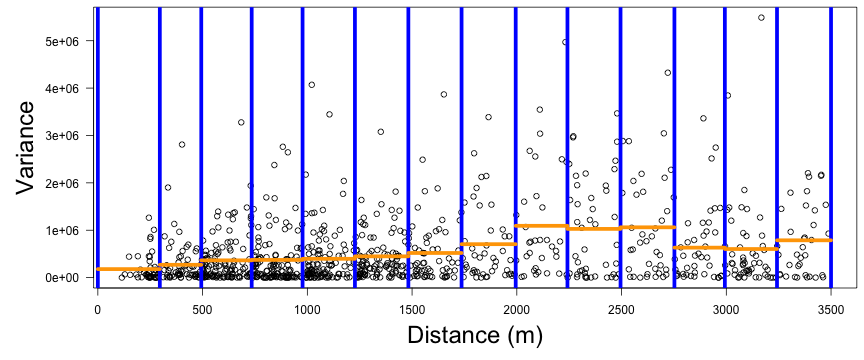<!-- --> ## Guidelines to contruct an empirical variogram .small[ - More bins at small distances - There should be enough values in each bin - Defining the *right* variogram is problem specific ] --- # Building an empirical variogram **Total Phosphorus in sediment in the Harbour of Hamilton (Ontario)** <div id="htmlwidget-54684663379b0c5f1b76" style="width:100%;height:70%;" class="leaflet html-widget"></div> <script type="application/json" data-for="htmlwidget-54684663379b0c5f1b76">{"x":{"options":{"minZoom":1,"maxZoom":100,"crs":{"crsClass":"L.CRS.EPSG3857","code":null,"proj4def":null,"projectedBounds":null,"options":{}},"preferCanvas":false,"bounceAtZoomLimits":false,"maxBounds":[[[-90,-370]],[[90,370]]]},"calls":[{"method":"addProviderTiles","args":["CartoDB.Positron",1,"CartoDB.Positron",{"errorTileUrl":"","noWrap":false,"detectRetina":false}]},{"method":"addProviderTiles","args":["CartoDB.DarkMatter",2,"CartoDB.DarkMatter",{"errorTileUrl":"","noWrap":false,"detectRetina":false}]},{"method":"addProviderTiles","args":["OpenStreetMap",3,"OpenStreetMap",{"errorTileUrl":"","noWrap":false,"detectRetina":false}]},{"method":"addProviderTiles","args":["Esri.WorldImagery",4,"Esri.WorldImagery",{"errorTileUrl":"","noWrap":false,"detectRetina":false}]},{"method":"addProviderTiles","args":["OpenTopoMap",5,"OpenTopoMap",{"errorTileUrl":"","noWrap":false,"detectRetina":false}]},{"method":"createMapPane","args":["point",440]},{"method":"addCircleMarkers","args":[[43.2894444446666,43.3064166664999,43.3006666666666,43.2886333333999,43.3038777777999,43.2962960779999,43.2849999996665,43.2744748053999,43.2760515329999,43.2751805557499,43.287919823409,43.2791666669999,43.2777777779999,43.2749999999999,43.2769444439999,43.2783333329999,43.2794444439999,43.2808333329999,43.2819444439999,43.2772222219999,43.2786111109999,43.2805555559999,43.2822222219999,43.2838888889999,43.2855555559999,43.2761111109999,43.2780555559999,43.2799999999999,43.2822222219999,43.2841666669999,43.2861111109999,43.2766666669999,43.2786111109999,43.2808333329999,43.2830555559999,43.2852777779999,43.2874999999999,43.2897222219999,43.2786111109999,43.2811111109999,43.2833333329999,43.2855555559999,43.2877777779999,43.2899999999999,43.2755555559999],[-79.8021296293333,-79.8259583335,-79.8161666666667,-79.811972222,-79.8321923108,-79.8496619388,-79.8720925923333,-79.882028961,-79.8487415724,-79.84546527825,-79.8376767679091,-79.8725,-79.855277778,-79.838611111,-79.842222222,-79.845,-79.85,-79.85,-79.8525,-79.838055556,-79.840277778,-79.842222222,-79.844166667,-79.846388889,-79.848333333,-79.835,-79.836111111,-79.8375,-79.838888889,-79.840277778,-79.841666667,-79.833333333,-79.833888889,-79.834444444,-79.835,-79.835555556,-79.836388889,-79.836944444,-79.831388889,-79.831388889,-79.831111111,-79.830833333,-79.830694444,-79.830555556,-79.836388889],6,null,"tpSP - Value.Valeur",{"crs":{"crsClass":"L.CRS.EPSG3857","code":null,"proj4def":null,"projectedBounds":null,"options":{}},"pane":"point","stroke":true,"color":"#333333","weight":2,"opacity":[0.9,0.9,0.9,0.9,0.9,0.9,0.9,0.9,0.9,0.9,0.9,0.9,0.9,0.9,0.9,0.9,0.9,0.9,0.9,0.9,0.9,0.9,0.9,0.9,0.9,0.9,0.9,0.9,0.9,0.9,0.9,0.9,0.9,0.9,0.9,0.9,0.9,0.9,0.9,0.9,0.9,0.9,0.9,0.9,0.9],"fill":true,"fillColor":["#25AA83","#471366","#8CD645","#25AA83","#46337F","#BDDF26","#355E8D","#1F9F88","#287C8E","#228D8D","#47C06F","#20938C","#3C508B","#3C508B","#32648E","#287C8E","#20938C","#25AA83","#1F998A","#25AA83","#1F9F88","#DEE318","#20938C","#7DD250","#3BBB75","#25AA83","#20938C","#1F9F88","#60CA60","#2AB07F","#25AA83","#2D708E","#228D8D","#32B67A","#53C568","#60CA60","#47C06F","#3BBB75","#32648E","#32648E","#1F9F88","#1F998A","#6ECE58","#60CA60","#20938C"],"fillOpacity":[0.6,0.6,0.6,0.6,0.6,0.6,0.6,0.6,0.6,0.6,0.6,0.6,0.6,0.6,0.6,0.6,0.6,0.6,0.6,0.6,0.6,0.6,0.6,0.6,0.6,0.6,0.6,0.6,0.6,0.6,0.6,0.6,0.6,0.6,0.6,0.6,0.6,0.6,0.6,0.6,0.6,0.6,0.6,0.6,0.6]},null,null,["<html><head><link rel=\"stylesheet\" type=\"text/css\" href=\"lib/popup/popup.css\"><\/head><body><div class=\"scrollableContainer\"><table class=\"popup scrollable\" id=\"popup\"><tr class='coord'><td><\/td><td><b>Feature ID<\/b><\/td><td align='right'>733 <\/td><\/tr><tr class='alt'><td>1<\/td><td><b>Site.Site <\/b><\/td><td align='right'>7005 <\/td><\/tr><tr><td>2<\/td><td><b>Protocol <\/b><\/td><td align='right'>CABIN - Open Water <\/td><\/tr><tr class='alt'><td>3<\/td><td><b>Protocole <\/b><\/td><td align='right'>RCBA - Eaux libres <\/td><\/tr><tr><td>4<\/td><td><b>JulianDay.JourJulian <\/b><\/td><td align='right'>257 <\/td><\/tr><tr class='alt'><td>5<\/td><td><b>Year.Année <\/b><\/td><td align='right'>2005 <\/td><\/tr><tr><td>6<\/td><td><b>SiteDescription.Descriptiondusite <\/b><\/td><td align='right'> <\/td><\/tr><tr class='alt'><td>7<\/td><td><b>SampleNumber.Numérod.échantillon. <\/b><\/td><td align='right'>1 <\/td><\/tr><tr><td>8<\/td><td><b>Status.État <\/b><\/td><td align='right'>Test <\/td><\/tr><tr class='alt'><td>9<\/td><td><b>status <\/b><\/td><td align='right'>2 <\/td><\/tr><tr><td>10<\/td><td><b>QAQC <\/b><\/td><td align='right'>False <\/td><\/tr><tr class='alt'><td>11<\/td><td><b>Type.Type <\/b><\/td><td align='right'>Sediment Chemistry <\/td><\/tr><tr><td>12<\/td><td><b>Variable <\/b><\/td><td align='right'>TP <\/td><\/tr><tr class='alt'><td>13<\/td><td><b>VariableDescription <\/b><\/td><td align='right'>Total Phosphorus in sediment <\/td><\/tr><tr><td>14<\/td><td><b>VariableFr <\/b><\/td><td align='right'>PT <\/td><\/tr><tr class='alt'><td>15<\/td><td><b>DescriptiondelaVariable <\/b><\/td><td align='right'>Phosphore total dans le sédiment <\/td><\/tr><tr><td>16<\/td><td><b>Unit.Unité <\/b><\/td><td align='right'>ppm <\/td><\/tr><tr class='alt'><td>17<\/td><td><b>Value.Valeur <\/b><\/td><td align='right'>2330 <\/td><\/tr><tr><td>18<\/td><td><b>MDL <\/b><\/td><td align='right'>NA <\/td><\/tr><tr class='alt'><td>19<\/td><td><b>Computed.Calculé <\/b><\/td><td align='right'>NA <\/td><\/tr><tr><td>20<\/td><td><b>Note.Remarque <\/b><\/td><td align='right'> <\/td><\/tr><tr class='alt'><td>21<\/td><td><b>depth <\/b><\/td><td align='right'>17.6 <\/td><\/tr><tr><td>22<\/td><td><b>geometry <\/b><\/td><td align='right'>sfc_POINT <\/td><\/tr><\/table><\/div><\/body><\/html>","<html><head><link rel=\"stylesheet\" type=\"text/css\" href=\"lib/popup/popup.css\"><\/head><body><div class=\"scrollableContainer\"><table class=\"popup scrollable\" id=\"popup\"><tr class='coord'><td><\/td><td><b>Feature ID<\/b><\/td><td align='right'>949 <\/td><\/tr><tr class='alt'><td>1<\/td><td><b>Site.Site <\/b><\/td><td align='right'>7008 <\/td><\/tr><tr><td>2<\/td><td><b>Protocol <\/b><\/td><td align='right'>CABIN - Open Water <\/td><\/tr><tr class='alt'><td>3<\/td><td><b>Protocole <\/b><\/td><td align='right'>RCBA - Eaux libres <\/td><\/tr><tr><td>4<\/td><td><b>JulianDay.JourJulian <\/b><\/td><td align='right'>257 <\/td><\/tr><tr class='alt'><td>5<\/td><td><b>Year.Année <\/b><\/td><td align='right'>2005 <\/td><\/tr><tr><td>6<\/td><td><b>SiteDescription.Descriptiondusite <\/b><\/td><td align='right'> <\/td><\/tr><tr class='alt'><td>7<\/td><td><b>SampleNumber.Numérod.échantillon. <\/b><\/td><td align='right'>1 <\/td><\/tr><tr><td>8<\/td><td><b>Status.État <\/b><\/td><td align='right'>Test <\/td><\/tr><tr class='alt'><td>9<\/td><td><b>status <\/b><\/td><td align='right'>2 <\/td><\/tr><tr><td>10<\/td><td><b>QAQC <\/b><\/td><td align='right'>False <\/td><\/tr><tr class='alt'><td>11<\/td><td><b>Type.Type <\/b><\/td><td align='right'>Sediment Chemistry <\/td><\/tr><tr><td>12<\/td><td><b>Variable <\/b><\/td><td align='right'>TP <\/td><\/tr><tr class='alt'><td>13<\/td><td><b>VariableDescription <\/b><\/td><td align='right'>Total Phosphorus in sediment <\/td><\/tr><tr><td>14<\/td><td><b>VariableFr <\/b><\/td><td align='right'>PT <\/td><\/tr><tr class='alt'><td>15<\/td><td><b>DescriptiondelaVariable <\/b><\/td><td align='right'>Phosphore total dans le sédiment <\/td><\/tr><tr><td>16<\/td><td><b>Unit.Unité <\/b><\/td><td align='right'>ppm <\/td><\/tr><tr class='alt'><td>17<\/td><td><b>Value.Valeur <\/b><\/td><td align='right'>277 <\/td><\/tr><tr><td>18<\/td><td><b>MDL <\/b><\/td><td align='right'>NA <\/td><\/tr><tr class='alt'><td>19<\/td><td><b>Computed.Calculé <\/b><\/td><td align='right'>NA <\/td><\/tr><tr><td>20<\/td><td><b>Note.Remarque <\/b><\/td><td align='right'> <\/td><\/tr><tr class='alt'><td>21<\/td><td><b>depth <\/b><\/td><td align='right'>1.7 <\/td><\/tr><tr><td>22<\/td><td><b>geometry <\/b><\/td><td align='right'>sfc_POINT <\/td><\/tr><\/table><\/div><\/body><\/html>","<html><head><link rel=\"stylesheet\" type=\"text/css\" href=\"lib/popup/popup.css\"><\/head><body><div class=\"scrollableContainer\"><table class=\"popup scrollable\" id=\"popup\"><tr class='coord'><td><\/td><td><b>Feature ID<\/b><\/td><td align='right'>1003 <\/td><\/tr><tr class='alt'><td>1<\/td><td><b>Site.Site <\/b><\/td><td align='right'>7009 <\/td><\/tr><tr><td>2<\/td><td><b>Protocol <\/b><\/td><td align='right'>CABIN - Open Water <\/td><\/tr><tr class='alt'><td>3<\/td><td><b>Protocole <\/b><\/td><td align='right'>RCBA - Eaux libres <\/td><\/tr><tr><td>4<\/td><td><b>JulianDay.JourJulian <\/b><\/td><td align='right'>257 <\/td><\/tr><tr class='alt'><td>5<\/td><td><b>Year.Année <\/b><\/td><td align='right'>2005 <\/td><\/tr><tr><td>6<\/td><td><b>SiteDescription.Descriptiondusite <\/b><\/td><td align='right'> <\/td><\/tr><tr class='alt'><td>7<\/td><td><b>SampleNumber.Numérod.échantillon. <\/b><\/td><td align='right'>1 <\/td><\/tr><tr><td>8<\/td><td><b>Status.État <\/b><\/td><td align='right'>Test <\/td><\/tr><tr class='alt'><td>9<\/td><td><b>status <\/b><\/td><td align='right'>2 <\/td><\/tr><tr><td>10<\/td><td><b>QAQC <\/b><\/td><td align='right'>False <\/td><\/tr><tr class='alt'><td>11<\/td><td><b>Type.Type <\/b><\/td><td align='right'>Sediment Chemistry <\/td><\/tr><tr><td>12<\/td><td><b>Variable <\/b><\/td><td align='right'>TP <\/td><\/tr><tr class='alt'><td>13<\/td><td><b>VariableDescription <\/b><\/td><td align='right'>Total Phosphorus in sediment <\/td><\/tr><tr><td>14<\/td><td><b>VariableFr <\/b><\/td><td align='right'>PT <\/td><\/tr><tr class='alt'><td>15<\/td><td><b>DescriptiondelaVariable <\/b><\/td><td align='right'>Phosphore total dans le sédiment <\/td><\/tr><tr><td>16<\/td><td><b>Unit.Unité <\/b><\/td><td align='right'>ppm <\/td><\/tr><tr class='alt'><td>17<\/td><td><b>Value.Valeur <\/b><\/td><td align='right'>3130 <\/td><\/tr><tr><td>18<\/td><td><b>MDL <\/b><\/td><td align='right'>NA <\/td><\/tr><tr class='alt'><td>19<\/td><td><b>Computed.Calculé <\/b><\/td><td align='right'>NA <\/td><\/tr><tr><td>20<\/td><td><b>Note.Remarque <\/b><\/td><td align='right'> <\/td><\/tr><tr class='alt'><td>21<\/td><td><b>depth <\/b><\/td><td align='right'>12.8 <\/td><\/tr><tr><td>22<\/td><td><b>geometry <\/b><\/td><td align='right'>sfc_POINT <\/td><\/tr><\/table><\/div><\/body><\/html>","<html><head><link rel=\"stylesheet\" type=\"text/css\" href=\"lib/popup/popup.css\"><\/head><body><div class=\"scrollableContainer\"><table class=\"popup scrollable\" id=\"popup\"><tr class='coord'><td><\/td><td><b>Feature ID<\/b><\/td><td align='right'>1057 <\/td><\/tr><tr class='alt'><td>1<\/td><td><b>Site.Site <\/b><\/td><td align='right'>7010 <\/td><\/tr><tr><td>2<\/td><td><b>Protocol <\/b><\/td><td align='right'>CABIN - Open Water <\/td><\/tr><tr class='alt'><td>3<\/td><td><b>Protocole <\/b><\/td><td align='right'>RCBA - Eaux libres <\/td><\/tr><tr><td>4<\/td><td><b>JulianDay.JourJulian <\/b><\/td><td align='right'>257 <\/td><\/tr><tr class='alt'><td>5<\/td><td><b>Year.Année <\/b><\/td><td align='right'>2005 <\/td><\/tr><tr><td>6<\/td><td><b>SiteDescription.Descriptiondusite <\/b><\/td><td align='right'> <\/td><\/tr><tr class='alt'><td>7<\/td><td><b>SampleNumber.Numérod.échantillon. <\/b><\/td><td align='right'>1 <\/td><\/tr><tr><td>8<\/td><td><b>Status.État <\/b><\/td><td align='right'>Test <\/td><\/tr><tr class='alt'><td>9<\/td><td><b>status <\/b><\/td><td align='right'>2 <\/td><\/tr><tr><td>10<\/td><td><b>QAQC <\/b><\/td><td align='right'>False <\/td><\/tr><tr class='alt'><td>11<\/td><td><b>Type.Type <\/b><\/td><td align='right'>Sediment Chemistry <\/td><\/tr><tr><td>12<\/td><td><b>Variable <\/b><\/td><td align='right'>TP <\/td><\/tr><tr class='alt'><td>13<\/td><td><b>VariableDescription <\/b><\/td><td align='right'>Total Phosphorus in sediment <\/td><\/tr><tr><td>14<\/td><td><b>VariableFr <\/b><\/td><td align='right'>PT <\/td><\/tr><tr class='alt'><td>15<\/td><td><b>DescriptiondelaVariable <\/b><\/td><td align='right'>Phosphore total dans le sédiment <\/td><\/tr><tr><td>16<\/td><td><b>Unit.Unité <\/b><\/td><td align='right'>ppm <\/td><\/tr><tr class='alt'><td>17<\/td><td><b>Value.Valeur <\/b><\/td><td align='right'>2350 <\/td><\/tr><tr><td>18<\/td><td><b>MDL <\/b><\/td><td align='right'>NA <\/td><\/tr><tr class='alt'><td>19<\/td><td><b>Computed.Calculé <\/b><\/td><td align='right'>NA <\/td><\/tr><tr><td>20<\/td><td><b>Note.Remarque <\/b><\/td><td align='right'> <\/td><\/tr><tr class='alt'><td>21<\/td><td><b>depth <\/b><\/td><td align='right'>15.6 <\/td><\/tr><tr><td>22<\/td><td><b>geometry <\/b><\/td><td align='right'>sfc_POINT <\/td><\/tr><\/table><\/div><\/body><\/html>","<html><head><link rel=\"stylesheet\" type=\"text/css\" href=\"lib/popup/popup.css\"><\/head><body><div class=\"scrollableContainer\"><table class=\"popup scrollable\" id=\"popup\"><tr class='coord'><td><\/td><td><b>Feature ID<\/b><\/td><td align='right'>1378 <\/td><\/tr><tr class='alt'><td>1<\/td><td><b>Site.Site <\/b><\/td><td align='right'>7015 <\/td><\/tr><tr><td>2<\/td><td><b>Protocol <\/b><\/td><td align='right'>CABIN - Open Water <\/td><\/tr><tr class='alt'><td>3<\/td><td><b>Protocole <\/b><\/td><td align='right'>RCBA - Eaux libres <\/td><\/tr><tr><td>4<\/td><td><b>JulianDay.JourJulian <\/b><\/td><td align='right'>257 <\/td><\/tr><tr class='alt'><td>5<\/td><td><b>Year.Année <\/b><\/td><td align='right'>2005 <\/td><\/tr><tr><td>6<\/td><td><b>SiteDescription.Descriptiondusite <\/b><\/td><td align='right'> <\/td><\/tr><tr class='alt'><td>7<\/td><td><b>SampleNumber.Numérod.échantillon. <\/b><\/td><td align='right'>1 <\/td><\/tr><tr><td>8<\/td><td><b>Status.État <\/b><\/td><td align='right'>Test <\/td><\/tr><tr class='alt'><td>9<\/td><td><b>status <\/b><\/td><td align='right'>2 <\/td><\/tr><tr><td>10<\/td><td><b>QAQC <\/b><\/td><td align='right'>False <\/td><\/tr><tr class='alt'><td>11<\/td><td><b>Type.Type <\/b><\/td><td align='right'>Sediment Chemistry <\/td><\/tr><tr><td>12<\/td><td><b>Variable <\/b><\/td><td align='right'>TP <\/td><\/tr><tr class='alt'><td>13<\/td><td><b>VariableDescription <\/b><\/td><td align='right'>Total Phosphorus in sediment <\/td><\/tr><tr><td>14<\/td><td><b>VariableFr <\/b><\/td><td align='right'>PT <\/td><\/tr><tr class='alt'><td>15<\/td><td><b>DescriptiondelaVariable <\/b><\/td><td align='right'>Phosphore total dans le sédiment <\/td><\/tr><tr><td>16<\/td><td><b>Unit.Unité <\/b><\/td><td align='right'>ppm <\/td><\/tr><tr class='alt'><td>17<\/td><td><b>Value.Valeur <\/b><\/td><td align='right'>649 <\/td><\/tr><tr><td>18<\/td><td><b>MDL <\/b><\/td><td align='right'>NA <\/td><\/tr><tr class='alt'><td>19<\/td><td><b>Computed.Calculé <\/b><\/td><td align='right'>NA <\/td><\/tr><tr><td>20<\/td><td><b>Note.Remarque <\/b><\/td><td align='right'> <\/td><\/tr><tr class='alt'><td>21<\/td><td><b>depth <\/b><\/td><td align='right'>7.9 <\/td><\/tr><tr><td>22<\/td><td><b>geometry <\/b><\/td><td align='right'>sfc_POINT <\/td><\/tr><\/table><\/div><\/body><\/html>","<html><head><link rel=\"stylesheet\" type=\"text/css\" href=\"lib/popup/popup.css\"><\/head><body><div class=\"scrollableContainer\"><table class=\"popup scrollable\" id=\"popup\"><tr class='coord'><td><\/td><td><b>Feature ID<\/b><\/td><td align='right'>1585 <\/td><\/tr><tr class='alt'><td>1<\/td><td><b>Site.Site <\/b><\/td><td align='right'>7024 <\/td><\/tr><tr><td>2<\/td><td><b>Protocol <\/b><\/td><td align='right'>CABIN - Open Water <\/td><\/tr><tr class='alt'><td>3<\/td><td><b>Protocole <\/b><\/td><td align='right'>RCBA - Eaux libres <\/td><\/tr><tr><td>4<\/td><td><b>JulianDay.JourJulian <\/b><\/td><td align='right'>257 <\/td><\/tr><tr class='alt'><td>5<\/td><td><b>Year.Année <\/b><\/td><td align='right'>2005 <\/td><\/tr><tr><td>6<\/td><td><b>SiteDescription.Descriptiondusite <\/b><\/td><td align='right'> <\/td><\/tr><tr class='alt'><td>7<\/td><td><b>SampleNumber.Numérod.échantillon. <\/b><\/td><td align='right'>1 <\/td><\/tr><tr><td>8<\/td><td><b>Status.État <\/b><\/td><td align='right'>Test <\/td><\/tr><tr class='alt'><td>9<\/td><td><b>status <\/b><\/td><td align='right'>2 <\/td><\/tr><tr><td>10<\/td><td><b>QAQC <\/b><\/td><td align='right'>False <\/td><\/tr><tr class='alt'><td>11<\/td><td><b>Type.Type <\/b><\/td><td align='right'>Sediment Chemistry <\/td><\/tr><tr><td>12<\/td><td><b>Variable <\/b><\/td><td align='right'>TP <\/td><\/tr><tr class='alt'><td>13<\/td><td><b>VariableDescription <\/b><\/td><td align='right'>Total Phosphorus in sediment <\/td><\/tr><tr><td>14<\/td><td><b>VariableFr <\/b><\/td><td align='right'>PT <\/td><\/tr><tr class='alt'><td>15<\/td><td><b>DescriptiondelaVariable <\/b><\/td><td align='right'>Phosphore total dans le sédiment <\/td><\/tr><tr><td>16<\/td><td><b>Unit.Unité <\/b><\/td><td align='right'>ppm <\/td><\/tr><tr class='alt'><td>17<\/td><td><b>Value.Valeur <\/b><\/td><td align='right'>3430 <\/td><\/tr><tr><td>18<\/td><td><b>MDL <\/b><\/td><td align='right'>NA <\/td><\/tr><tr class='alt'><td>19<\/td><td><b>Computed.Calculé <\/b><\/td><td align='right'>NA <\/td><\/tr><tr><td>20<\/td><td><b>Note.Remarque <\/b><\/td><td align='right'> <\/td><\/tr><tr class='alt'><td>21<\/td><td><b>depth <\/b><\/td><td align='right'>9.8 <\/td><\/tr><tr><td>22<\/td><td><b>geometry <\/b><\/td><td align='right'>sfc_POINT <\/td><\/tr><\/table><\/div><\/body><\/html>","<html><head><link rel=\"stylesheet\" type=\"text/css\" href=\"lib/popup/popup.css\"><\/head><body><div class=\"scrollableContainer\"><table class=\"popup scrollable\" id=\"popup\"><tr class='coord'><td><\/td><td><b>Feature ID<\/b><\/td><td align='right'>1741 <\/td><\/tr><tr class='alt'><td>1<\/td><td><b>Site.Site <\/b><\/td><td align='right'>7031 <\/td><\/tr><tr><td>2<\/td><td><b>Protocol <\/b><\/td><td align='right'>CABIN - Open Water <\/td><\/tr><tr class='alt'><td>3<\/td><td><b>Protocole <\/b><\/td><td align='right'>RCBA - Eaux libres <\/td><\/tr><tr><td>4<\/td><td><b>JulianDay.JourJulian <\/b><\/td><td align='right'>251 <\/td><\/tr><tr class='alt'><td>5<\/td><td><b>Year.Année <\/b><\/td><td align='right'>2005 <\/td><\/tr><tr><td>6<\/td><td><b>SiteDescription.Descriptiondusite <\/b><\/td><td align='right'> <\/td><\/tr><tr class='alt'><td>7<\/td><td><b>SampleNumber.Numérod.échantillon. <\/b><\/td><td align='right'>1 <\/td><\/tr><tr><td>8<\/td><td><b>Status.État <\/b><\/td><td align='right'>Test <\/td><\/tr><tr class='alt'><td>9<\/td><td><b>status <\/b><\/td><td align='right'>2 <\/td><\/tr><tr><td>10<\/td><td><b>QAQC <\/b><\/td><td align='right'>False <\/td><\/tr><tr class='alt'><td>11<\/td><td><b>Type.Type <\/b><\/td><td align='right'>Sediment Chemistry <\/td><\/tr><tr><td>12<\/td><td><b>Variable <\/b><\/td><td align='right'>TP <\/td><\/tr><tr class='alt'><td>13<\/td><td><b>VariableDescription <\/b><\/td><td align='right'>Total Phosphorus in sediment <\/td><\/tr><tr><td>14<\/td><td><b>VariableFr <\/b><\/td><td align='right'>PT <\/td><\/tr><tr class='alt'><td>15<\/td><td><b>DescriptiondelaVariable <\/b><\/td><td align='right'>Phosphore total dans le sédiment <\/td><\/tr><tr><td>16<\/td><td><b>Unit.Unité <\/b><\/td><td align='right'>ppm <\/td><\/tr><tr class='alt'><td>17<\/td><td><b>Value.Valeur <\/b><\/td><td align='right'>1195 <\/td><\/tr><tr><td>18<\/td><td><b>MDL <\/b><\/td><td align='right'>NA <\/td><\/tr><tr class='alt'><td>19<\/td><td><b>Computed.Calculé <\/b><\/td><td align='right'>NA <\/td><\/tr><tr><td>20<\/td><td><b>Note.Remarque <\/b><\/td><td align='right'> <\/td><\/tr><tr class='alt'><td>21<\/td><td><b>depth <\/b><\/td><td align='right'>3.9 <\/td><\/tr><tr><td>22<\/td><td><b>geometry <\/b><\/td><td align='right'>sfc_POINT <\/td><\/tr><\/table><\/div><\/body><\/html>","<html><head><link rel=\"stylesheet\" type=\"text/css\" href=\"lib/popup/popup.css\"><\/head><body><div class=\"scrollableContainer\"><table class=\"popup scrollable\" id=\"popup\"><tr class='coord'><td><\/td><td><b>Feature ID<\/b><\/td><td align='right'>1846 <\/td><\/tr><tr class='alt'><td>1<\/td><td><b>Site.Site <\/b><\/td><td align='right'>7036 <\/td><\/tr><tr><td>2<\/td><td><b>Protocol <\/b><\/td><td align='right'>CABIN - Open Water <\/td><\/tr><tr class='alt'><td>3<\/td><td><b>Protocole <\/b><\/td><td align='right'>RCBA - Eaux libres <\/td><\/tr><tr><td>4<\/td><td><b>JulianDay.JourJulian <\/b><\/td><td align='right'>256 <\/td><\/tr><tr class='alt'><td>5<\/td><td><b>Year.Année <\/b><\/td><td align='right'>2005 <\/td><\/tr><tr><td>6<\/td><td><b>SiteDescription.Descriptiondusite <\/b><\/td><td align='right'> <\/td><\/tr><tr class='alt'><td>7<\/td><td><b>SampleNumber.Numérod.échantillon. <\/b><\/td><td align='right'>1 <\/td><\/tr><tr><td>8<\/td><td><b>Status.État <\/b><\/td><td align='right'>Test <\/td><\/tr><tr class='alt'><td>9<\/td><td><b>status <\/b><\/td><td align='right'>2 <\/td><\/tr><tr><td>10<\/td><td><b>QAQC <\/b><\/td><td align='right'>False <\/td><\/tr><tr class='alt'><td>11<\/td><td><b>Type.Type <\/b><\/td><td align='right'>Sediment Chemistry <\/td><\/tr><tr><td>12<\/td><td><b>Variable <\/b><\/td><td align='right'>TP <\/td><\/tr><tr class='alt'><td>13<\/td><td><b>VariableDescription <\/b><\/td><td align='right'>Total Phosphorus in sediment <\/td><\/tr><tr><td>14<\/td><td><b>VariableFr <\/b><\/td><td align='right'>PT <\/td><\/tr><tr class='alt'><td>15<\/td><td><b>DescriptiondelaVariable <\/b><\/td><td align='right'>Phosphore total dans le sédiment <\/td><\/tr><tr><td>16<\/td><td><b>Unit.Unité <\/b><\/td><td align='right'>ppm <\/td><\/tr><tr class='alt'><td>17<\/td><td><b>Value.Valeur <\/b><\/td><td align='right'>2200 <\/td><\/tr><tr><td>18<\/td><td><b>MDL <\/b><\/td><td align='right'>NA <\/td><\/tr><tr class='alt'><td>19<\/td><td><b>Computed.Calculé <\/b><\/td><td align='right'>NA <\/td><\/tr><tr><td>20<\/td><td><b>Note.Remarque <\/b><\/td><td align='right'> <\/td><\/tr><tr class='alt'><td>21<\/td><td><b>depth <\/b><\/td><td align='right'>7.5 <\/td><\/tr><tr><td>22<\/td><td><b>geometry <\/b><\/td><td align='right'>sfc_POINT <\/td><\/tr><\/table><\/div><\/body><\/html>","<html><head><link rel=\"stylesheet\" type=\"text/css\" href=\"lib/popup/popup.css\"><\/head><body><div class=\"scrollableContainer\"><table class=\"popup scrollable\" id=\"popup\"><tr class='coord'><td><\/td><td><b>Feature ID<\/b><\/td><td align='right'>1951 <\/td><\/tr><tr class='alt'><td>1<\/td><td><b>Site.Site <\/b><\/td><td align='right'>7038 <\/td><\/tr><tr><td>2<\/td><td><b>Protocol <\/b><\/td><td align='right'>CABIN - Open Water <\/td><\/tr><tr class='alt'><td>3<\/td><td><b>Protocole <\/b><\/td><td align='right'>RCBA - Eaux libres <\/td><\/tr><tr><td>4<\/td><td><b>JulianDay.JourJulian <\/b><\/td><td align='right'>251 <\/td><\/tr><tr class='alt'><td>5<\/td><td><b>Year.Année <\/b><\/td><td align='right'>2005 <\/td><\/tr><tr><td>6<\/td><td><b>SiteDescription.Descriptiondusite <\/b><\/td><td align='right'> <\/td><\/tr><tr class='alt'><td>7<\/td><td><b>SampleNumber.Numérod.échantillon. <\/b><\/td><td align='right'>1 <\/td><\/tr><tr><td>8<\/td><td><b>Status.État <\/b><\/td><td align='right'>Test <\/td><\/tr><tr class='alt'><td>9<\/td><td><b>status <\/b><\/td><td align='right'>2 <\/td><\/tr><tr><td>10<\/td><td><b>QAQC <\/b><\/td><td align='right'>False <\/td><\/tr><tr class='alt'><td>11<\/td><td><b>Type.Type <\/b><\/td><td align='right'>Sediment Chemistry <\/td><\/tr><tr><td>12<\/td><td><b>Variable <\/b><\/td><td align='right'>TP <\/td><\/tr><tr class='alt'><td>13<\/td><td><b>VariableDescription <\/b><\/td><td align='right'>Total Phosphorus in sediment <\/td><\/tr><tr><td>14<\/td><td><b>VariableFr <\/b><\/td><td align='right'>PT <\/td><\/tr><tr class='alt'><td>15<\/td><td><b>DescriptiondelaVariable <\/b><\/td><td align='right'>Phosphore total dans le sédiment <\/td><\/tr><tr><td>16<\/td><td><b>Unit.Unité <\/b><\/td><td align='right'>ppm <\/td><\/tr><tr class='alt'><td>17<\/td><td><b>Value.Valeur <\/b><\/td><td align='right'>1620 <\/td><\/tr><tr><td>18<\/td><td><b>MDL <\/b><\/td><td align='right'>NA <\/td><\/tr><tr class='alt'><td>19<\/td><td><b>Computed.Calculé <\/b><\/td><td align='right'>NA <\/td><\/tr><tr><td>20<\/td><td><b>Note.Remarque <\/b><\/td><td align='right'> <\/td><\/tr><tr class='alt'><td>21<\/td><td><b>depth <\/b><\/td><td align='right'>9.5 <\/td><\/tr><tr><td>22<\/td><td><b>geometry <\/b><\/td><td align='right'>sfc_POINT <\/td><\/tr><\/table><\/div><\/body><\/html>","<html><head><link rel=\"stylesheet\" type=\"text/css\" href=\"lib/popup/popup.css\"><\/head><body><div class=\"scrollableContainer\"><table class=\"popup scrollable\" id=\"popup\"><tr class='coord'><td><\/td><td><b>Feature ID<\/b><\/td><td align='right'>2056 <\/td><\/tr><tr class='alt'><td>1<\/td><td><b>Site.Site <\/b><\/td><td align='right'>7039 <\/td><\/tr><tr><td>2<\/td><td><b>Protocol <\/b><\/td><td align='right'>CABIN - Open Water <\/td><\/tr><tr class='alt'><td>3<\/td><td><b>Protocole <\/b><\/td><td align='right'>RCBA - Eaux libres <\/td><\/tr><tr><td>4<\/td><td><b>JulianDay.JourJulian <\/b><\/td><td align='right'>251 <\/td><\/tr><tr class='alt'><td>5<\/td><td><b>Year.Année <\/b><\/td><td align='right'>2005 <\/td><\/tr><tr><td>6<\/td><td><b>SiteDescription.Descriptiondusite <\/b><\/td><td align='right'> <\/td><\/tr><tr class='alt'><td>7<\/td><td><b>SampleNumber.Numérod.échantillon. <\/b><\/td><td align='right'>1 <\/td><\/tr><tr><td>8<\/td><td><b>Status.État <\/b><\/td><td align='right'>Test <\/td><\/tr><tr class='alt'><td>9<\/td><td><b>status <\/b><\/td><td align='right'>2 <\/td><\/tr><tr><td>10<\/td><td><b>QAQC <\/b><\/td><td align='right'>False <\/td><\/tr><tr class='alt'><td>11<\/td><td><b>Type.Type <\/b><\/td><td align='right'>Sediment Chemistry <\/td><\/tr><tr><td>12<\/td><td><b>Variable <\/b><\/td><td align='right'>TP <\/td><\/tr><tr class='alt'><td>13<\/td><td><b>VariableDescription <\/b><\/td><td align='right'>Total Phosphorus in sediment <\/td><\/tr><tr><td>14<\/td><td><b>VariableFr <\/b><\/td><td align='right'>PT <\/td><\/tr><tr class='alt'><td>15<\/td><td><b>DescriptiondelaVariable <\/b><\/td><td align='right'>Phosphore total dans le sédiment <\/td><\/tr><tr><td>16<\/td><td><b>Unit.Unité <\/b><\/td><td align='right'>ppm <\/td><\/tr><tr class='alt'><td>17<\/td><td><b>Value.Valeur <\/b><\/td><td align='right'>1930 <\/td><\/tr><tr><td>18<\/td><td><b>MDL <\/b><\/td><td align='right'>NA <\/td><\/tr><tr class='alt'><td>19<\/td><td><b>Computed.Calculé <\/b><\/td><td align='right'>NA <\/td><\/tr><tr><td>20<\/td><td><b>Note.Remarque <\/b><\/td><td align='right'> <\/td><\/tr><tr class='alt'><td>21<\/td><td><b>depth <\/b><\/td><td align='right'>9.2 <\/td><\/tr><tr><td>22<\/td><td><b>geometry <\/b><\/td><td align='right'>sfc_POINT <\/td><\/tr><\/table><\/div><\/body><\/html>","<html><head><link rel=\"stylesheet\" type=\"text/css\" href=\"lib/popup/popup.css\"><\/head><body><div class=\"scrollableContainer\"><table class=\"popup scrollable\" id=\"popup\"><tr class='coord'><td><\/td><td><b>Feature ID<\/b><\/td><td align='right'>2977 <\/td><\/tr><tr class='alt'><td>1<\/td><td><b>Site.Site <\/b><\/td><td align='right'>HH19 <\/td><\/tr><tr><td>2<\/td><td><b>Protocol <\/b><\/td><td align='right'>CABIN - Open Water <\/td><\/tr><tr class='alt'><td>3<\/td><td><b>Protocole <\/b><\/td><td align='right'>RCBA - Eaux libres <\/td><\/tr><tr><td>4<\/td><td><b>JulianDay.JourJulian <\/b><\/td><td align='right'>252 <\/td><\/tr><tr class='alt'><td>5<\/td><td><b>Year.Année <\/b><\/td><td align='right'>2005 <\/td><\/tr><tr><td>6<\/td><td><b>SiteDescription.Descriptiondusite <\/b><\/td><td align='right'> <\/td><\/tr><tr class='alt'><td>7<\/td><td><b>SampleNumber.Numérod.échantillon. <\/b><\/td><td align='right'>1 <\/td><\/tr><tr><td>8<\/td><td><b>Status.État <\/b><\/td><td align='right'>Test <\/td><\/tr><tr class='alt'><td>9<\/td><td><b>status <\/b><\/td><td align='right'>2 <\/td><\/tr><tr><td>10<\/td><td><b>QAQC <\/b><\/td><td align='right'>False <\/td><\/tr><tr class='alt'><td>11<\/td><td><b>Type.Type <\/b><\/td><td align='right'>Sediment Chemistry <\/td><\/tr><tr><td>12<\/td><td><b>Variable <\/b><\/td><td align='right'>TP <\/td><\/tr><tr class='alt'><td>13<\/td><td><b>VariableDescription <\/b><\/td><td align='right'>Total Phosphorus in sediment <\/td><\/tr><tr><td>14<\/td><td><b>VariableFr <\/b><\/td><td align='right'>PT <\/td><\/tr><tr class='alt'><td>15<\/td><td><b>DescriptiondelaVariable <\/b><\/td><td align='right'>Phosphore total dans le sédiment <\/td><\/tr><tr><td>16<\/td><td><b>Unit.Unité <\/b><\/td><td align='right'>ppm <\/td><\/tr><tr class='alt'><td>17<\/td><td><b>Value.Valeur <\/b><\/td><td align='right'>2710 <\/td><\/tr><tr><td>18<\/td><td><b>MDL <\/b><\/td><td align='right'>NA <\/td><\/tr><tr class='alt'><td>19<\/td><td><b>Computed.Calculé <\/b><\/td><td align='right'>NA <\/td><\/tr><tr><td>20<\/td><td><b>Note.Remarque <\/b><\/td><td align='right'> <\/td><\/tr><tr class='alt'><td>21<\/td><td><b>depth <\/b><\/td><td align='right'>23.2 <\/td><\/tr><tr><td>22<\/td><td><b>geometry <\/b><\/td><td align='right'>sfc_POINT <\/td><\/tr><\/table><\/div><\/body><\/html>","<html><head><link rel=\"stylesheet\" type=\"text/css\" href=\"lib/popup/popup.css\"><\/head><body><div class=\"scrollableContainer\"><table class=\"popup scrollable\" id=\"popup\"><tr class='coord'><td><\/td><td><b>Feature ID<\/b><\/td><td align='right'>3247 <\/td><\/tr><tr class='alt'><td>1<\/td><td><b>Site.Site <\/b><\/td><td align='right'>HH3 <\/td><\/tr><tr><td>2<\/td><td><b>Protocol <\/b><\/td><td align='right'>CABIN - Open Water <\/td><\/tr><tr class='alt'><td>3<\/td><td><b>Protocole <\/b><\/td><td align='right'>RCBA - Eaux libres <\/td><\/tr><tr><td>4<\/td><td><b>JulianDay.JourJulian <\/b><\/td><td align='right'>251 <\/td><\/tr><tr class='alt'><td>5<\/td><td><b>Year.Année <\/b><\/td><td align='right'>2005 <\/td><\/tr><tr><td>6<\/td><td><b>SiteDescription.Descriptiondusite <\/b><\/td><td align='right'> <\/td><\/tr><tr class='alt'><td>7<\/td><td><b>SampleNumber.Numérod.échantillon. <\/b><\/td><td align='right'>1 <\/td><\/tr><tr><td>8<\/td><td><b>Status.État <\/b><\/td><td align='right'>Test <\/td><\/tr><tr class='alt'><td>9<\/td><td><b>status <\/b><\/td><td align='right'>2 <\/td><\/tr><tr><td>10<\/td><td><b>QAQC <\/b><\/td><td align='right'>False <\/td><\/tr><tr class='alt'><td>11<\/td><td><b>Type.Type <\/b><\/td><td align='right'>Sediment Chemistry <\/td><\/tr><tr><td>12<\/td><td><b>Variable <\/b><\/td><td align='right'>TP <\/td><\/tr><tr class='alt'><td>13<\/td><td><b>VariableDescription <\/b><\/td><td align='right'>Total Phosphorus in sediment <\/td><\/tr><tr><td>14<\/td><td><b>VariableFr <\/b><\/td><td align='right'>PT <\/td><\/tr><tr class='alt'><td>15<\/td><td><b>DescriptiondelaVariable <\/b><\/td><td align='right'>Phosphore total dans le sédiment <\/td><\/tr><tr><td>16<\/td><td><b>Unit.Unité <\/b><\/td><td align='right'>ppm <\/td><\/tr><tr class='alt'><td>17<\/td><td><b>Value.Valeur <\/b><\/td><td align='right'>1990 <\/td><\/tr><tr><td>18<\/td><td><b>MDL <\/b><\/td><td align='right'>NA <\/td><\/tr><tr class='alt'><td>19<\/td><td><b>Computed.Calculé <\/b><\/td><td align='right'>NA <\/td><\/tr><tr><td>20<\/td><td><b>Note.Remarque <\/b><\/td><td align='right'> <\/td><\/tr><tr class='alt'><td>21<\/td><td><b>depth <\/b><\/td><td align='right'>12.2 <\/td><\/tr><tr><td>22<\/td><td><b>geometry <\/b><\/td><td align='right'>sfc_POINT <\/td><\/tr><\/table><\/div><\/body><\/html>","<html><head><link rel=\"stylesheet\" type=\"text/css\" href=\"lib/popup/popup.css\"><\/head><body><div class=\"scrollableContainer\"><table class=\"popup scrollable\" id=\"popup\"><tr class='coord'><td><\/td><td><b>Feature ID<\/b><\/td><td align='right'>3301 <\/td><\/tr><tr class='alt'><td>1<\/td><td><b>Site.Site <\/b><\/td><td align='right'>RR05-1A <\/td><\/tr><tr><td>2<\/td><td><b>Protocol <\/b><\/td><td align='right'>CABIN - Open Water <\/td><\/tr><tr class='alt'><td>3<\/td><td><b>Protocole <\/b><\/td><td align='right'>RCBA - Eaux libres <\/td><\/tr><tr><td>4<\/td><td><b>JulianDay.JourJulian <\/b><\/td><td align='right'>251 <\/td><\/tr><tr class='alt'><td>5<\/td><td><b>Year.Année <\/b><\/td><td align='right'>2005 <\/td><\/tr><tr><td>6<\/td><td><b>SiteDescription.Descriptiondusite <\/b><\/td><td align='right'> <\/td><\/tr><tr class='alt'><td>7<\/td><td><b>SampleNumber.Numérod.échantillon. <\/b><\/td><td align='right'>1 <\/td><\/tr><tr><td>8<\/td><td><b>Status.État <\/b><\/td><td align='right'>Test <\/td><\/tr><tr class='alt'><td>9<\/td><td><b>status <\/b><\/td><td align='right'>2 <\/td><\/tr><tr><td>10<\/td><td><b>QAQC <\/b><\/td><td align='right'>False <\/td><\/tr><tr class='alt'><td>11<\/td><td><b>Type.Type <\/b><\/td><td align='right'>Sediment Chemistry <\/td><\/tr><tr><td>12<\/td><td><b>Variable <\/b><\/td><td align='right'>TP <\/td><\/tr><tr class='alt'><td>13<\/td><td><b>VariableDescription <\/b><\/td><td align='right'>Total Phosphorus in sediment <\/td><\/tr><tr><td>14<\/td><td><b>VariableFr <\/b><\/td><td align='right'>PT <\/td><\/tr><tr class='alt'><td>15<\/td><td><b>DescriptiondelaVariable <\/b><\/td><td align='right'>Phosphore total dans le sédiment <\/td><\/tr><tr><td>16<\/td><td><b>Unit.Unité <\/b><\/td><td align='right'>ppm <\/td><\/tr><tr class='alt'><td>17<\/td><td><b>Value.Valeur <\/b><\/td><td align='right'>965 <\/td><\/tr><tr><td>18<\/td><td><b>MDL <\/b><\/td><td align='right'>NA <\/td><\/tr><tr class='alt'><td>19<\/td><td><b>Computed.Calculé <\/b><\/td><td align='right'>NA <\/td><\/tr><tr><td>20<\/td><td><b>Note.Remarque <\/b><\/td><td align='right'> <\/td><\/tr><tr class='alt'><td>21<\/td><td><b>depth <\/b><\/td><td align='right'>9 <\/td><\/tr><tr><td>22<\/td><td><b>geometry <\/b><\/td><td align='right'>sfc_POINT <\/td><\/tr><\/table><\/div><\/body><\/html>","<html><head><link rel=\"stylesheet\" type=\"text/css\" href=\"lib/popup/popup.css\"><\/head><body><div class=\"scrollableContainer\"><table class=\"popup scrollable\" id=\"popup\"><tr class='coord'><td><\/td><td><b>Feature ID<\/b><\/td><td align='right'>3355 <\/td><\/tr><tr class='alt'><td>1<\/td><td><b>Site.Site <\/b><\/td><td align='right'>RR05-2A <\/td><\/tr><tr><td>2<\/td><td><b>Protocol <\/b><\/td><td align='right'>CABIN - Open Water <\/td><\/tr><tr class='alt'><td>3<\/td><td><b>Protocole <\/b><\/td><td align='right'>RCBA - Eaux libres <\/td><\/tr><tr><td>4<\/td><td><b>JulianDay.JourJulian <\/b><\/td><td align='right'>251 <\/td><\/tr><tr class='alt'><td>5<\/td><td><b>Year.Année <\/b><\/td><td align='right'>2005 <\/td><\/tr><tr><td>6<\/td><td><b>SiteDescription.Descriptiondusite <\/b><\/td><td align='right'> <\/td><\/tr><tr class='alt'><td>7<\/td><td><b>SampleNumber.Numérod.échantillon. <\/b><\/td><td align='right'>1 <\/td><\/tr><tr><td>8<\/td><td><b>Status.État <\/b><\/td><td align='right'>Test <\/td><\/tr><tr class='alt'><td>9<\/td><td><b>status <\/b><\/td><td align='right'>2 <\/td><\/tr><tr><td>10<\/td><td><b>QAQC <\/b><\/td><td align='right'>False <\/td><\/tr><tr class='alt'><td>11<\/td><td><b>Type.Type <\/b><\/td><td align='right'>Sediment Chemistry <\/td><\/tr><tr><td>12<\/td><td><b>Variable <\/b><\/td><td align='right'>TP <\/td><\/tr><tr class='alt'><td>13<\/td><td><b>VariableDescription <\/b><\/td><td align='right'>Total Phosphorus in sediment <\/td><\/tr><tr><td>14<\/td><td><b>VariableFr <\/b><\/td><td align='right'>PT <\/td><\/tr><tr class='alt'><td>15<\/td><td><b>DescriptiondelaVariable <\/b><\/td><td align='right'>Phosphore total dans le sédiment <\/td><\/tr><tr><td>16<\/td><td><b>Unit.Unité <\/b><\/td><td align='right'>ppm <\/td><\/tr><tr class='alt'><td>17<\/td><td><b>Value.Valeur <\/b><\/td><td align='right'>1030 <\/td><\/tr><tr><td>18<\/td><td><b>MDL <\/b><\/td><td align='right'>NA <\/td><\/tr><tr class='alt'><td>19<\/td><td><b>Computed.Calculé <\/b><\/td><td align='right'>NA <\/td><\/tr><tr><td>20<\/td><td><b>Note.Remarque <\/b><\/td><td align='right'> <\/td><\/tr><tr class='alt'><td>21<\/td><td><b>depth <\/b><\/td><td align='right'>5.1 <\/td><\/tr><tr><td>22<\/td><td><b>geometry <\/b><\/td><td align='right'>sfc_POINT <\/td><\/tr><\/table><\/div><\/body><\/html>","<html><head><link rel=\"stylesheet\" type=\"text/css\" href=\"lib/popup/popup.css\"><\/head><body><div class=\"scrollableContainer\"><table class=\"popup scrollable\" id=\"popup\"><tr class='coord'><td><\/td><td><b>Feature ID<\/b><\/td><td align='right'>3409 <\/td><\/tr><tr class='alt'><td>1<\/td><td><b>Site.Site <\/b><\/td><td align='right'>RR05-2B <\/td><\/tr><tr><td>2<\/td><td><b>Protocol <\/b><\/td><td align='right'>CABIN - Open Water <\/td><\/tr><tr class='alt'><td>3<\/td><td><b>Protocole <\/b><\/td><td align='right'>RCBA - Eaux libres <\/td><\/tr><tr><td>4<\/td><td><b>JulianDay.JourJulian <\/b><\/td><td align='right'>252 <\/td><\/tr><tr class='alt'><td>5<\/td><td><b>Year.Année <\/b><\/td><td align='right'>2005 <\/td><\/tr><tr><td>6<\/td><td><b>SiteDescription.Descriptiondusite <\/b><\/td><td align='right'> <\/td><\/tr><tr class='alt'><td>7<\/td><td><b>SampleNumber.Numérod.échantillon. <\/b><\/td><td align='right'>1 <\/td><\/tr><tr><td>8<\/td><td><b>Status.État <\/b><\/td><td align='right'>Test <\/td><\/tr><tr class='alt'><td>9<\/td><td><b>status <\/b><\/td><td align='right'>2 <\/td><\/tr><tr><td>10<\/td><td><b>QAQC <\/b><\/td><td align='right'>False <\/td><\/tr><tr class='alt'><td>11<\/td><td><b>Type.Type <\/b><\/td><td align='right'>Sediment Chemistry <\/td><\/tr><tr><td>12<\/td><td><b>Variable <\/b><\/td><td align='right'>TP <\/td><\/tr><tr class='alt'><td>13<\/td><td><b>VariableDescription <\/b><\/td><td align='right'>Total Phosphorus in sediment <\/td><\/tr><tr><td>14<\/td><td><b>VariableFr <\/b><\/td><td align='right'>PT <\/td><\/tr><tr class='alt'><td>15<\/td><td><b>DescriptiondelaVariable <\/b><\/td><td align='right'>Phosphore total dans le sédiment <\/td><\/tr><tr><td>16<\/td><td><b>Unit.Unité <\/b><\/td><td align='right'>ppm <\/td><\/tr><tr class='alt'><td>17<\/td><td><b>Value.Valeur <\/b><\/td><td align='right'>1220 <\/td><\/tr><tr><td>18<\/td><td><b>MDL <\/b><\/td><td align='right'>NA <\/td><\/tr><tr class='alt'><td>19<\/td><td><b>Computed.Calculé <\/b><\/td><td align='right'>NA <\/td><\/tr><tr><td>20<\/td><td><b>Note.Remarque <\/b><\/td><td align='right'> <\/td><\/tr><tr class='alt'><td>21<\/td><td><b>depth <\/b><\/td><td align='right'>14.4 <\/td><\/tr><tr><td>22<\/td><td><b>geometry <\/b><\/td><td align='right'>sfc_POINT <\/td><\/tr><\/table><\/div><\/body><\/html>","<html><head><link rel=\"stylesheet\" type=\"text/css\" href=\"lib/popup/popup.css\"><\/head><body><div class=\"scrollableContainer\"><table class=\"popup scrollable\" id=\"popup\"><tr class='coord'><td><\/td><td><b>Feature ID<\/b><\/td><td align='right'>3463 <\/td><\/tr><tr class='alt'><td>1<\/td><td><b>Site.Site <\/b><\/td><td align='right'>RR05-2C <\/td><\/tr><tr><td>2<\/td><td><b>Protocol <\/b><\/td><td align='right'>CABIN - Open Water <\/td><\/tr><tr class='alt'><td>3<\/td><td><b>Protocole <\/b><\/td><td align='right'>RCBA - Eaux libres <\/td><\/tr><tr><td>4<\/td><td><b>JulianDay.JourJulian <\/b><\/td><td align='right'>252 <\/td><\/tr><tr class='alt'><td>5<\/td><td><b>Year.Année <\/b><\/td><td align='right'>2005 <\/td><\/tr><tr><td>6<\/td><td><b>SiteDescription.Descriptiondusite <\/b><\/td><td align='right'> <\/td><\/tr><tr class='alt'><td>7<\/td><td><b>SampleNumber.Numérod.échantillon. <\/b><\/td><td align='right'>1 <\/td><\/tr><tr><td>8<\/td><td><b>Status.État <\/b><\/td><td align='right'>Test <\/td><\/tr><tr class='alt'><td>9<\/td><td><b>status <\/b><\/td><td align='right'>2 <\/td><\/tr><tr><td>10<\/td><td><b>QAQC <\/b><\/td><td align='right'>False <\/td><\/tr><tr class='alt'><td>11<\/td><td><b>Type.Type <\/b><\/td><td align='right'>Sediment Chemistry <\/td><\/tr><tr><td>12<\/td><td><b>Variable <\/b><\/td><td align='right'>TP <\/td><\/tr><tr class='alt'><td>13<\/td><td><b>VariableDescription <\/b><\/td><td align='right'>Total Phosphorus in sediment <\/td><\/tr><tr><td>14<\/td><td><b>VariableFr <\/b><\/td><td align='right'>PT <\/td><\/tr><tr class='alt'><td>15<\/td><td><b>DescriptiondelaVariable <\/b><\/td><td align='right'>Phosphore total dans le sédiment <\/td><\/tr><tr><td>16<\/td><td><b>Unit.Unité <\/b><\/td><td align='right'>ppm <\/td><\/tr><tr class='alt'><td>17<\/td><td><b>Value.Valeur <\/b><\/td><td align='right'>1640 <\/td><\/tr><tr><td>18<\/td><td><b>MDL <\/b><\/td><td align='right'>NA <\/td><\/tr><tr class='alt'><td>19<\/td><td><b>Computed.Calculé <\/b><\/td><td align='right'>NA <\/td><\/tr><tr><td>20<\/td><td><b>Note.Remarque <\/b><\/td><td align='right'> <\/td><\/tr><tr class='alt'><td>21<\/td><td><b>depth <\/b><\/td><td align='right'>19.7 <\/td><\/tr><tr><td>22<\/td><td><b>geometry <\/b><\/td><td align='right'>sfc_POINT <\/td><\/tr><\/table><\/div><\/body><\/html>","<html><head><link rel=\"stylesheet\" type=\"text/css\" href=\"lib/popup/popup.css\"><\/head><body><div class=\"scrollableContainer\"><table class=\"popup scrollable\" id=\"popup\"><tr class='coord'><td><\/td><td><b>Feature ID<\/b><\/td><td align='right'>3517 <\/td><\/tr><tr class='alt'><td>1<\/td><td><b>Site.Site <\/b><\/td><td align='right'>RR05-2D <\/td><\/tr><tr><td>2<\/td><td><b>Protocol <\/b><\/td><td align='right'>CABIN - Open Water <\/td><\/tr><tr class='alt'><td>3<\/td><td><b>Protocole <\/b><\/td><td align='right'>RCBA - Eaux libres <\/td><\/tr><tr><td>4<\/td><td><b>JulianDay.JourJulian <\/b><\/td><td align='right'>251 <\/td><\/tr><tr class='alt'><td>5<\/td><td><b>Year.Année <\/b><\/td><td align='right'>2005 <\/td><\/tr><tr><td>6<\/td><td><b>SiteDescription.Descriptiondusite <\/b><\/td><td align='right'> <\/td><\/tr><tr class='alt'><td>7<\/td><td><b>SampleNumber.Numérod.échantillon. <\/b><\/td><td align='right'>1 <\/td><\/tr><tr><td>8<\/td><td><b>Status.État <\/b><\/td><td align='right'>Test <\/td><\/tr><tr class='alt'><td>9<\/td><td><b>status <\/b><\/td><td align='right'>2 <\/td><\/tr><tr><td>10<\/td><td><b>QAQC <\/b><\/td><td align='right'>False <\/td><\/tr><tr class='alt'><td>11<\/td><td><b>Type.Type <\/b><\/td><td align='right'>Sediment Chemistry <\/td><\/tr><tr><td>12<\/td><td><b>Variable <\/b><\/td><td align='right'>TP <\/td><\/tr><tr class='alt'><td>13<\/td><td><b>VariableDescription <\/b><\/td><td align='right'>Total Phosphorus in sediment <\/td><\/tr><tr><td>14<\/td><td><b>VariableFr <\/b><\/td><td align='right'>PT <\/td><\/tr><tr class='alt'><td>15<\/td><td><b>DescriptiondelaVariable <\/b><\/td><td align='right'>Phosphore total dans le sédiment <\/td><\/tr><tr><td>16<\/td><td><b>Unit.Unité <\/b><\/td><td align='right'>ppm <\/td><\/tr><tr class='alt'><td>17<\/td><td><b>Value.Valeur <\/b><\/td><td align='right'>2020 <\/td><\/tr><tr><td>18<\/td><td><b>MDL <\/b><\/td><td align='right'>NA <\/td><\/tr><tr class='alt'><td>19<\/td><td><b>Computed.Calculé <\/b><\/td><td align='right'>NA <\/td><\/tr><tr><td>20<\/td><td><b>Note.Remarque <\/b><\/td><td align='right'> <\/td><\/tr><tr class='alt'><td>21<\/td><td><b>depth <\/b><\/td><td align='right'>19.1 <\/td><\/tr><tr><td>22<\/td><td><b>geometry <\/b><\/td><td align='right'>sfc_POINT <\/td><\/tr><\/table><\/div><\/body><\/html>","<html><head><link rel=\"stylesheet\" type=\"text/css\" href=\"lib/popup/popup.css\"><\/head><body><div class=\"scrollableContainer\"><table class=\"popup scrollable\" id=\"popup\"><tr class='coord'><td><\/td><td><b>Feature ID<\/b><\/td><td align='right'>3571 <\/td><\/tr><tr class='alt'><td>1<\/td><td><b>Site.Site <\/b><\/td><td align='right'>RR05-2E <\/td><\/tr><tr><td>2<\/td><td><b>Protocol <\/b><\/td><td align='right'>CABIN - Open Water <\/td><\/tr><tr class='alt'><td>3<\/td><td><b>Protocole <\/b><\/td><td align='right'>RCBA - Eaux libres <\/td><\/tr><tr><td>4<\/td><td><b>JulianDay.JourJulian <\/b><\/td><td align='right'>251 <\/td><\/tr><tr class='alt'><td>5<\/td><td><b>Year.Année <\/b><\/td><td align='right'>2005 <\/td><\/tr><tr><td>6<\/td><td><b>SiteDescription.Descriptiondusite <\/b><\/td><td align='right'> <\/td><\/tr><tr class='alt'><td>7<\/td><td><b>SampleNumber.Numérod.échantillon. <\/b><\/td><td align='right'>1 <\/td><\/tr><tr><td>8<\/td><td><b>Status.État <\/b><\/td><td align='right'>Test <\/td><\/tr><tr class='alt'><td>9<\/td><td><b>status <\/b><\/td><td align='right'>2 <\/td><\/tr><tr><td>10<\/td><td><b>QAQC <\/b><\/td><td align='right'>False <\/td><\/tr><tr class='alt'><td>11<\/td><td><b>Type.Type <\/b><\/td><td align='right'>Sediment Chemistry <\/td><\/tr><tr><td>12<\/td><td><b>Variable <\/b><\/td><td align='right'>TP <\/td><\/tr><tr class='alt'><td>13<\/td><td><b>VariableDescription <\/b><\/td><td align='right'>Total Phosphorus in sediment <\/td><\/tr><tr><td>14<\/td><td><b>VariableFr <\/b><\/td><td align='right'>PT <\/td><\/tr><tr class='alt'><td>15<\/td><td><b>DescriptiondelaVariable <\/b><\/td><td align='right'>Phosphore total dans le sédiment <\/td><\/tr><tr><td>16<\/td><td><b>Unit.Unité <\/b><\/td><td align='right'>ppm <\/td><\/tr><tr class='alt'><td>17<\/td><td><b>Value.Valeur <\/b><\/td><td align='right'>2360 <\/td><\/tr><tr><td>18<\/td><td><b>MDL <\/b><\/td><td align='right'>NA <\/td><\/tr><tr class='alt'><td>19<\/td><td><b>Computed.Calculé <\/b><\/td><td align='right'>NA <\/td><\/tr><tr><td>20<\/td><td><b>Note.Remarque <\/b><\/td><td align='right'> <\/td><\/tr><tr class='alt'><td>21<\/td><td><b>depth <\/b><\/td><td align='right'>16.6 <\/td><\/tr><tr><td>22<\/td><td><b>geometry <\/b><\/td><td align='right'>sfc_POINT <\/td><\/tr><\/table><\/div><\/body><\/html>","<html><head><link rel=\"stylesheet\" type=\"text/css\" href=\"lib/popup/popup.css\"><\/head><body><div class=\"scrollableContainer\"><table class=\"popup scrollable\" id=\"popup\"><tr class='coord'><td><\/td><td><b>Feature ID<\/b><\/td><td align='right'>3733 <\/td><\/tr><tr class='alt'><td>1<\/td><td><b>Site.Site <\/b><\/td><td align='right'>RR05-2F <\/td><\/tr><tr><td>2<\/td><td><b>Protocol <\/b><\/td><td align='right'>CABIN - Open Water <\/td><\/tr><tr class='alt'><td>3<\/td><td><b>Protocole <\/b><\/td><td align='right'>RCBA - Eaux libres <\/td><\/tr><tr><td>4<\/td><td><b>JulianDay.JourJulian <\/b><\/td><td align='right'>251 <\/td><\/tr><tr class='alt'><td>5<\/td><td><b>Year.Année <\/b><\/td><td align='right'>2005 <\/td><\/tr><tr><td>6<\/td><td><b>SiteDescription.Descriptiondusite <\/b><\/td><td align='right'> <\/td><\/tr><tr class='alt'><td>7<\/td><td><b>SampleNumber.Numérod.échantillon. <\/b><\/td><td align='right'>1 <\/td><\/tr><tr><td>8<\/td><td><b>Status.État <\/b><\/td><td align='right'>Test <\/td><\/tr><tr class='alt'><td>9<\/td><td><b>status <\/b><\/td><td align='right'>2 <\/td><\/tr><tr><td>10<\/td><td><b>QAQC <\/b><\/td><td align='right'>False <\/td><\/tr><tr class='alt'><td>11<\/td><td><b>Type.Type <\/b><\/td><td align='right'>Sediment Chemistry <\/td><\/tr><tr><td>12<\/td><td><b>Variable <\/b><\/td><td align='right'>TP <\/td><\/tr><tr class='alt'><td>13<\/td><td><b>VariableDescription <\/b><\/td><td align='right'>Total Phosphorus in sediment <\/td><\/tr><tr><td>14<\/td><td><b>VariableFr <\/b><\/td><td align='right'>PT <\/td><\/tr><tr class='alt'><td>15<\/td><td><b>DescriptiondelaVariable <\/b><\/td><td align='right'>Phosphore total dans le sédiment <\/td><\/tr><tr><td>16<\/td><td><b>Unit.Unité <\/b><\/td><td align='right'>ppm <\/td><\/tr><tr class='alt'><td>17<\/td><td><b>Value.Valeur <\/b><\/td><td align='right'>2030 <\/td><\/tr><tr><td>18<\/td><td><b>MDL <\/b><\/td><td align='right'>NA <\/td><\/tr><tr class='alt'><td>19<\/td><td><b>Computed.Calculé <\/b><\/td><td align='right'>NA <\/td><\/tr><tr><td>20<\/td><td><b>Note.Remarque <\/b><\/td><td align='right'> <\/td><\/tr><tr class='alt'><td>21<\/td><td><b>depth <\/b><\/td><td align='right'>19 <\/td><\/tr><tr><td>22<\/td><td><b>geometry <\/b><\/td><td align='right'>sfc_POINT <\/td><\/tr><\/table><\/div><\/body><\/html>","<html><head><link rel=\"stylesheet\" type=\"text/css\" href=\"lib/popup/popup.css\"><\/head><body><div class=\"scrollableContainer\"><table class=\"popup scrollable\" id=\"popup\"><tr class='coord'><td><\/td><td><b>Feature ID<\/b><\/td><td align='right'>3787 <\/td><\/tr><tr class='alt'><td>1<\/td><td><b>Site.Site <\/b><\/td><td align='right'>RR05-3B <\/td><\/tr><tr><td>2<\/td><td><b>Protocol <\/b><\/td><td align='right'>CABIN - Open Water <\/td><\/tr><tr class='alt'><td>3<\/td><td><b>Protocole <\/b><\/td><td align='right'>RCBA - Eaux libres <\/td><\/tr><tr><td>4<\/td><td><b>JulianDay.JourJulian <\/b><\/td><td align='right'>252 <\/td><\/tr><tr class='alt'><td>5<\/td><td><b>Year.Année <\/b><\/td><td align='right'>2005 <\/td><\/tr><tr><td>6<\/td><td><b>SiteDescription.Descriptiondusite <\/b><\/td><td align='right'> <\/td><\/tr><tr class='alt'><td>7<\/td><td><b>SampleNumber.Numérod.échantillon. <\/b><\/td><td align='right'>1 <\/td><\/tr><tr><td>8<\/td><td><b>Status.État <\/b><\/td><td align='right'>Test <\/td><\/tr><tr class='alt'><td>9<\/td><td><b>status <\/b><\/td><td align='right'>2 <\/td><\/tr><tr><td>10<\/td><td><b>QAQC <\/b><\/td><td align='right'>False <\/td><\/tr><tr class='alt'><td>11<\/td><td><b>Type.Type <\/b><\/td><td align='right'>Sediment Chemistry <\/td><\/tr><tr><td>12<\/td><td><b>Variable <\/b><\/td><td align='right'>TP <\/td><\/tr><tr class='alt'><td>13<\/td><td><b>VariableDescription <\/b><\/td><td align='right'>Total Phosphorus in sediment <\/td><\/tr><tr><td>14<\/td><td><b>VariableFr <\/b><\/td><td align='right'>PT <\/td><\/tr><tr class='alt'><td>15<\/td><td><b>DescriptiondelaVariable <\/b><\/td><td align='right'>Phosphore total dans le sédiment <\/td><\/tr><tr><td>16<\/td><td><b>Unit.Unité <\/b><\/td><td align='right'>ppm <\/td><\/tr><tr class='alt'><td>17<\/td><td><b>Value.Valeur <\/b><\/td><td align='right'>2340 <\/td><\/tr><tr><td>18<\/td><td><b>MDL <\/b><\/td><td align='right'>NA <\/td><\/tr><tr class='alt'><td>19<\/td><td><b>Computed.Calculé <\/b><\/td><td align='right'>NA <\/td><\/tr><tr><td>20<\/td><td><b>Note.Remarque <\/b><\/td><td align='right'> <\/td><\/tr><tr class='alt'><td>21<\/td><td><b>depth <\/b><\/td><td align='right'>10.1 <\/td><\/tr><tr><td>22<\/td><td><b>geometry <\/b><\/td><td align='right'>sfc_POINT <\/td><\/tr><\/table><\/div><\/body><\/html>","<html><head><link rel=\"stylesheet\" type=\"text/css\" href=\"lib/popup/popup.css\"><\/head><body><div class=\"scrollableContainer\"><table class=\"popup scrollable\" id=\"popup\"><tr class='coord'><td><\/td><td><b>Feature ID<\/b><\/td><td align='right'>3841 <\/td><\/tr><tr class='alt'><td>1<\/td><td><b>Site.Site <\/b><\/td><td align='right'>RR05-3C <\/td><\/tr><tr><td>2<\/td><td><b>Protocol <\/b><\/td><td align='right'>CABIN - Open Water <\/td><\/tr><tr class='alt'><td>3<\/td><td><b>Protocole <\/b><\/td><td align='right'>RCBA - Eaux libres <\/td><\/tr><tr><td>4<\/td><td><b>JulianDay.JourJulian <\/b><\/td><td align='right'>252 <\/td><\/tr><tr class='alt'><td>5<\/td><td><b>Year.Année <\/b><\/td><td align='right'>2005 <\/td><\/tr><tr><td>6<\/td><td><b>SiteDescription.Descriptiondusite <\/b><\/td><td align='right'> <\/td><\/tr><tr class='alt'><td>7<\/td><td><b>SampleNumber.Numérod.échantillon. <\/b><\/td><td align='right'>1 <\/td><\/tr><tr><td>8<\/td><td><b>Status.État <\/b><\/td><td align='right'>Test <\/td><\/tr><tr class='alt'><td>9<\/td><td><b>status <\/b><\/td><td align='right'>2 <\/td><\/tr><tr><td>10<\/td><td><b>QAQC <\/b><\/td><td align='right'>False <\/td><\/tr><tr class='alt'><td>11<\/td><td><b>Type.Type <\/b><\/td><td align='right'>Sediment Chemistry <\/td><\/tr><tr><td>12<\/td><td><b>Variable <\/b><\/td><td align='right'>TP <\/td><\/tr><tr class='alt'><td>13<\/td><td><b>VariableDescription <\/b><\/td><td align='right'>Total Phosphorus in sediment <\/td><\/tr><tr><td>14<\/td><td><b>VariableFr <\/b><\/td><td align='right'>PT <\/td><\/tr><tr class='alt'><td>15<\/td><td><b>DescriptiondelaVariable <\/b><\/td><td align='right'>Phosphore total dans le sédiment <\/td><\/tr><tr><td>16<\/td><td><b>Unit.Unité <\/b><\/td><td align='right'>ppm <\/td><\/tr><tr class='alt'><td>17<\/td><td><b>Value.Valeur <\/b><\/td><td align='right'>2170 <\/td><\/tr><tr><td>18<\/td><td><b>MDL <\/b><\/td><td align='right'>NA <\/td><\/tr><tr class='alt'><td>19<\/td><td><b>Computed.Calculé <\/b><\/td><td align='right'>NA <\/td><\/tr><tr><td>20<\/td><td><b>Note.Remarque <\/b><\/td><td align='right'> <\/td><\/tr><tr class='alt'><td>21<\/td><td><b>depth <\/b><\/td><td align='right'>18.7 <\/td><\/tr><tr><td>22<\/td><td><b>geometry <\/b><\/td><td align='right'>sfc_POINT <\/td><\/tr><\/table><\/div><\/body><\/html>","<html><head><link rel=\"stylesheet\" type=\"text/css\" href=\"lib/popup/popup.css\"><\/head><body><div class=\"scrollableContainer\"><table class=\"popup scrollable\" id=\"popup\"><tr class='coord'><td><\/td><td><b>Feature ID<\/b><\/td><td align='right'>4003 <\/td><\/tr><tr class='alt'><td>1<\/td><td><b>Site.Site <\/b><\/td><td align='right'>RR05-3D <\/td><\/tr><tr><td>2<\/td><td><b>Protocol <\/b><\/td><td align='right'>CABIN - Open Water <\/td><\/tr><tr class='alt'><td>3<\/td><td><b>Protocole <\/b><\/td><td align='right'>RCBA - Eaux libres <\/td><\/tr><tr><td>4<\/td><td><b>JulianDay.JourJulian <\/b><\/td><td align='right'>252 <\/td><\/tr><tr class='alt'><td>5<\/td><td><b>Year.Année <\/b><\/td><td align='right'>2005 <\/td><\/tr><tr><td>6<\/td><td><b>SiteDescription.Descriptiondusite <\/b><\/td><td align='right'> <\/td><\/tr><tr class='alt'><td>7<\/td><td><b>SampleNumber.Numérod.échantillon. <\/b><\/td><td align='right'>1 <\/td><\/tr><tr><td>8<\/td><td><b>Status.État <\/b><\/td><td align='right'>Test <\/td><\/tr><tr class='alt'><td>9<\/td><td><b>status <\/b><\/td><td align='right'>2 <\/td><\/tr><tr><td>10<\/td><td><b>QAQC <\/b><\/td><td align='right'>False <\/td><\/tr><tr class='alt'><td>11<\/td><td><b>Type.Type <\/b><\/td><td align='right'>Sediment Chemistry <\/td><\/tr><tr><td>12<\/td><td><b>Variable <\/b><\/td><td align='right'>TP <\/td><\/tr><tr class='alt'><td>13<\/td><td><b>VariableDescription <\/b><\/td><td align='right'>Total Phosphorus in sediment <\/td><\/tr><tr><td>14<\/td><td><b>VariableFr <\/b><\/td><td align='right'>PT <\/td><\/tr><tr class='alt'><td>15<\/td><td><b>DescriptiondelaVariable <\/b><\/td><td align='right'>Phosphore total dans le sédiment <\/td><\/tr><tr><td>16<\/td><td><b>Unit.Unité <\/b><\/td><td align='right'>ppm <\/td><\/tr><tr class='alt'><td>17<\/td><td><b>Value.Valeur <\/b><\/td><td align='right'>3590 <\/td><\/tr><tr><td>18<\/td><td><b>MDL <\/b><\/td><td align='right'>NA <\/td><\/tr><tr class='alt'><td>19<\/td><td><b>Computed.Calculé <\/b><\/td><td align='right'>NA <\/td><\/tr><tr><td>20<\/td><td><b>Note.Remarque <\/b><\/td><td align='right'> <\/td><\/tr><tr class='alt'><td>21<\/td><td><b>depth <\/b><\/td><td align='right'>14.1 <\/td><\/tr><tr><td>22<\/td><td><b>geometry <\/b><\/td><td align='right'>sfc_POINT <\/td><\/tr><\/table><\/div><\/body><\/html>","<html><head><link rel=\"stylesheet\" type=\"text/css\" href=\"lib/popup/popup.css\"><\/head><body><div class=\"scrollableContainer\"><table class=\"popup scrollable\" id=\"popup\"><tr class='coord'><td><\/td><td><b>Feature ID<\/b><\/td><td align='right'>4057 <\/td><\/tr><tr class='alt'><td>1<\/td><td><b>Site.Site <\/b><\/td><td align='right'>RR05-3E <\/td><\/tr><tr><td>2<\/td><td><b>Protocol <\/b><\/td><td align='right'>CABIN - Open Water <\/td><\/tr><tr class='alt'><td>3<\/td><td><b>Protocole <\/b><\/td><td align='right'>RCBA - Eaux libres <\/td><\/tr><tr><td>4<\/td><td><b>JulianDay.JourJulian <\/b><\/td><td align='right'>252 <\/td><\/tr><tr class='alt'><td>5<\/td><td><b>Year.Année <\/b><\/td><td align='right'>2005 <\/td><\/tr><tr><td>6<\/td><td><b>SiteDescription.Descriptiondusite <\/b><\/td><td align='right'> <\/td><\/tr><tr class='alt'><td>7<\/td><td><b>SampleNumber.Numérod.échantillon. <\/b><\/td><td align='right'>1 <\/td><\/tr><tr><td>8<\/td><td><b>Status.État <\/b><\/td><td align='right'>Test <\/td><\/tr><tr class='alt'><td>9<\/td><td><b>status <\/b><\/td><td align='right'>2 <\/td><\/tr><tr><td>10<\/td><td><b>QAQC <\/b><\/td><td align='right'>False <\/td><\/tr><tr class='alt'><td>11<\/td><td><b>Type.Type <\/b><\/td><td align='right'>Sediment Chemistry <\/td><\/tr><tr><td>12<\/td><td><b>Variable <\/b><\/td><td align='right'>TP <\/td><\/tr><tr class='alt'><td>13<\/td><td><b>VariableDescription <\/b><\/td><td align='right'>Total Phosphorus in sediment <\/td><\/tr><tr><td>14<\/td><td><b>VariableFr <\/b><\/td><td align='right'>PT <\/td><\/tr><tr class='alt'><td>15<\/td><td><b>DescriptiondelaVariable <\/b><\/td><td align='right'>Phosphore total dans le sédiment <\/td><\/tr><tr><td>16<\/td><td><b>Unit.Unité <\/b><\/td><td align='right'>ppm <\/td><\/tr><tr class='alt'><td>17<\/td><td><b>Value.Valeur <\/b><\/td><td align='right'>2000 <\/td><\/tr><tr><td>18<\/td><td><b>MDL <\/b><\/td><td align='right'>NA <\/td><\/tr><tr class='alt'><td>19<\/td><td><b>Computed.Calculé <\/b><\/td><td align='right'>NA <\/td><\/tr><tr><td>20<\/td><td><b>Note.Remarque <\/b><\/td><td align='right'> <\/td><\/tr><tr class='alt'><td>21<\/td><td><b>depth <\/b><\/td><td align='right'>15.3 <\/td><\/tr><tr><td>22<\/td><td><b>geometry <\/b><\/td><td align='right'>sfc_POINT <\/td><\/tr><\/table><\/div><\/body><\/html>","<html><head><link rel=\"stylesheet\" type=\"text/css\" href=\"lib/popup/popup.css\"><\/head><body><div class=\"scrollableContainer\"><table class=\"popup scrollable\" id=\"popup\"><tr class='coord'><td><\/td><td><b>Feature ID<\/b><\/td><td align='right'>4111 <\/td><\/tr><tr class='alt'><td>1<\/td><td><b>Site.Site <\/b><\/td><td align='right'>RR05-3F <\/td><\/tr><tr><td>2<\/td><td><b>Protocol <\/b><\/td><td align='right'>CABIN - Open Water <\/td><\/tr><tr class='alt'><td>3<\/td><td><b>Protocole <\/b><\/td><td align='right'>RCBA - Eaux libres <\/td><\/tr><tr><td>4<\/td><td><b>JulianDay.JourJulian <\/b><\/td><td align='right'>252 <\/td><\/tr><tr class='alt'><td>5<\/td><td><b>Year.Année <\/b><\/td><td align='right'>2005 <\/td><\/tr><tr><td>6<\/td><td><b>SiteDescription.Descriptiondusite <\/b><\/td><td align='right'> <\/td><\/tr><tr class='alt'><td>7<\/td><td><b>SampleNumber.Numérod.échantillon. <\/b><\/td><td align='right'>1 <\/td><\/tr><tr><td>8<\/td><td><b>Status.État <\/b><\/td><td align='right'>Test <\/td><\/tr><tr class='alt'><td>9<\/td><td><b>status <\/b><\/td><td align='right'>2 <\/td><\/tr><tr><td>10<\/td><td><b>QAQC <\/b><\/td><td align='right'>False <\/td><\/tr><tr class='alt'><td>11<\/td><td><b>Type.Type <\/b><\/td><td align='right'>Sediment Chemistry <\/td><\/tr><tr><td>12<\/td><td><b>Variable <\/b><\/td><td align='right'>TP <\/td><\/tr><tr class='alt'><td>13<\/td><td><b>VariableDescription <\/b><\/td><td align='right'>Total Phosphorus in sediment <\/td><\/tr><tr><td>14<\/td><td><b>VariableFr <\/b><\/td><td align='right'>PT <\/td><\/tr><tr class='alt'><td>15<\/td><td><b>DescriptiondelaVariable <\/b><\/td><td align='right'>Phosphore total dans le sédiment <\/td><\/tr><tr><td>16<\/td><td><b>Unit.Unité <\/b><\/td><td align='right'>ppm <\/td><\/tr><tr class='alt'><td>17<\/td><td><b>Value.Valeur <\/b><\/td><td align='right'>3050 <\/td><\/tr><tr><td>18<\/td><td><b>MDL <\/b><\/td><td align='right'>NA <\/td><\/tr><tr class='alt'><td>19<\/td><td><b>Computed.Calculé <\/b><\/td><td align='right'>NA <\/td><\/tr><tr><td>20<\/td><td><b>Note.Remarque <\/b><\/td><td align='right'> <\/td><\/tr><tr class='alt'><td>21<\/td><td><b>depth <\/b><\/td><td align='right'>16.7 <\/td><\/tr><tr><td>22<\/td><td><b>geometry <\/b><\/td><td align='right'>sfc_POINT <\/td><\/tr><\/table><\/div><\/body><\/html>","<html><head><link rel=\"stylesheet\" type=\"text/css\" href=\"lib/popup/popup.css\"><\/head><body><div class=\"scrollableContainer\"><table class=\"popup scrollable\" id=\"popup\"><tr class='coord'><td><\/td><td><b>Feature ID<\/b><\/td><td align='right'>4165 <\/td><\/tr><tr class='alt'><td>1<\/td><td><b>Site.Site <\/b><\/td><td align='right'>RR05-3G <\/td><\/tr><tr><td>2<\/td><td><b>Protocol <\/b><\/td><td align='right'>CABIN - Open Water <\/td><\/tr><tr class='alt'><td>3<\/td><td><b>Protocole <\/b><\/td><td align='right'>RCBA - Eaux libres <\/td><\/tr><tr><td>4<\/td><td><b>JulianDay.JourJulian <\/b><\/td><td align='right'>252 <\/td><\/tr><tr class='alt'><td>5<\/td><td><b>Year.Année <\/b><\/td><td align='right'>2005 <\/td><\/tr><tr><td>6<\/td><td><b>SiteDescription.Descriptiondusite <\/b><\/td><td align='right'> <\/td><\/tr><tr class='alt'><td>7<\/td><td><b>SampleNumber.Numérod.échantillon. <\/b><\/td><td align='right'>1 <\/td><\/tr><tr><td>8<\/td><td><b>Status.État <\/b><\/td><td align='right'>Test <\/td><\/tr><tr class='alt'><td>9<\/td><td><b>status <\/b><\/td><td align='right'>2 <\/td><\/tr><tr><td>10<\/td><td><b>QAQC <\/b><\/td><td align='right'>False <\/td><\/tr><tr class='alt'><td>11<\/td><td><b>Type.Type <\/b><\/td><td align='right'>Sediment Chemistry <\/td><\/tr><tr><td>12<\/td><td><b>Variable <\/b><\/td><td align='right'>TP <\/td><\/tr><tr class='alt'><td>13<\/td><td><b>VariableDescription <\/b><\/td><td align='right'>Total Phosphorus in sediment <\/td><\/tr><tr><td>14<\/td><td><b>VariableFr <\/b><\/td><td align='right'>PT <\/td><\/tr><tr class='alt'><td>15<\/td><td><b>DescriptiondelaVariable <\/b><\/td><td align='right'>Phosphore total dans le sédiment <\/td><\/tr><tr><td>16<\/td><td><b>Unit.Unité <\/b><\/td><td align='right'>ppm <\/td><\/tr><tr class='alt'><td>17<\/td><td><b>Value.Valeur <\/b><\/td><td align='right'>2620 <\/td><\/tr><tr><td>18<\/td><td><b>MDL <\/b><\/td><td align='right'>NA <\/td><\/tr><tr class='alt'><td>19<\/td><td><b>Computed.Calculé <\/b><\/td><td align='right'>NA <\/td><\/tr><tr><td>20<\/td><td><b>Note.Remarque <\/b><\/td><td align='right'> <\/td><\/tr><tr class='alt'><td>21<\/td><td><b>depth <\/b><\/td><td align='right'>22.2 <\/td><\/tr><tr><td>22<\/td><td><b>geometry <\/b><\/td><td align='right'>sfc_POINT <\/td><\/tr><\/table><\/div><\/body><\/html>","<html><head><link rel=\"stylesheet\" type=\"text/css\" href=\"lib/popup/popup.css\"><\/head><body><div class=\"scrollableContainer\"><table class=\"popup scrollable\" id=\"popup\"><tr class='coord'><td><\/td><td><b>Feature ID<\/b><\/td><td align='right'>4219 <\/td><\/tr><tr class='alt'><td>1<\/td><td><b>Site.Site <\/b><\/td><td align='right'>RR05-4A <\/td><\/tr><tr><td>2<\/td><td><b>Protocol <\/b><\/td><td align='right'>CABIN - Open Water <\/td><\/tr><tr class='alt'><td>3<\/td><td><b>Protocole <\/b><\/td><td align='right'>RCBA - Eaux libres <\/td><\/tr><tr><td>4<\/td><td><b>JulianDay.JourJulian <\/b><\/td><td align='right'>250 <\/td><\/tr><tr class='alt'><td>5<\/td><td><b>Year.Année <\/b><\/td><td align='right'>2005 <\/td><\/tr><tr><td>6<\/td><td><b>SiteDescription.Descriptiondusite <\/b><\/td><td align='right'> <\/td><\/tr><tr class='alt'><td>7<\/td><td><b>SampleNumber.Numérod.échantillon. <\/b><\/td><td align='right'>1 <\/td><\/tr><tr><td>8<\/td><td><b>Status.État <\/b><\/td><td align='right'>Test <\/td><\/tr><tr class='alt'><td>9<\/td><td><b>status <\/b><\/td><td align='right'>2 <\/td><\/tr><tr><td>10<\/td><td><b>QAQC <\/b><\/td><td align='right'>False <\/td><\/tr><tr class='alt'><td>11<\/td><td><b>Type.Type <\/b><\/td><td align='right'>Sediment Chemistry <\/td><\/tr><tr><td>12<\/td><td><b>Variable <\/b><\/td><td align='right'>TP <\/td><\/tr><tr class='alt'><td>13<\/td><td><b>VariableDescription <\/b><\/td><td align='right'>Total Phosphorus in sediment <\/td><\/tr><tr><td>14<\/td><td><b>VariableFr <\/b><\/td><td align='right'>PT <\/td><\/tr><tr class='alt'><td>15<\/td><td><b>DescriptiondelaVariable <\/b><\/td><td align='right'>Phosphore total dans le sédiment <\/td><\/tr><tr><td>16<\/td><td><b>Unit.Unité <\/b><\/td><td align='right'>ppm <\/td><\/tr><tr class='alt'><td>17<\/td><td><b>Value.Valeur <\/b><\/td><td align='right'>2350 <\/td><\/tr><tr><td>18<\/td><td><b>MDL <\/b><\/td><td align='right'>NA <\/td><\/tr><tr class='alt'><td>19<\/td><td><b>Computed.Calculé <\/b><\/td><td align='right'>NA <\/td><\/tr><tr><td>20<\/td><td><b>Note.Remarque <\/b><\/td><td align='right'> <\/td><\/tr><tr class='alt'><td>21<\/td><td><b>depth <\/b><\/td><td align='right'>5.4 <\/td><\/tr><tr><td>22<\/td><td><b>geometry <\/b><\/td><td align='right'>sfc_POINT <\/td><\/tr><\/table><\/div><\/body><\/html>","<html><head><link rel=\"stylesheet\" type=\"text/css\" href=\"lib/popup/popup.css\"><\/head><body><div class=\"scrollableContainer\"><table class=\"popup scrollable\" id=\"popup\"><tr class='coord'><td><\/td><td><b>Feature ID<\/b><\/td><td align='right'>4273 <\/td><\/tr><tr class='alt'><td>1<\/td><td><b>Site.Site <\/b><\/td><td align='right'>RR05-4B <\/td><\/tr><tr><td>2<\/td><td><b>Protocol <\/b><\/td><td align='right'>CABIN - Open Water <\/td><\/tr><tr class='alt'><td>3<\/td><td><b>Protocole <\/b><\/td><td align='right'>RCBA - Eaux libres <\/td><\/tr><tr><td>4<\/td><td><b>JulianDay.JourJulian <\/b><\/td><td align='right'>255 <\/td><\/tr><tr class='alt'><td>5<\/td><td><b>Year.Année <\/b><\/td><td align='right'>2005 <\/td><\/tr><tr><td>6<\/td><td><b>SiteDescription.Descriptiondusite <\/b><\/td><td align='right'> <\/td><\/tr><tr class='alt'><td>7<\/td><td><b>SampleNumber.Numérod.échantillon. <\/b><\/td><td align='right'>1 <\/td><\/tr><tr><td>8<\/td><td><b>Status.État <\/b><\/td><td align='right'>Test <\/td><\/tr><tr class='alt'><td>9<\/td><td><b>status <\/b><\/td><td align='right'>2 <\/td><\/tr><tr><td>10<\/td><td><b>QAQC <\/b><\/td><td align='right'>False <\/td><\/tr><tr class='alt'><td>11<\/td><td><b>Type.Type <\/b><\/td><td align='right'>Sediment Chemistry <\/td><\/tr><tr><td>12<\/td><td><b>Variable <\/b><\/td><td align='right'>TP <\/td><\/tr><tr class='alt'><td>13<\/td><td><b>VariableDescription <\/b><\/td><td align='right'>Total Phosphorus in sediment <\/td><\/tr><tr><td>14<\/td><td><b>VariableFr <\/b><\/td><td align='right'>PT <\/td><\/tr><tr class='alt'><td>15<\/td><td><b>DescriptiondelaVariable <\/b><\/td><td align='right'>Phosphore total dans le sédiment <\/td><\/tr><tr><td>16<\/td><td><b>Unit.Unité <\/b><\/td><td align='right'>ppm <\/td><\/tr><tr class='alt'><td>17<\/td><td><b>Value.Valeur <\/b><\/td><td align='right'>1980 <\/td><\/tr><tr><td>18<\/td><td><b>MDL <\/b><\/td><td align='right'>NA <\/td><\/tr><tr class='alt'><td>19<\/td><td><b>Computed.Calculé <\/b><\/td><td align='right'>NA <\/td><\/tr><tr><td>20<\/td><td><b>Note.Remarque <\/b><\/td><td align='right'> <\/td><\/tr><tr class='alt'><td>21<\/td><td><b>depth <\/b><\/td><td align='right'>10.3 <\/td><\/tr><tr><td>22<\/td><td><b>geometry <\/b><\/td><td align='right'>sfc_POINT <\/td><\/tr><\/table><\/div><\/body><\/html>","<html><head><link rel=\"stylesheet\" type=\"text/css\" href=\"lib/popup/popup.css\"><\/head><body><div class=\"scrollableContainer\"><table class=\"popup scrollable\" id=\"popup\"><tr class='coord'><td><\/td><td><b>Feature ID<\/b><\/td><td align='right'>4435 <\/td><\/tr><tr class='alt'><td>1<\/td><td><b>Site.Site <\/b><\/td><td align='right'>RR05-4C <\/td><\/tr><tr><td>2<\/td><td><b>Protocol <\/b><\/td><td align='right'>CABIN - Open Water <\/td><\/tr><tr class='alt'><td>3<\/td><td><b>Protocole <\/b><\/td><td align='right'>RCBA - Eaux libres <\/td><\/tr><tr><td>4<\/td><td><b>JulianDay.JourJulian <\/b><\/td><td align='right'>255 <\/td><\/tr><tr class='alt'><td>5<\/td><td><b>Year.Année <\/b><\/td><td align='right'>2005 <\/td><\/tr><tr><td>6<\/td><td><b>SiteDescription.Descriptiondusite <\/b><\/td><td align='right'> <\/td><\/tr><tr class='alt'><td>7<\/td><td><b>SampleNumber.Numérod.échantillon. <\/b><\/td><td align='right'>1 <\/td><\/tr><tr><td>8<\/td><td><b>Status.État <\/b><\/td><td align='right'>Test <\/td><\/tr><tr class='alt'><td>9<\/td><td><b>status <\/b><\/td><td align='right'>2 <\/td><\/tr><tr><td>10<\/td><td><b>QAQC <\/b><\/td><td align='right'>False <\/td><\/tr><tr class='alt'><td>11<\/td><td><b>Type.Type <\/b><\/td><td align='right'>Sediment Chemistry <\/td><\/tr><tr><td>12<\/td><td><b>Variable <\/b><\/td><td align='right'>TP <\/td><\/tr><tr class='alt'><td>13<\/td><td><b>VariableDescription <\/b><\/td><td align='right'>Total Phosphorus in sediment <\/td><\/tr><tr><td>14<\/td><td><b>VariableFr <\/b><\/td><td align='right'>PT <\/td><\/tr><tr class='alt'><td>15<\/td><td><b>DescriptiondelaVariable <\/b><\/td><td align='right'>Phosphore total dans le sédiment <\/td><\/tr><tr><td>16<\/td><td><b>Unit.Unité <\/b><\/td><td align='right'>ppm <\/td><\/tr><tr class='alt'><td>17<\/td><td><b>Value.Valeur <\/b><\/td><td align='right'>2200 <\/td><\/tr><tr><td>18<\/td><td><b>MDL <\/b><\/td><td align='right'>NA <\/td><\/tr><tr class='alt'><td>19<\/td><td><b>Computed.Calculé <\/b><\/td><td align='right'>NA <\/td><\/tr><tr><td>20<\/td><td><b>Note.Remarque <\/b><\/td><td align='right'> <\/td><\/tr><tr class='alt'><td>21<\/td><td><b>depth <\/b><\/td><td align='right'>18.6 <\/td><\/tr><tr><td>22<\/td><td><b>geometry <\/b><\/td><td align='right'>sfc_POINT <\/td><\/tr><\/table><\/div><\/body><\/html>","<html><head><link rel=\"stylesheet\" type=\"text/css\" href=\"lib/popup/popup.css\"><\/head><body><div class=\"scrollableContainer\"><table class=\"popup scrollable\" id=\"popup\"><tr class='coord'><td><\/td><td><b>Feature ID<\/b><\/td><td align='right'>4489 <\/td><\/tr><tr class='alt'><td>1<\/td><td><b>Site.Site <\/b><\/td><td align='right'>RR05-4D <\/td><\/tr><tr><td>2<\/td><td><b>Protocol <\/b><\/td><td align='right'>CABIN - Open Water <\/td><\/tr><tr class='alt'><td>3<\/td><td><b>Protocole <\/b><\/td><td align='right'>RCBA - Eaux libres <\/td><\/tr><tr><td>4<\/td><td><b>JulianDay.JourJulian <\/b><\/td><td align='right'>255 <\/td><\/tr><tr class='alt'><td>5<\/td><td><b>Year.Année <\/b><\/td><td align='right'>2005 <\/td><\/tr><tr><td>6<\/td><td><b>SiteDescription.Descriptiondusite <\/b><\/td><td align='right'> <\/td><\/tr><tr class='alt'><td>7<\/td><td><b>SampleNumber.Numérod.échantillon. <\/b><\/td><td align='right'>1 <\/td><\/tr><tr><td>8<\/td><td><b>Status.État <\/b><\/td><td align='right'>Test <\/td><\/tr><tr class='alt'><td>9<\/td><td><b>status <\/b><\/td><td align='right'>2 <\/td><\/tr><tr><td>10<\/td><td><b>QAQC <\/b><\/td><td align='right'>False <\/td><\/tr><tr class='alt'><td>11<\/td><td><b>Type.Type <\/b><\/td><td align='right'>Sediment Chemistry <\/td><\/tr><tr><td>12<\/td><td><b>Variable <\/b><\/td><td align='right'>TP <\/td><\/tr><tr class='alt'><td>13<\/td><td><b>VariableDescription <\/b><\/td><td align='right'>Total Phosphorus in sediment <\/td><\/tr><tr><td>14<\/td><td><b>VariableFr <\/b><\/td><td align='right'>PT <\/td><\/tr><tr class='alt'><td>15<\/td><td><b>DescriptiondelaVariable <\/b><\/td><td align='right'>Phosphore total dans le sédiment <\/td><\/tr><tr><td>16<\/td><td><b>Unit.Unité <\/b><\/td><td align='right'>ppm <\/td><\/tr><tr class='alt'><td>17<\/td><td><b>Value.Valeur <\/b><\/td><td align='right'>2870 <\/td><\/tr><tr><td>18<\/td><td><b>MDL <\/b><\/td><td align='right'>NA <\/td><\/tr><tr class='alt'><td>19<\/td><td><b>Computed.Calculé <\/b><\/td><td align='right'>NA <\/td><\/tr><tr><td>20<\/td><td><b>Note.Remarque <\/b><\/td><td align='right'> <\/td><\/tr><tr class='alt'><td>21<\/td><td><b>depth <\/b><\/td><td align='right'>15.6 <\/td><\/tr><tr><td>22<\/td><td><b>geometry <\/b><\/td><td align='right'>sfc_POINT <\/td><\/tr><\/table><\/div><\/body><\/html>","<html><head><link rel=\"stylesheet\" type=\"text/css\" href=\"lib/popup/popup.css\"><\/head><body><div class=\"scrollableContainer\"><table class=\"popup scrollable\" id=\"popup\"><tr class='coord'><td><\/td><td><b>Feature ID<\/b><\/td><td align='right'>4543 <\/td><\/tr><tr class='alt'><td>1<\/td><td><b>Site.Site <\/b><\/td><td align='right'>RR05-4E <\/td><\/tr><tr><td>2<\/td><td><b>Protocol <\/b><\/td><td align='right'>CABIN - Open Water <\/td><\/tr><tr class='alt'><td>3<\/td><td><b>Protocole <\/b><\/td><td align='right'>RCBA - Eaux libres <\/td><\/tr><tr><td>4<\/td><td><b>JulianDay.JourJulian <\/b><\/td><td align='right'>255 <\/td><\/tr><tr class='alt'><td>5<\/td><td><b>Year.Année <\/b><\/td><td align='right'>2005 <\/td><\/tr><tr><td>6<\/td><td><b>SiteDescription.Descriptiondusite <\/b><\/td><td align='right'> <\/td><\/tr><tr class='alt'><td>7<\/td><td><b>SampleNumber.Numérod.échantillon. <\/b><\/td><td align='right'>1 <\/td><\/tr><tr><td>8<\/td><td><b>Status.État <\/b><\/td><td align='right'>Test <\/td><\/tr><tr class='alt'><td>9<\/td><td><b>status <\/b><\/td><td align='right'>2 <\/td><\/tr><tr><td>10<\/td><td><b>QAQC <\/b><\/td><td align='right'>False <\/td><\/tr><tr class='alt'><td>11<\/td><td><b>Type.Type <\/b><\/td><td align='right'>Sediment Chemistry <\/td><\/tr><tr><td>12<\/td><td><b>Variable <\/b><\/td><td align='right'>TP <\/td><\/tr><tr class='alt'><td>13<\/td><td><b>VariableDescription <\/b><\/td><td align='right'>Total Phosphorus in sediment <\/td><\/tr><tr><td>14<\/td><td><b>VariableFr <\/b><\/td><td align='right'>PT <\/td><\/tr><tr class='alt'><td>15<\/td><td><b>DescriptiondelaVariable <\/b><\/td><td align='right'>Phosphore total dans le sédiment <\/td><\/tr><tr><td>16<\/td><td><b>Unit.Unité <\/b><\/td><td align='right'>ppm <\/td><\/tr><tr class='alt'><td>17<\/td><td><b>Value.Valeur <\/b><\/td><td align='right'>2410 <\/td><\/tr><tr><td>18<\/td><td><b>MDL <\/b><\/td><td align='right'>NA <\/td><\/tr><tr class='alt'><td>19<\/td><td><b>Computed.Calculé <\/b><\/td><td align='right'>NA <\/td><\/tr><tr><td>20<\/td><td><b>Note.Remarque <\/b><\/td><td align='right'> <\/td><\/tr><tr class='alt'><td>21<\/td><td><b>depth <\/b><\/td><td align='right'>19.8 <\/td><\/tr><tr><td>22<\/td><td><b>geometry <\/b><\/td><td align='right'>sfc_POINT <\/td><\/tr><\/table><\/div><\/body><\/html>","<html><head><link rel=\"stylesheet\" type=\"text/css\" href=\"lib/popup/popup.css\"><\/head><body><div class=\"scrollableContainer\"><table class=\"popup scrollable\" id=\"popup\"><tr class='coord'><td><\/td><td><b>Feature ID<\/b><\/td><td align='right'>4597 <\/td><\/tr><tr class='alt'><td>1<\/td><td><b>Site.Site <\/b><\/td><td align='right'>RR05-4F <\/td><\/tr><tr><td>2<\/td><td><b>Protocol <\/b><\/td><td align='right'>CABIN - Open Water <\/td><\/tr><tr class='alt'><td>3<\/td><td><b>Protocole <\/b><\/td><td align='right'>RCBA - Eaux libres <\/td><\/tr><tr><td>4<\/td><td><b>JulianDay.JourJulian <\/b><\/td><td align='right'>252 <\/td><\/tr><tr class='alt'><td>5<\/td><td><b>Year.Année <\/b><\/td><td align='right'>2005 <\/td><\/tr><tr><td>6<\/td><td><b>SiteDescription.Descriptiondusite <\/b><\/td><td align='right'> <\/td><\/tr><tr class='alt'><td>7<\/td><td><b>SampleNumber.Numérod.échantillon. <\/b><\/td><td align='right'>1 <\/td><\/tr><tr><td>8<\/td><td><b>Status.État <\/b><\/td><td align='right'>Test <\/td><\/tr><tr class='alt'><td>9<\/td><td><b>status <\/b><\/td><td align='right'>2 <\/td><\/tr><tr><td>10<\/td><td><b>QAQC <\/b><\/td><td align='right'>False <\/td><\/tr><tr class='alt'><td>11<\/td><td><b>Type.Type <\/b><\/td><td align='right'>Sediment Chemistry <\/td><\/tr><tr><td>12<\/td><td><b>Variable <\/b><\/td><td align='right'>TP <\/td><\/tr><tr class='alt'><td>13<\/td><td><b>VariableDescription <\/b><\/td><td align='right'>Total Phosphorus in sediment <\/td><\/tr><tr><td>14<\/td><td><b>VariableFr <\/b><\/td><td align='right'>PT <\/td><\/tr><tr class='alt'><td>15<\/td><td><b>DescriptiondelaVariable <\/b><\/td><td align='right'>Phosphore total dans le sédiment <\/td><\/tr><tr><td>16<\/td><td><b>Unit.Unité <\/b><\/td><td align='right'>ppm <\/td><\/tr><tr class='alt'><td>17<\/td><td><b>Value.Valeur <\/b><\/td><td align='right'>2370 <\/td><\/tr><tr><td>18<\/td><td><b>MDL <\/b><\/td><td align='right'>NA <\/td><\/tr><tr class='alt'><td>19<\/td><td><b>Computed.Calculé <\/b><\/td><td align='right'>NA <\/td><\/tr><tr><td>20<\/td><td><b>Note.Remarque <\/b><\/td><td align='right'> <\/td><\/tr><tr class='alt'><td>21<\/td><td><b>depth <\/b><\/td><td align='right'>22 <\/td><\/tr><tr><td>22<\/td><td><b>geometry <\/b><\/td><td align='right'>sfc_POINT <\/td><\/tr><\/table><\/div><\/body><\/html>","<html><head><link rel=\"stylesheet\" type=\"text/css\" href=\"lib/popup/popup.css\"><\/head><body><div class=\"scrollableContainer\"><table class=\"popup scrollable\" id=\"popup\"><tr class='coord'><td><\/td><td><b>Feature ID<\/b><\/td><td align='right'>4651 <\/td><\/tr><tr class='alt'><td>1<\/td><td><b>Site.Site <\/b><\/td><td align='right'>RR05-5A <\/td><\/tr><tr><td>2<\/td><td><b>Protocol <\/b><\/td><td align='right'>CABIN - Open Water <\/td><\/tr><tr class='alt'><td>3<\/td><td><b>Protocole <\/b><\/td><td align='right'>RCBA - Eaux libres <\/td><\/tr><tr><td>4<\/td><td><b>JulianDay.JourJulian <\/b><\/td><td align='right'>250 <\/td><\/tr><tr class='alt'><td>5<\/td><td><b>Year.Année <\/b><\/td><td align='right'>2005 <\/td><\/tr><tr><td>6<\/td><td><b>SiteDescription.Descriptiondusite <\/b><\/td><td align='right'> <\/td><\/tr><tr class='alt'><td>7<\/td><td><b>SampleNumber.Numérod.échantillon. <\/b><\/td><td align='right'>1 <\/td><\/tr><tr><td>8<\/td><td><b>Status.État <\/b><\/td><td align='right'>Test <\/td><\/tr><tr class='alt'><td>9<\/td><td><b>status <\/b><\/td><td align='right'>2 <\/td><\/tr><tr><td>10<\/td><td><b>QAQC <\/b><\/td><td align='right'>False <\/td><\/tr><tr class='alt'><td>11<\/td><td><b>Type.Type <\/b><\/td><td align='right'>Sediment Chemistry <\/td><\/tr><tr><td>12<\/td><td><b>Variable <\/b><\/td><td align='right'>TP <\/td><\/tr><tr class='alt'><td>13<\/td><td><b>VariableDescription <\/b><\/td><td align='right'>Total Phosphorus in sediment <\/td><\/tr><tr><td>14<\/td><td><b>VariableFr <\/b><\/td><td align='right'>PT <\/td><\/tr><tr class='alt'><td>15<\/td><td><b>DescriptiondelaVariable <\/b><\/td><td align='right'>Phosphore total dans le sédiment <\/td><\/tr><tr><td>16<\/td><td><b>Unit.Unité <\/b><\/td><td align='right'>ppm <\/td><\/tr><tr class='alt'><td>17<\/td><td><b>Value.Valeur <\/b><\/td><td align='right'>1410 <\/td><\/tr><tr><td>18<\/td><td><b>MDL <\/b><\/td><td align='right'>NA <\/td><\/tr><tr class='alt'><td>19<\/td><td><b>Computed.Calculé <\/b><\/td><td align='right'>NA <\/td><\/tr><tr><td>20<\/td><td><b>Note.Remarque <\/b><\/td><td align='right'> <\/td><\/tr><tr class='alt'><td>21<\/td><td><b>depth <\/b><\/td><td align='right'>5.6 <\/td><\/tr><tr><td>22<\/td><td><b>geometry <\/b><\/td><td align='right'>sfc_POINT <\/td><\/tr><\/table><\/div><\/body><\/html>","<html><head><link rel=\"stylesheet\" type=\"text/css\" href=\"lib/popup/popup.css\"><\/head><body><div class=\"scrollableContainer\"><table class=\"popup scrollable\" id=\"popup\"><tr class='coord'><td><\/td><td><b>Feature ID<\/b><\/td><td align='right'>4705 <\/td><\/tr><tr class='alt'><td>1<\/td><td><b>Site.Site <\/b><\/td><td align='right'>RR05-5B <\/td><\/tr><tr><td>2<\/td><td><b>Protocol <\/b><\/td><td align='right'>CABIN - Open Water <\/td><\/tr><tr class='alt'><td>3<\/td><td><b>Protocole <\/b><\/td><td align='right'>RCBA - Eaux libres <\/td><\/tr><tr><td>4<\/td><td><b>JulianDay.JourJulian <\/b><\/td><td align='right'>255 <\/td><\/tr><tr class='alt'><td>5<\/td><td><b>Year.Année <\/b><\/td><td align='right'>2005 <\/td><\/tr><tr><td>6<\/td><td><b>SiteDescription.Descriptiondusite <\/b><\/td><td align='right'> <\/td><\/tr><tr class='alt'><td>7<\/td><td><b>SampleNumber.Numérod.échantillon. <\/b><\/td><td align='right'>1 <\/td><\/tr><tr><td>8<\/td><td><b>Status.État <\/b><\/td><td align='right'>Test <\/td><\/tr><tr class='alt'><td>9<\/td><td><b>status <\/b><\/td><td align='right'>2 <\/td><\/tr><tr><td>10<\/td><td><b>QAQC <\/b><\/td><td align='right'>False <\/td><\/tr><tr class='alt'><td>11<\/td><td><b>Type.Type <\/b><\/td><td align='right'>Sediment Chemistry <\/td><\/tr><tr><td>12<\/td><td><b>Variable <\/b><\/td><td align='right'>TP <\/td><\/tr><tr class='alt'><td>13<\/td><td><b>VariableDescription <\/b><\/td><td align='right'>Total Phosphorus in sediment <\/td><\/tr><tr><td>14<\/td><td><b>VariableFr <\/b><\/td><td align='right'>PT <\/td><\/tr><tr class='alt'><td>15<\/td><td><b>DescriptiondelaVariable <\/b><\/td><td align='right'>Phosphore total dans le sédiment <\/td><\/tr><tr><td>16<\/td><td><b>Unit.Unité <\/b><\/td><td align='right'>ppm <\/td><\/tr><tr class='alt'><td>17<\/td><td><b>Value.Valeur <\/b><\/td><td align='right'>1870 <\/td><\/tr><tr><td>18<\/td><td><b>MDL <\/b><\/td><td align='right'>NA <\/td><\/tr><tr class='alt'><td>19<\/td><td><b>Computed.Calculé <\/b><\/td><td align='right'>NA <\/td><\/tr><tr><td>20<\/td><td><b>Note.Remarque <\/b><\/td><td align='right'> <\/td><\/tr><tr class='alt'><td>21<\/td><td><b>depth <\/b><\/td><td align='right'>8.9 <\/td><\/tr><tr><td>22<\/td><td><b>geometry <\/b><\/td><td align='right'>sfc_POINT <\/td><\/tr><\/table><\/div><\/body><\/html>","<html><head><link rel=\"stylesheet\" type=\"text/css\" href=\"lib/popup/popup.css\"><\/head><body><div class=\"scrollableContainer\"><table class=\"popup scrollable\" id=\"popup\"><tr class='coord'><td><\/td><td><b>Feature ID<\/b><\/td><td align='right'>4759 <\/td><\/tr><tr class='alt'><td>1<\/td><td><b>Site.Site <\/b><\/td><td align='right'>RR05-5C <\/td><\/tr><tr><td>2<\/td><td><b>Protocol <\/b><\/td><td align='right'>CABIN - Open Water <\/td><\/tr><tr class='alt'><td>3<\/td><td><b>Protocole <\/b><\/td><td align='right'>RCBA - Eaux libres <\/td><\/tr><tr><td>4<\/td><td><b>JulianDay.JourJulian <\/b><\/td><td align='right'>255 <\/td><\/tr><tr class='alt'><td>5<\/td><td><b>Year.Année <\/b><\/td><td align='right'>2005 <\/td><\/tr><tr><td>6<\/td><td><b>SiteDescription.Descriptiondusite <\/b><\/td><td align='right'> <\/td><\/tr><tr class='alt'><td>7<\/td><td><b>SampleNumber.Numérod.échantillon. <\/b><\/td><td align='right'>1 <\/td><\/tr><tr><td>8<\/td><td><b>Status.État <\/b><\/td><td align='right'>Test <\/td><\/tr><tr class='alt'><td>9<\/td><td><b>status <\/b><\/td><td align='right'>2 <\/td><\/tr><tr><td>10<\/td><td><b>QAQC <\/b><\/td><td align='right'>False <\/td><\/tr><tr class='alt'><td>11<\/td><td><b>Type.Type <\/b><\/td><td align='right'>Sediment Chemistry <\/td><\/tr><tr><td>12<\/td><td><b>Variable <\/b><\/td><td align='right'>TP <\/td><\/tr><tr class='alt'><td>13<\/td><td><b>VariableDescription <\/b><\/td><td align='right'>Total Phosphorus in sediment <\/td><\/tr><tr><td>14<\/td><td><b>VariableFr <\/b><\/td><td align='right'>PT <\/td><\/tr><tr class='alt'><td>15<\/td><td><b>DescriptiondelaVariable <\/b><\/td><td align='right'>Phosphore total dans le sédiment <\/td><\/tr><tr><td>16<\/td><td><b>Unit.Unité <\/b><\/td><td align='right'>ppm <\/td><\/tr><tr class='alt'><td>17<\/td><td><b>Value.Valeur <\/b><\/td><td align='right'>2520 <\/td><\/tr><tr><td>18<\/td><td><b>MDL <\/b><\/td><td align='right'>NA <\/td><\/tr><tr class='alt'><td>19<\/td><td><b>Computed.Calculé <\/b><\/td><td align='right'>NA <\/td><\/tr><tr><td>20<\/td><td><b>Note.Remarque <\/b><\/td><td align='right'> <\/td><\/tr><tr class='alt'><td>21<\/td><td><b>depth <\/b><\/td><td align='right'>17.3 <\/td><\/tr><tr><td>22<\/td><td><b>geometry <\/b><\/td><td align='right'>sfc_POINT <\/td><\/tr><\/table><\/div><\/body><\/html>","<html><head><link rel=\"stylesheet\" type=\"text/css\" href=\"lib/popup/popup.css\"><\/head><body><div class=\"scrollableContainer\"><table class=\"popup scrollable\" id=\"popup\"><tr class='coord'><td><\/td><td><b>Feature ID<\/b><\/td><td align='right'>4921 <\/td><\/tr><tr class='alt'><td>1<\/td><td><b>Site.Site <\/b><\/td><td align='right'>RR05-5D <\/td><\/tr><tr><td>2<\/td><td><b>Protocol <\/b><\/td><td align='right'>CABIN - Open Water <\/td><\/tr><tr class='alt'><td>3<\/td><td><b>Protocole <\/b><\/td><td align='right'>RCBA - Eaux libres <\/td><\/tr><tr><td>4<\/td><td><b>JulianDay.JourJulian <\/b><\/td><td align='right'>255 <\/td><\/tr><tr class='alt'><td>5<\/td><td><b>Year.Année <\/b><\/td><td align='right'>2005 <\/td><\/tr><tr><td>6<\/td><td><b>SiteDescription.Descriptiondusite <\/b><\/td><td align='right'> <\/td><\/tr><tr class='alt'><td>7<\/td><td><b>SampleNumber.Numérod.échantillon. <\/b><\/td><td align='right'>1 <\/td><\/tr><tr><td>8<\/td><td><b>Status.État <\/b><\/td><td align='right'>Test <\/td><\/tr><tr class='alt'><td>9<\/td><td><b>status <\/b><\/td><td align='right'>2 <\/td><\/tr><tr><td>10<\/td><td><b>QAQC <\/b><\/td><td align='right'>False <\/td><\/tr><tr class='alt'><td>11<\/td><td><b>Type.Type <\/b><\/td><td align='right'>Sediment Chemistry <\/td><\/tr><tr><td>12<\/td><td><b>Variable <\/b><\/td><td align='right'>TP <\/td><\/tr><tr class='alt'><td>13<\/td><td><b>VariableDescription <\/b><\/td><td align='right'>Total Phosphorus in sediment <\/td><\/tr><tr><td>14<\/td><td><b>VariableFr <\/b><\/td><td align='right'>PT <\/td><\/tr><tr class='alt'><td>15<\/td><td><b>DescriptiondelaVariable <\/b><\/td><td align='right'>Phosphore total dans le sédiment <\/td><\/tr><tr><td>16<\/td><td><b>Unit.Unité <\/b><\/td><td align='right'>ppm <\/td><\/tr><tr class='alt'><td>17<\/td><td><b>Value.Valeur <\/b><\/td><td align='right'>2745 <\/td><\/tr><tr><td>18<\/td><td><b>MDL <\/b><\/td><td align='right'>NA <\/td><\/tr><tr class='alt'><td>19<\/td><td><b>Computed.Calculé <\/b><\/td><td align='right'>NA <\/td><\/tr><tr><td>20<\/td><td><b>Note.Remarque <\/b><\/td><td align='right'> <\/td><\/tr><tr class='alt'><td>21<\/td><td><b>depth <\/b><\/td><td align='right'>22.9 <\/td><\/tr><tr><td>22<\/td><td><b>geometry <\/b><\/td><td align='right'>sfc_POINT <\/td><\/tr><\/table><\/div><\/body><\/html>","<html><head><link rel=\"stylesheet\" type=\"text/css\" href=\"lib/popup/popup.css\"><\/head><body><div class=\"scrollableContainer\"><table class=\"popup scrollable\" id=\"popup\"><tr class='coord'><td><\/td><td><b>Feature ID<\/b><\/td><td align='right'>4975 <\/td><\/tr><tr class='alt'><td>1<\/td><td><b>Site.Site <\/b><\/td><td align='right'>RR05-5E <\/td><\/tr><tr><td>2<\/td><td><b>Protocol <\/b><\/td><td align='right'>CABIN - Open Water <\/td><\/tr><tr class='alt'><td>3<\/td><td><b>Protocole <\/b><\/td><td align='right'>RCBA - Eaux libres <\/td><\/tr><tr><td>4<\/td><td><b>JulianDay.JourJulian <\/b><\/td><td align='right'>255 <\/td><\/tr><tr class='alt'><td>5<\/td><td><b>Year.Année <\/b><\/td><td align='right'>2005 <\/td><\/tr><tr><td>6<\/td><td><b>SiteDescription.Descriptiondusite <\/b><\/td><td align='right'> <\/td><\/tr><tr class='alt'><td>7<\/td><td><b>SampleNumber.Numérod.échantillon. <\/b><\/td><td align='right'>1 <\/td><\/tr><tr><td>8<\/td><td><b>Status.État <\/b><\/td><td align='right'>Test <\/td><\/tr><tr class='alt'><td>9<\/td><td><b>status <\/b><\/td><td align='right'>2 <\/td><\/tr><tr><td>10<\/td><td><b>QAQC <\/b><\/td><td align='right'>False <\/td><\/tr><tr class='alt'><td>11<\/td><td><b>Type.Type <\/b><\/td><td align='right'>Sediment Chemistry <\/td><\/tr><tr><td>12<\/td><td><b>Variable <\/b><\/td><td align='right'>TP <\/td><\/tr><tr class='alt'><td>13<\/td><td><b>VariableDescription <\/b><\/td><td align='right'>Total Phosphorus in sediment <\/td><\/tr><tr><td>14<\/td><td><b>VariableFr <\/b><\/td><td align='right'>PT <\/td><\/tr><tr class='alt'><td>15<\/td><td><b>DescriptiondelaVariable <\/b><\/td><td align='right'>Phosphore total dans le sédiment <\/td><\/tr><tr><td>16<\/td><td><b>Unit.Unité <\/b><\/td><td align='right'>ppm <\/td><\/tr><tr class='alt'><td>17<\/td><td><b>Value.Valeur <\/b><\/td><td align='right'>2910 <\/td><\/tr><tr><td>18<\/td><td><b>MDL <\/b><\/td><td align='right'>NA <\/td><\/tr><tr class='alt'><td>19<\/td><td><b>Computed.Calculé <\/b><\/td><td align='right'>NA <\/td><\/tr><tr><td>20<\/td><td><b>Note.Remarque <\/b><\/td><td align='right'> <\/td><\/tr><tr class='alt'><td>21<\/td><td><b>depth <\/b><\/td><td align='right'>23.4 <\/td><\/tr><tr><td>22<\/td><td><b>geometry <\/b><\/td><td align='right'>sfc_POINT <\/td><\/tr><\/table><\/div><\/body><\/html>","<html><head><link rel=\"stylesheet\" type=\"text/css\" href=\"lib/popup/popup.css\"><\/head><body><div class=\"scrollableContainer\"><table class=\"popup scrollable\" id=\"popup\"><tr class='coord'><td><\/td><td><b>Feature ID<\/b><\/td><td align='right'>5029 <\/td><\/tr><tr class='alt'><td>1<\/td><td><b>Site.Site <\/b><\/td><td align='right'>RR05-5F <\/td><\/tr><tr><td>2<\/td><td><b>Protocol <\/b><\/td><td align='right'>CABIN - Open Water <\/td><\/tr><tr class='alt'><td>3<\/td><td><b>Protocole <\/b><\/td><td align='right'>RCBA - Eaux libres <\/td><\/tr><tr><td>4<\/td><td><b>JulianDay.JourJulian <\/b><\/td><td align='right'>255 <\/td><\/tr><tr class='alt'><td>5<\/td><td><b>Year.Année <\/b><\/td><td align='right'>2005 <\/td><\/tr><tr><td>6<\/td><td><b>SiteDescription.Descriptiondusite <\/b><\/td><td align='right'> <\/td><\/tr><tr class='alt'><td>7<\/td><td><b>SampleNumber.Numérod.échantillon. <\/b><\/td><td align='right'>1 <\/td><\/tr><tr><td>8<\/td><td><b>Status.État <\/b><\/td><td align='right'>Test <\/td><\/tr><tr class='alt'><td>9<\/td><td><b>status <\/b><\/td><td align='right'>2 <\/td><\/tr><tr><td>10<\/td><td><b>QAQC <\/b><\/td><td align='right'>False <\/td><\/tr><tr class='alt'><td>11<\/td><td><b>Type.Type <\/b><\/td><td align='right'>Sediment Chemistry <\/td><\/tr><tr><td>12<\/td><td><b>Variable <\/b><\/td><td align='right'>TP <\/td><\/tr><tr class='alt'><td>13<\/td><td><b>VariableDescription <\/b><\/td><td align='right'>Total Phosphorus in sediment <\/td><\/tr><tr><td>14<\/td><td><b>VariableFr <\/b><\/td><td align='right'>PT <\/td><\/tr><tr class='alt'><td>15<\/td><td><b>DescriptiondelaVariable <\/b><\/td><td align='right'>Phosphore total dans le sédiment <\/td><\/tr><tr><td>16<\/td><td><b>Unit.Unité <\/b><\/td><td align='right'>ppm <\/td><\/tr><tr class='alt'><td>17<\/td><td><b>Value.Valeur <\/b><\/td><td align='right'>2720 <\/td><\/tr><tr><td>18<\/td><td><b>MDL <\/b><\/td><td align='right'>NA <\/td><\/tr><tr class='alt'><td>19<\/td><td><b>Computed.Calculé <\/b><\/td><td align='right'>NA <\/td><\/tr><tr><td>20<\/td><td><b>Note.Remarque <\/b><\/td><td align='right'> <\/td><\/tr><tr class='alt'><td>21<\/td><td><b>depth <\/b><\/td><td align='right'>23.4 <\/td><\/tr><tr><td>22<\/td><td><b>geometry <\/b><\/td><td align='right'>sfc_POINT <\/td><\/tr><\/table><\/div><\/body><\/html>","<html><head><link rel=\"stylesheet\" type=\"text/css\" href=\"lib/popup/popup.css\"><\/head><body><div class=\"scrollableContainer\"><table class=\"popup scrollable\" id=\"popup\"><tr class='coord'><td><\/td><td><b>Feature ID<\/b><\/td><td align='right'>5059 <\/td><\/tr><tr class='alt'><td>1<\/td><td><b>Site.Site <\/b><\/td><td align='right'>RR05-5G <\/td><\/tr><tr><td>2<\/td><td><b>Protocol <\/b><\/td><td align='right'>CABIN - Open Water <\/td><\/tr><tr class='alt'><td>3<\/td><td><b>Protocole <\/b><\/td><td align='right'>RCBA - Eaux libres <\/td><\/tr><tr><td>4<\/td><td><b>JulianDay.JourJulian <\/b><\/td><td align='right'>256 <\/td><\/tr><tr class='alt'><td>5<\/td><td><b>Year.Année <\/b><\/td><td align='right'>2005 <\/td><\/tr><tr><td>6<\/td><td><b>SiteDescription.Descriptiondusite <\/b><\/td><td align='right'> <\/td><\/tr><tr class='alt'><td>7<\/td><td><b>SampleNumber.Numérod.échantillon. <\/b><\/td><td align='right'>1 <\/td><\/tr><tr><td>8<\/td><td><b>Status.État <\/b><\/td><td align='right'>Test <\/td><\/tr><tr class='alt'><td>9<\/td><td><b>status <\/b><\/td><td align='right'>2 <\/td><\/tr><tr><td>10<\/td><td><b>QAQC <\/b><\/td><td align='right'>False <\/td><\/tr><tr class='alt'><td>11<\/td><td><b>Type.Type <\/b><\/td><td align='right'>Sediment Chemistry <\/td><\/tr><tr><td>12<\/td><td><b>Variable <\/b><\/td><td align='right'>TP <\/td><\/tr><tr class='alt'><td>13<\/td><td><b>VariableDescription <\/b><\/td><td align='right'>Total Phosphorus in sediment <\/td><\/tr><tr><td>14<\/td><td><b>VariableFr <\/b><\/td><td align='right'>PT <\/td><\/tr><tr class='alt'><td>15<\/td><td><b>DescriptiondelaVariable <\/b><\/td><td align='right'>Phosphore total dans le sédiment <\/td><\/tr><tr><td>16<\/td><td><b>Unit.Unité <\/b><\/td><td align='right'>ppm <\/td><\/tr><tr class='alt'><td>17<\/td><td><b>Value.Valeur <\/b><\/td><td align='right'>2590 <\/td><\/tr><tr><td>18<\/td><td><b>MDL <\/b><\/td><td align='right'>NA <\/td><\/tr><tr class='alt'><td>19<\/td><td><b>Computed.Calculé <\/b><\/td><td align='right'>NA <\/td><\/tr><tr><td>20<\/td><td><b>Note.Remarque <\/b><\/td><td align='right'> <\/td><\/tr><tr class='alt'><td>21<\/td><td><b>depth <\/b><\/td><td align='right'>22.2 <\/td><\/tr><tr><td>22<\/td><td><b>geometry <\/b><\/td><td align='right'>sfc_POINT <\/td><\/tr><\/table><\/div><\/body><\/html>","<html><head><link rel=\"stylesheet\" type=\"text/css\" href=\"lib/popup/popup.css\"><\/head><body><div class=\"scrollableContainer\"><table class=\"popup scrollable\" id=\"popup\"><tr class='coord'><td><\/td><td><b>Feature ID<\/b><\/td><td align='right'>5137 <\/td><\/tr><tr class='alt'><td>1<\/td><td><b>Site.Site <\/b><\/td><td align='right'>RR05-6A <\/td><\/tr><tr><td>2<\/td><td><b>Protocol <\/b><\/td><td align='right'>CABIN - Open Water <\/td><\/tr><tr class='alt'><td>3<\/td><td><b>Protocole <\/b><\/td><td align='right'>RCBA - Eaux libres <\/td><\/tr><tr><td>4<\/td><td><b>JulianDay.JourJulian <\/b><\/td><td align='right'>256 <\/td><\/tr><tr class='alt'><td>5<\/td><td><b>Year.Année <\/b><\/td><td align='right'>2005 <\/td><\/tr><tr><td>6<\/td><td><b>SiteDescription.Descriptiondusite <\/b><\/td><td align='right'> <\/td><\/tr><tr class='alt'><td>7<\/td><td><b>SampleNumber.Numérod.échantillon. <\/b><\/td><td align='right'>1 <\/td><\/tr><tr><td>8<\/td><td><b>Status.État <\/b><\/td><td align='right'>Test <\/td><\/tr><tr class='alt'><td>9<\/td><td><b>status <\/b><\/td><td align='right'>2 <\/td><\/tr><tr><td>10<\/td><td><b>QAQC <\/b><\/td><td align='right'>False <\/td><\/tr><tr class='alt'><td>11<\/td><td><b>Type.Type <\/b><\/td><td align='right'>Sediment Chemistry <\/td><\/tr><tr><td>12<\/td><td><b>Variable <\/b><\/td><td align='right'>TP <\/td><\/tr><tr class='alt'><td>13<\/td><td><b>VariableDescription <\/b><\/td><td align='right'>Total Phosphorus in sediment <\/td><\/tr><tr><td>14<\/td><td><b>VariableFr <\/b><\/td><td align='right'>PT <\/td><\/tr><tr class='alt'><td>15<\/td><td><b>DescriptiondelaVariable <\/b><\/td><td align='right'>Phosphore total dans le sédiment <\/td><\/tr><tr><td>16<\/td><td><b>Unit.Unité <\/b><\/td><td align='right'>ppm <\/td><\/tr><tr class='alt'><td>17<\/td><td><b>Value.Valeur <\/b><\/td><td align='right'>1290 <\/td><\/tr><tr><td>18<\/td><td><b>MDL <\/b><\/td><td align='right'>NA <\/td><\/tr><tr class='alt'><td>19<\/td><td><b>Computed.Calculé <\/b><\/td><td align='right'>NA <\/td><\/tr><tr><td>20<\/td><td><b>Note.Remarque <\/b><\/td><td align='right'> <\/td><\/tr><tr class='alt'><td>21<\/td><td><b>depth <\/b><\/td><td align='right'>8.5 <\/td><\/tr><tr><td>22<\/td><td><b>geometry <\/b><\/td><td align='right'>sfc_POINT <\/td><\/tr><\/table><\/div><\/body><\/html>","<html><head><link rel=\"stylesheet\" type=\"text/css\" href=\"lib/popup/popup.css\"><\/head><body><div class=\"scrollableContainer\"><table class=\"popup scrollable\" id=\"popup\"><tr class='coord'><td><\/td><td><b>Feature ID<\/b><\/td><td align='right'>5191 <\/td><\/tr><tr class='alt'><td>1<\/td><td><b>Site.Site <\/b><\/td><td align='right'>RR05-6B <\/td><\/tr><tr><td>2<\/td><td><b>Protocol <\/b><\/td><td align='right'>CABIN - Open Water <\/td><\/tr><tr class='alt'><td>3<\/td><td><b>Protocole <\/b><\/td><td align='right'>RCBA - Eaux libres <\/td><\/tr><tr><td>4<\/td><td><b>JulianDay.JourJulian <\/b><\/td><td align='right'>256 <\/td><\/tr><tr class='alt'><td>5<\/td><td><b>Year.Année <\/b><\/td><td align='right'>2005 <\/td><\/tr><tr><td>6<\/td><td><b>SiteDescription.Descriptiondusite <\/b><\/td><td align='right'> <\/td><\/tr><tr class='alt'><td>7<\/td><td><b>SampleNumber.Numérod.échantillon. <\/b><\/td><td align='right'>1 <\/td><\/tr><tr><td>8<\/td><td><b>Status.État <\/b><\/td><td align='right'>Test <\/td><\/tr><tr class='alt'><td>9<\/td><td><b>status <\/b><\/td><td align='right'>2 <\/td><\/tr><tr><td>10<\/td><td><b>QAQC <\/b><\/td><td align='right'>False <\/td><\/tr><tr class='alt'><td>11<\/td><td><b>Type.Type <\/b><\/td><td align='right'>Sediment Chemistry <\/td><\/tr><tr><td>12<\/td><td><b>Variable <\/b><\/td><td align='right'>TP <\/td><\/tr><tr class='alt'><td>13<\/td><td><b>VariableDescription <\/b><\/td><td align='right'>Total Phosphorus in sediment <\/td><\/tr><tr><td>14<\/td><td><b>VariableFr <\/b><\/td><td align='right'>PT <\/td><\/tr><tr class='alt'><td>15<\/td><td><b>DescriptiondelaVariable <\/b><\/td><td align='right'>Phosphore total dans le sédiment <\/td><\/tr><tr><td>16<\/td><td><b>Unit.Unité <\/b><\/td><td align='right'>ppm <\/td><\/tr><tr class='alt'><td>17<\/td><td><b>Value.Valeur <\/b><\/td><td align='right'>1240 <\/td><\/tr><tr><td>18<\/td><td><b>MDL <\/b><\/td><td align='right'>NA <\/td><\/tr><tr class='alt'><td>19<\/td><td><b>Computed.Calculé <\/b><\/td><td align='right'>NA <\/td><\/tr><tr><td>20<\/td><td><b>Note.Remarque <\/b><\/td><td align='right'> <\/td><\/tr><tr class='alt'><td>21<\/td><td><b>depth <\/b><\/td><td align='right'>8.5 <\/td><\/tr><tr><td>22<\/td><td><b>geometry <\/b><\/td><td align='right'>sfc_POINT <\/td><\/tr><\/table><\/div><\/body><\/html>","<html><head><link rel=\"stylesheet\" type=\"text/css\" href=\"lib/popup/popup.css\"><\/head><body><div class=\"scrollableContainer\"><table class=\"popup scrollable\" id=\"popup\"><tr class='coord'><td><\/td><td><b>Feature ID<\/b><\/td><td align='right'>5245 <\/td><\/tr><tr class='alt'><td>1<\/td><td><b>Site.Site <\/b><\/td><td align='right'>RR05-6C <\/td><\/tr><tr><td>2<\/td><td><b>Protocol <\/b><\/td><td align='right'>CABIN - Open Water <\/td><\/tr><tr class='alt'><td>3<\/td><td><b>Protocole <\/b><\/td><td align='right'>RCBA - Eaux libres <\/td><\/tr><tr><td>4<\/td><td><b>JulianDay.JourJulian <\/b><\/td><td align='right'>256 <\/td><\/tr><tr class='alt'><td>5<\/td><td><b>Year.Année <\/b><\/td><td align='right'>2005 <\/td><\/tr><tr><td>6<\/td><td><b>SiteDescription.Descriptiondusite <\/b><\/td><td align='right'> <\/td><\/tr><tr class='alt'><td>7<\/td><td><b>SampleNumber.Numérod.échantillon. <\/b><\/td><td align='right'>1 <\/td><\/tr><tr><td>8<\/td><td><b>Status.État <\/b><\/td><td align='right'>Test <\/td><\/tr><tr class='alt'><td>9<\/td><td><b>status <\/b><\/td><td align='right'>2 <\/td><\/tr><tr><td>10<\/td><td><b>QAQC <\/b><\/td><td align='right'>False <\/td><\/tr><tr class='alt'><td>11<\/td><td><b>Type.Type <\/b><\/td><td align='right'>Sediment Chemistry <\/td><\/tr><tr><td>12<\/td><td><b>Variable <\/b><\/td><td align='right'>TP <\/td><\/tr><tr class='alt'><td>13<\/td><td><b>VariableDescription <\/b><\/td><td align='right'>Total Phosphorus in sediment <\/td><\/tr><tr><td>14<\/td><td><b>VariableFr <\/b><\/td><td align='right'>PT <\/td><\/tr><tr class='alt'><td>15<\/td><td><b>DescriptiondelaVariable <\/b><\/td><td align='right'>Phosphore total dans le sédiment <\/td><\/tr><tr><td>16<\/td><td><b>Unit.Unité <\/b><\/td><td align='right'>ppm <\/td><\/tr><tr class='alt'><td>17<\/td><td><b>Value.Valeur <\/b><\/td><td align='right'>2180 <\/td><\/tr><tr><td>18<\/td><td><b>MDL <\/b><\/td><td align='right'>NA <\/td><\/tr><tr class='alt'><td>19<\/td><td><b>Computed.Calculé <\/b><\/td><td align='right'>NA <\/td><\/tr><tr><td>20<\/td><td><b>Note.Remarque <\/b><\/td><td align='right'> <\/td><\/tr><tr class='alt'><td>21<\/td><td><b>depth <\/b><\/td><td align='right'>24.7 <\/td><\/tr><tr><td>22<\/td><td><b>geometry <\/b><\/td><td align='right'>sfc_POINT <\/td><\/tr><\/table><\/div><\/body><\/html>","<html><head><link rel=\"stylesheet\" type=\"text/css\" href=\"lib/popup/popup.css\"><\/head><body><div class=\"scrollableContainer\"><table class=\"popup scrollable\" id=\"popup\"><tr class='coord'><td><\/td><td><b>Feature ID<\/b><\/td><td align='right'>5299 <\/td><\/tr><tr class='alt'><td>1<\/td><td><b>Site.Site <\/b><\/td><td align='right'>RR05-6D <\/td><\/tr><tr><td>2<\/td><td><b>Protocol <\/b><\/td><td align='right'>CABIN - Open Water <\/td><\/tr><tr class='alt'><td>3<\/td><td><b>Protocole <\/b><\/td><td align='right'>RCBA - Eaux libres <\/td><\/tr><tr><td>4<\/td><td><b>JulianDay.JourJulian <\/b><\/td><td align='right'>256 <\/td><\/tr><tr class='alt'><td>5<\/td><td><b>Year.Année <\/b><\/td><td align='right'>2005 <\/td><\/tr><tr><td>6<\/td><td><b>SiteDescription.Descriptiondusite <\/b><\/td><td align='right'> <\/td><\/tr><tr class='alt'><td>7<\/td><td><b>SampleNumber.Numérod.échantillon. <\/b><\/td><td align='right'>1 <\/td><\/tr><tr><td>8<\/td><td><b>Status.État <\/b><\/td><td align='right'>Test <\/td><\/tr><tr class='alt'><td>9<\/td><td><b>status <\/b><\/td><td align='right'>2 <\/td><\/tr><tr><td>10<\/td><td><b>QAQC <\/b><\/td><td align='right'>False <\/td><\/tr><tr class='alt'><td>11<\/td><td><b>Type.Type <\/b><\/td><td align='right'>Sediment Chemistry <\/td><\/tr><tr><td>12<\/td><td><b>Variable <\/b><\/td><td align='right'>TP <\/td><\/tr><tr class='alt'><td>13<\/td><td><b>VariableDescription <\/b><\/td><td align='right'>Total Phosphorus in sediment <\/td><\/tr><tr><td>14<\/td><td><b>VariableFr <\/b><\/td><td align='right'>PT <\/td><\/tr><tr class='alt'><td>15<\/td><td><b>DescriptiondelaVariable <\/b><\/td><td align='right'>Phosphore total dans le sédiment <\/td><\/tr><tr><td>16<\/td><td><b>Unit.Unité <\/b><\/td><td align='right'>ppm <\/td><\/tr><tr class='alt'><td>17<\/td><td><b>Value.Valeur <\/b><\/td><td align='right'>2110 <\/td><\/tr><tr><td>18<\/td><td><b>MDL <\/b><\/td><td align='right'>NA <\/td><\/tr><tr class='alt'><td>19<\/td><td><b>Computed.Calculé <\/b><\/td><td align='right'>NA <\/td><\/tr><tr><td>20<\/td><td><b>Note.Remarque <\/b><\/td><td align='right'> <\/td><\/tr><tr class='alt'><td>21<\/td><td><b>depth <\/b><\/td><td align='right'>22.3 <\/td><\/tr><tr><td>22<\/td><td><b>geometry <\/b><\/td><td align='right'>sfc_POINT <\/td><\/tr><\/table><\/div><\/body><\/html>","<html><head><link rel=\"stylesheet\" type=\"text/css\" href=\"lib/popup/popup.css\"><\/head><body><div class=\"scrollableContainer\"><table class=\"popup scrollable\" id=\"popup\"><tr class='coord'><td><\/td><td><b>Feature ID<\/b><\/td><td align='right'>5353 <\/td><\/tr><tr class='alt'><td>1<\/td><td><b>Site.Site <\/b><\/td><td align='right'>RR05-6E <\/td><\/tr><tr><td>2<\/td><td><b>Protocol <\/b><\/td><td align='right'>CABIN - Open Water <\/td><\/tr><tr class='alt'><td>3<\/td><td><b>Protocole <\/b><\/td><td align='right'>RCBA - Eaux libres <\/td><\/tr><tr><td>4<\/td><td><b>JulianDay.JourJulian <\/b><\/td><td align='right'>256 <\/td><\/tr><tr class='alt'><td>5<\/td><td><b>Year.Année <\/b><\/td><td align='right'>2005 <\/td><\/tr><tr><td>6<\/td><td><b>SiteDescription.Descriptiondusite <\/b><\/td><td align='right'> <\/td><\/tr><tr class='alt'><td>7<\/td><td><b>SampleNumber.Numérod.échantillon. <\/b><\/td><td align='right'>1 <\/td><\/tr><tr><td>8<\/td><td><b>Status.État <\/b><\/td><td align='right'>Test <\/td><\/tr><tr class='alt'><td>9<\/td><td><b>status <\/b><\/td><td align='right'>2 <\/td><\/tr><tr><td>10<\/td><td><b>QAQC <\/b><\/td><td align='right'>False <\/td><\/tr><tr class='alt'><td>11<\/td><td><b>Type.Type <\/b><\/td><td align='right'>Sediment Chemistry <\/td><\/tr><tr><td>12<\/td><td><b>Variable <\/b><\/td><td align='right'>TP <\/td><\/tr><tr class='alt'><td>13<\/td><td><b>VariableDescription <\/b><\/td><td align='right'>Total Phosphorus in sediment <\/td><\/tr><tr><td>14<\/td><td><b>VariableFr <\/b><\/td><td align='right'>PT <\/td><\/tr><tr class='alt'><td>15<\/td><td><b>DescriptiondelaVariable <\/b><\/td><td align='right'>Phosphore total dans le sédiment <\/td><\/tr><tr><td>16<\/td><td><b>Unit.Unité <\/b><\/td><td align='right'>ppm <\/td><\/tr><tr class='alt'><td>17<\/td><td><b>Value.Valeur <\/b><\/td><td align='right'>2940 <\/td><\/tr><tr><td>18<\/td><td><b>MDL <\/b><\/td><td align='right'>NA <\/td><\/tr><tr class='alt'><td>19<\/td><td><b>Computed.Calculé <\/b><\/td><td align='right'>NA <\/td><\/tr><tr><td>20<\/td><td><b>Note.Remarque <\/b><\/td><td align='right'> <\/td><\/tr><tr class='alt'><td>21<\/td><td><b>depth <\/b><\/td><td align='right'>23.3 <\/td><\/tr><tr><td>22<\/td><td><b>geometry <\/b><\/td><td align='right'>sfc_POINT <\/td><\/tr><\/table><\/div><\/body><\/html>","<html><head><link rel=\"stylesheet\" type=\"text/css\" href=\"lib/popup/popup.css\"><\/head><body><div class=\"scrollableContainer\"><table class=\"popup scrollable\" id=\"popup\"><tr class='coord'><td><\/td><td><b>Feature ID<\/b><\/td><td align='right'>5407 <\/td><\/tr><tr class='alt'><td>1<\/td><td><b>Site.Site <\/b><\/td><td align='right'>RR05-6F <\/td><\/tr><tr><td>2<\/td><td><b>Protocol <\/b><\/td><td align='right'>CABIN - Open Water <\/td><\/tr><tr class='alt'><td>3<\/td><td><b>Protocole <\/b><\/td><td align='right'>RCBA - Eaux libres <\/td><\/tr><tr><td>4<\/td><td><b>JulianDay.JourJulian <\/b><\/td><td align='right'>256 <\/td><\/tr><tr class='alt'><td>5<\/td><td><b>Year.Année <\/b><\/td><td align='right'>2005 <\/td><\/tr><tr><td>6<\/td><td><b>SiteDescription.Descriptiondusite <\/b><\/td><td align='right'> <\/td><\/tr><tr class='alt'><td>7<\/td><td><b>SampleNumber.Numérod.échantillon. <\/b><\/td><td align='right'>1 <\/td><\/tr><tr><td>8<\/td><td><b>Status.État <\/b><\/td><td align='right'>Test <\/td><\/tr><tr class='alt'><td>9<\/td><td><b>status <\/b><\/td><td align='right'>2 <\/td><\/tr><tr><td>10<\/td><td><b>QAQC <\/b><\/td><td align='right'>False <\/td><\/tr><tr class='alt'><td>11<\/td><td><b>Type.Type <\/b><\/td><td align='right'>Sediment Chemistry <\/td><\/tr><tr><td>12<\/td><td><b>Variable <\/b><\/td><td align='right'>TP <\/td><\/tr><tr class='alt'><td>13<\/td><td><b>VariableDescription <\/b><\/td><td align='right'>Total Phosphorus in sediment <\/td><\/tr><tr><td>14<\/td><td><b>VariableFr <\/b><\/td><td align='right'>PT <\/td><\/tr><tr class='alt'><td>15<\/td><td><b>DescriptiondelaVariable <\/b><\/td><td align='right'>Phosphore total dans le sédiment <\/td><\/tr><tr><td>16<\/td><td><b>Unit.Unité <\/b><\/td><td align='right'>ppm <\/td><\/tr><tr class='alt'><td>17<\/td><td><b>Value.Valeur <\/b><\/td><td align='right'>2880 <\/td><\/tr><tr><td>18<\/td><td><b>MDL <\/b><\/td><td align='right'>NA <\/td><\/tr><tr class='alt'><td>19<\/td><td><b>Computed.Calculé <\/b><\/td><td align='right'>NA <\/td><\/tr><tr><td>20<\/td><td><b>Note.Remarque <\/b><\/td><td align='right'> <\/td><\/tr><tr class='alt'><td>21<\/td><td><b>depth <\/b><\/td><td align='right'>22.3 <\/td><\/tr><tr><td>22<\/td><td><b>geometry <\/b><\/td><td align='right'>sfc_POINT <\/td><\/tr><\/table><\/div><\/body><\/html>","<html><head><link rel=\"stylesheet\" type=\"text/css\" href=\"lib/popup/popup.css\"><\/head><body><div class=\"scrollableContainer\"><table class=\"popup scrollable\" id=\"popup\"><tr class='coord'><td><\/td><td><b>Feature ID<\/b><\/td><td align='right'>6109 <\/td><\/tr><tr class='alt'><td>1<\/td><td><b>Site.Site <\/b><\/td><td align='right'>RR74(2005) <\/td><\/tr><tr><td>2<\/td><td><b>Protocol <\/b><\/td><td align='right'>CABIN - Open Water <\/td><\/tr><tr class='alt'><td>3<\/td><td><b>Protocole <\/b><\/td><td align='right'>RCBA - Eaux libres <\/td><\/tr><tr><td>4<\/td><td><b>JulianDay.JourJulian <\/b><\/td><td align='right'>250 <\/td><\/tr><tr class='alt'><td>5<\/td><td><b>Year.Année <\/b><\/td><td align='right'>2005 <\/td><\/tr><tr><td>6<\/td><td><b>SiteDescription.Descriptiondusite <\/b><\/td><td align='right'> <\/td><\/tr><tr class='alt'><td>7<\/td><td><b>SampleNumber.Numérod.échantillon. <\/b><\/td><td align='right'>1 <\/td><\/tr><tr><td>8<\/td><td><b>Status.État <\/b><\/td><td align='right'>Test <\/td><\/tr><tr class='alt'><td>9<\/td><td><b>status <\/b><\/td><td align='right'>2 <\/td><\/tr><tr><td>10<\/td><td><b>QAQC <\/b><\/td><td align='right'>False <\/td><\/tr><tr class='alt'><td>11<\/td><td><b>Type.Type <\/b><\/td><td align='right'>Sediment Chemistry <\/td><\/tr><tr><td>12<\/td><td><b>Variable <\/b><\/td><td align='right'>TP <\/td><\/tr><tr class='alt'><td>13<\/td><td><b>VariableDescription <\/b><\/td><td align='right'>Total Phosphorus in sediment <\/td><\/tr><tr><td>14<\/td><td><b>VariableFr <\/b><\/td><td align='right'>PT <\/td><\/tr><tr class='alt'><td>15<\/td><td><b>DescriptiondelaVariable <\/b><\/td><td align='right'>Phosphore total dans le sédiment <\/td><\/tr><tr><td>16<\/td><td><b>Unit.Unité <\/b><\/td><td align='right'>ppm <\/td><\/tr><tr class='alt'><td>17<\/td><td><b>Value.Valeur <\/b><\/td><td align='right'>1980 <\/td><\/tr><tr><td>18<\/td><td><b>MDL <\/b><\/td><td align='right'>NA <\/td><\/tr><tr class='alt'><td>19<\/td><td><b>Computed.Calculé <\/b><\/td><td align='right'>NA <\/td><\/tr><tr><td>20<\/td><td><b>Note.Remarque <\/b><\/td><td align='right'> <\/td><\/tr><tr class='alt'><td>21<\/td><td><b>depth <\/b><\/td><td align='right'>4.9 <\/td><\/tr><tr><td>22<\/td><td><b>geometry <\/b><\/td><td align='right'>sfc_POINT <\/td><\/tr><\/table><\/div><\/body><\/html>"],{"maxWidth":800,"minWidth":50,"autoPan":true,"keepInView":false,"closeButton":true,"closeOnClick":true,"className":""},["2330","277","3130","2350","649","3430","1195","2200","1620","1930","2710","1990","965","1030","1220","1640","2020","2360","2030","2340","2170","3590","2000","3050","2620","2350","1980","2200","2870","2410","2370","1410","1870","2520","2745","2910","2720","2590","1290","1240","2180","2110","2940","2880","1980"],{"interactive":false,"permanent":false,"direction":"auto","opacity":1,"offset":[0,0],"textsize":"10px","textOnly":false,"className":"","sticky":true},null]},{"method":"addScaleBar","args":[{"maxWidth":100,"metric":true,"imperial":true,"updateWhenIdle":true,"position":"bottomleft"}]},{"method":"addHomeButton","args":[-79.882028961,43.2744748053999,-79.8021296293333,43.3064166664999,"Zoom to tpSP - Value.Valeur","<strong> tpSP - Value.Valeur <\/strong>","bottomright"]},{"method":"addLayersControl","args":[["CartoDB.Positron","CartoDB.DarkMatter","OpenStreetMap","Esri.WorldImagery","OpenTopoMap"],"tpSP - Value.Valeur",{"collapsed":true,"autoZIndex":true,"position":"topleft"}]},{"method":"addLegend","args":[{"colors":["#440154 , #481A6C 6.73105946272261%, #3E4989 21.8231210383338%, #2D718E 36.9151826139451%, #20958B 52.0072441895563%, #37B977 67.0993057651675%, #88D548 82.1913673407788%, #ECE51C 97.28342891639%, #FDE725 "],"labels":["500","1,000","1,500","2,000","2,500","3,000","3,500"],"na_color":null,"na_label":"NA","opacity":1,"position":"topright","type":"numeric","title":"tpSP - Value.Valeur","extra":{"p_1":0.0673105946272261,"p_n":0.9728342891639},"layerId":null,"className":"info legend","group":"tpSP - Value.Valeur"}]}],"limits":{"lat":[43.2744748053999,43.3064166664999],"lng":[-79.882028961,-79.8021296293333]}},"evals":[],"jsHooks":{"render":[{"code":"function(el, x, data) {\n return (\n function(el, x, data) {\n // get the leaflet map\n var map = this; //HTMLWidgets.find('#' + el.id);\n // we need a new div element because we have to handle\n // the mouseover output separately\n // debugger;\n function addElement () {\n // generate new div Element\n var newDiv = $(document.createElement('div'));\n // append at end of leaflet htmlwidget container\n $(el).append(newDiv);\n //provide ID and style\n newDiv.addClass('lnlt');\n newDiv.css({\n 'position': 'relative',\n 'bottomleft': '0px',\n 'background-color': 'rgba(255, 255, 255, 0.7)',\n 'box-shadow': '0 0 2px #bbb',\n 'background-clip': 'padding-box',\n 'margin': '0',\n 'padding-left': '5px',\n 'color': '#333',\n 'font': '9px/1.5 \"Helvetica Neue\", Arial, Helvetica, sans-serif',\n 'z-index': '700',\n });\n return newDiv;\n }\n\n\n // check for already existing lnlt class to not duplicate\n var lnlt = $(el).find('.lnlt');\n\n if(!lnlt.length) {\n lnlt = addElement();\n\n // grab the special div we generated in the beginning\n // and put the mousmove output there\n\n map.on('mousemove', function (e) {\n if (e.originalEvent.ctrlKey) {\n if (document.querySelector('.lnlt') === null) lnlt = addElement();\n lnlt.text(\n ' lon: ' + (e.latlng.lng).toFixed(5) +\n ' | lat: ' + (e.latlng.lat).toFixed(5) +\n ' | zoom: ' + map.getZoom() +\n ' | x: ' + L.CRS.EPSG3857.project(e.latlng).x.toFixed(0) +\n ' | y: ' + L.CRS.EPSG3857.project(e.latlng).y.toFixed(0) +\n ' | epsg: 3857 ' +\n ' | proj4: +proj=merc +a=6378137 +b=6378137 +lat_ts=0.0 +lon_0=0.0 +x_0=0.0 +y_0=0 +k=1.0 +units=m +nadgrids=@null +no_defs ');\n } else {\n if (document.querySelector('.lnlt') === null) lnlt = addElement();\n lnlt.text(\n ' lon: ' + (e.latlng.lng).toFixed(5) +\n ' | lat: ' + (e.latlng.lat).toFixed(5) +\n ' | zoom: ' + map.getZoom() + ' ');\n }\n });\n\n // remove the lnlt div when mouse leaves map\n map.on('mouseout', function (e) {\n var strip = document.querySelector('.lnlt');\n strip.remove();\n });\n\n };\n\n //$(el).keypress(67, function(e) {\n map.on('preclick', function(e) {\n if (e.originalEvent.ctrlKey) {\n if (document.querySelector('.lnlt') === null) lnlt = addElement();\n lnlt.text(\n ' lon: ' + (e.latlng.lng).toFixed(5) +\n ' | lat: ' + (e.latlng.lat).toFixed(5) +\n ' | zoom: ' + map.getZoom() + ' ');\n var txt = document.querySelector('.lnlt').textContent;\n console.log(txt);\n //txt.innerText.focus();\n //txt.select();\n setClipboardText('\"' + txt + '\"');\n }\n });\n\n //map.on('click', function (e) {\n // var txt = document.querySelector('.lnlt').textContent;\n // console.log(txt);\n // //txt.innerText.focus();\n // //txt.select();\n // setClipboardText(txt);\n //});\n\n function setClipboardText(text){\n var id = 'mycustom-clipboard-textarea-hidden-id';\n var existsTextarea = document.getElementById(id);\n\n if(!existsTextarea){\n console.log('Creating textarea');\n var textarea = document.createElement('textarea');\n textarea.id = id;\n // Place in top-left corner of screen regardless of scroll position.\n textarea.style.position = 'fixed';\n textarea.style.top = 0;\n textarea.style.left = 0;\n\n // Ensure it has a small width and height. Setting to 1px / 1em\n // doesn't work as this gives a negative w/h on some browsers.\n textarea.style.width = '1px';\n textarea.style.height = '1px';\n\n // We don't need padding, reducing the size if it does flash render.\n textarea.style.padding = 0;\n\n // Clean up any borders.\n textarea.style.border = 'none';\n textarea.style.outline = 'none';\n textarea.style.boxShadow = 'none';\n\n // Avoid flash of white box if rendered for any reason.\n textarea.style.background = 'transparent';\n document.querySelector('body').appendChild(textarea);\n console.log('The textarea now exists :)');\n existsTextarea = document.getElementById(id);\n }else{\n console.log('The textarea already exists :3')\n }\n\n existsTextarea.value = text;\n existsTextarea.select();\n\n try {\n var status = document.execCommand('copy');\n if(!status){\n console.error('Cannot copy text');\n }else{\n console.log('The text is now on the clipboard');\n }\n } catch (err) {\n console.log('Unable to copy.');\n }\n }\n\n\n }\n ).call(this.getMap(), el, x, data);\n}","data":null}]}}</script> --- # Building an empirical variogram ## Step 1 - Study spatial autocorrelation ### Lagged scatter plot (take 1) Lagged scatter plot draw point pairs at a specific separation distances. --- # Building an empirical variogram <img src="index_files/figure-html/unnamed-chunk-5-1.png" style="display: block; margin: auto;" /> .small[There seems to be some structure among samples at distances between 0 and 1000 m.] --- # Building an empirical variogram ## Step 1 - Study spatial autocorrelation ### Lagged scatter plot (take 2) Lets look at finer bins within the first 2000 m (just to be on the safe side) --- # Building an empirical variogram <img src="index_files/figure-html/unnamed-chunk-6-1.png" style="display: block; margin: auto;" /> This results confirms that there is some autocorrelation structure within the first 1000 m. --- # Building an empirical variogram ## Step 2 - Cloud variogram Construct a cloud variogram with a maximum distance of 1500 m (again just to be on the safe side). <img src="index_files/figure-html/unnamed-chunk-7-1.png" style="display: block; margin: auto;" /> --- # Building an empirical variogram ## Step 3 - Check for outliers ```r outliers <- plot(varioCloud, digitize = TRUE) ``` <img src="assets/img/Outlier.png" width="90%" /> --- # Building an empirical variogram ## Step 4 - Remove outlier (if any) Here is an example of how to do this ```r tpSP <- tpSP[-6,] ``` --- # Building an empirical variogram ## Step 5 - Redraw the cloud variogram ```r varioCloud <- variogram(Value.Valeur ~ 1, data = tpSP, cloud= TRUE,cutoff = 1500) plot(varioCloud) ``` <img src="index_files/figure-html/unnamed-chunk-12-1.png" style="display: block; margin: auto;" /> --- # Building an empirical variogram ## Step 6 - Define the bins Recall that : - More bins at small distances - There should be enough values in each bin ```r # Define bin limits binLimit <- c(seq(0,1000,by = 100), seq(1200,1500, by = 200)) # Construct variogram varioEmpGood <- variogram(Value.Valeur ~ 1, data = tpSP, cutoff = 1500, boundaries = binLimit) ``` --- # Building an empirical variogram ## Step 6 - Define the bins ```r plot(varioEmpGood, cex = 2, pch = 19) ``` <img src="index_files/figure-html/unnamed-chunk-14-1.png" style="display: block; margin: auto;" /> --- # Building an empirical variogram ## Step 6 - Define the bins ```r head(varioEmpGood) ``` ``` ## np dist gamma dir.hor dir.ver id ## 1 7 158.9042 155742.9 0 0 var1 ## 2 38 253.5557 199650.7 0 0 var1 ## 3 33 361.2278 291768.2 0 0 var1 ## 4 35 459.2204 286853.9 0 0 var1 ## 5 59 539.0844 283460.9 0 0 var1 ## 6 44 642.1258 396474.4 0 0 var1 ``` --- class: inverse, center, middle # Model variogram <html><div style='float:left'></div><hr color='#EB811B' size=1px width=720px></html> --- # Model variogram The model variogram fits the empirical variogram. Variogram (empirical and model alike) have a typical structure, to which some terminology is typically used. <img src="https://aegis4048.github.io/jupyter_images/basic_variogram.png" width="90%" /> --- # Type of model variogram There exist many types of model variograms. In the `gstat` package, 17 different types of model variograms have been implemented. .pull-left[ - `Nug` : nugget - `Exp` : exponential - `Sph` : spherical - `Gau` : gaussian - `Exclass` : Exponential class - `Mat` : Matérn - `Ste` : Stein - `Cir` : circular - `Lin` : linear ] .pull-right[ - `Bes` : bessel - `Pen` : pentaspherical - `Per` : periodic - `Hol` : hole - `Log` : logarithmic - `Pow` : power - `Spl` : spline - `Leg` : Legendre - `Err` : Measurement error - `Int` : Intercept ] --- # Type of model variogram <img src="index_files/figure-html/unnamed-chunk-17-1.png" style="display: block; margin: auto;" /> --- # The Spherical model <img src="index_files/figure-html/unnamed-chunk-18-1.png" style="display: block; margin: auto;" /> .small[ `$$\gamma(\boldsymbol{h}) = \left\{\begin{align} \sigma^2_0 + \sigma^2_c\left(\frac{3\boldsymbol{h}}{2\nu}-\frac{1\boldsymbol{h^3}}{2\nu^3}\right), &\qquad 0 < \boldsymbol{h} \le \nu\\ \sigma^2_0 + \sigma^2_c, &\qquad \boldsymbol{h} \ge \nu\\ \end{align}\right.$$` - `\(\boldsymbol{h}\)` is the distance between two samples - `\(\sigma^2_0 + \sigma^2_c\)` is the variance (sill) - `\(\sigma^2_0\)` is the nugget effect - `\(\nu\)` is the effective range **Note** : When `\(\sigma^2_0 = 1\)` and `\(\sigma^2_c = 1\)` this model is called the *Standard Spherical Model*. ] --- # The Exponential model <img src="index_files/figure-html/unnamed-chunk-19-1.png" style="display: block; margin: auto;" /> `$$\gamma(\boldsymbol{h}) = \sigma^2_0 + \sigma^2_c\left(1 - e^{-\boldsymbol{h}/\nu}\right)$$` - `\(\boldsymbol{h}\)` is the distance between two samples - `\(\sigma^2_0 + \sigma^2_c\)` is the variance (sill) - `\(\sigma^2_0\)` is the nugget effect - `\(\nu\)` is the effective range --- # The Matérn model <img src="index_files/figure-html/unnamed-chunk-20-1.png" style="display: block; margin: auto;" /> .small[ `$$\gamma(\boldsymbol{h}) = \frac{\sigma^2}{2^{\nu-1}\Gamma(\nu)}\left(\kappa \boldsymbol{h}\right)^\nu K_\nu\left(\kappa \boldsymbol{h}\right)$$` ] where - `\(\boldsymbol{h}\)` is the distance between two samples - `\(\sigma^2\)` is the variance (sill) - `\(\nu\)` is the range - `\(\kappa\)` is scaling parameter (always `\(> 0\)`) - `\(K_\nu\)` is a Bessel function of the second kind of order `\(\nu\)` --- # Choosing the right model variogram Choosing the right model variogram depends on the problem at hand. However, there are a few important aspects worth knowing ## General aspects - The variogram chosen should relate to the question you are asking - This is not only curve fitting ## Aspects specific to a model variogram - Some doubts have been raised about the **hole** model variogram - The **spline** model variogram seems to need exceeding large range values to fit an empirical variogram properly --- # Fitting a model variogram There exist a few ways to fit a model variogram to an empirical variogram. ## Visually By trying to visually pass the best possible curve to the empirical variogram. This approach is implemented in the package `geoR` in the function `eyefit`. .Large[.red[**Not recommended**]] --- # Fitting a model variogram There exist a few ways to fit a model variogram to an empirical variogram. In the `fit.variogram` function of the `gstat` package. ## Weighting the importance of the bin Using as weight - The number of points per bin (`fit.method = 1`) `$$n_{\mathbf{h}_j}$$` - The number of points per bin divided by the variance (`fit.method = 2`) `$$\frac{n_{\mathbf{h}_j}}{\gamma(\boldsymbol h_j)^2}$$` --- # Fitting a model variogram There exist a few ways to fit a model variogram to an empirical variogram. In the `fit.variogram` function of the `gstat` package. ## Weighting the importance of the bin Using as weight - The number of points per bin divided by the squared bin size (`fit.method=7`) `$$\frac{n_{\mathbf{h}_j}}{\boldsymbol h_j^2}$$` This is the default option in `fit.variogram`. In practice, it is a technique that has been shown to work well, but is not supported by theory. --- # Fitting a model variogram There exist a few ways to fit a model variogram to an empirical variogram. In the `fit.variogram` function of the `gstat` package. ## Using ordinary least squares (OLS) The sums of squares between the model and the data is minimized (`fit.method=6`) `$$\sum\left(Z(\mathbf{s})-\widehat{Z}(\mathbf{s})\right)^2$$` --- # Fitting a model variogram ## Using restricted maximum likelihood (REML) The `fit.variogram.reml` function of the `gstat` package uses a restricted maximum likelihood (REML) approach to fit the model variogram to the empirical variogram. This is approach is rather slow and it is not recommended if there are more than 100 samples. This approach relies on all distances (pairs of points; cloud variogram) to fit the model variogram. --- # Choosing the right fitting approach The short answer is : .Large["It depends !"] .small[ Visual fitting: Use **only** to get some starting values for other model fitting approaches. `fit.method = 1` : If you want to place more emphasis on the number of points in bins. `fit.method = 2` : If you want to account for the variation of the data in bins. `fit.method = 6` : If you **do not** want to account for the size of the bins. This approach only fits the model to the points (That's it!) This may be interesting to use if the bins all have the same number of points. `fit.method = 7` : If you want to account for the size (in distance) of bins. `fit.variogram.reml` : Theoretically, this is often the best approach, but because it is slow, it becomes useless to use it for moderate to large datasets (more 100 samples). ] --- # Fitting a model variogram in practice **Total Phosphorus in sediment in the Harbour of Hamilton (Ontario)** <div id="htmlwidget-4d17845761fb8d23d9ed" style="width:100%;height:55%;" class="leaflet html-widget"></div> <script type="application/json" data-for="htmlwidget-4d17845761fb8d23d9ed">{"x":{"options":{"minZoom":1,"maxZoom":100,"crs":{"crsClass":"L.CRS.EPSG3857","code":null,"proj4def":null,"projectedBounds":null,"options":{}},"preferCanvas":false,"bounceAtZoomLimits":false,"maxBounds":[[[-90,-370]],[[90,370]]]},"calls":[{"method":"addProviderTiles","args":["CartoDB.Positron",1,"CartoDB.Positron",{"errorTileUrl":"","noWrap":false,"detectRetina":false}]},{"method":"addProviderTiles","args":["CartoDB.DarkMatter",2,"CartoDB.DarkMatter",{"errorTileUrl":"","noWrap":false,"detectRetina":false}]},{"method":"addProviderTiles","args":["OpenStreetMap",3,"OpenStreetMap",{"errorTileUrl":"","noWrap":false,"detectRetina":false}]},{"method":"addProviderTiles","args":["Esri.WorldImagery",4,"Esri.WorldImagery",{"errorTileUrl":"","noWrap":false,"detectRetina":false}]},{"method":"addProviderTiles","args":["OpenTopoMap",5,"OpenTopoMap",{"errorTileUrl":"","noWrap":false,"detectRetina":false}]},{"method":"createMapPane","args":["point",440]},{"method":"addCircleMarkers","args":[[43.2894444446666,43.3064166664999,43.3006666666666,43.2886333333999,43.3038777777999,43.2962960779999,43.2849999996665,43.2744748053999,43.2760515329999,43.2751805557499,43.287919823409,43.2791666669999,43.2777777779999,43.2749999999999,43.2769444439999,43.2783333329999,43.2794444439999,43.2808333329999,43.2819444439999,43.2772222219999,43.2786111109999,43.2805555559999,43.2822222219999,43.2838888889999,43.2855555559999,43.2761111109999,43.2780555559999,43.2799999999999,43.2822222219999,43.2841666669999,43.2861111109999,43.2766666669999,43.2786111109999,43.2808333329999,43.2830555559999,43.2852777779999,43.2874999999999,43.2897222219999,43.2786111109999,43.2811111109999,43.2833333329999,43.2855555559999,43.2877777779999,43.2899999999999,43.2755555559999],[-79.8021296293333,-79.8259583335,-79.8161666666667,-79.811972222,-79.8321923108,-79.8496619388,-79.8720925923333,-79.882028961,-79.8487415724,-79.84546527825,-79.8376767679091,-79.8725,-79.855277778,-79.838611111,-79.842222222,-79.845,-79.85,-79.85,-79.8525,-79.838055556,-79.840277778,-79.842222222,-79.844166667,-79.846388889,-79.848333333,-79.835,-79.836111111,-79.8375,-79.838888889,-79.840277778,-79.841666667,-79.833333333,-79.833888889,-79.834444444,-79.835,-79.835555556,-79.836388889,-79.836944444,-79.831388889,-79.831388889,-79.831111111,-79.830833333,-79.830694444,-79.830555556,-79.836388889],6,null,"tpSP - Value.Valeur",{"crs":{"crsClass":"L.CRS.EPSG3857","code":null,"proj4def":null,"projectedBounds":null,"options":{}},"pane":"point","stroke":true,"color":"#333333","weight":2,"opacity":[0.9,0.9,0.9,0.9,0.9,0.9,0.9,0.9,0.9,0.9,0.9,0.9,0.9,0.9,0.9,0.9,0.9,0.9,0.9,0.9,0.9,0.9,0.9,0.9,0.9,0.9,0.9,0.9,0.9,0.9,0.9,0.9,0.9,0.9,0.9,0.9,0.9,0.9,0.9,0.9,0.9,0.9,0.9,0.9,0.9],"fill":true,"fillColor":["#25AA83","#471366","#8CD645","#25AA83","#46337F","#BDDF26","#355E8D","#1F9F88","#287C8E","#228D8D","#47C06F","#20938C","#3C508B","#3C508B","#32648E","#287C8E","#20938C","#25AA83","#1F998A","#25AA83","#1F9F88","#DEE318","#20938C","#7DD250","#3BBB75","#25AA83","#20938C","#1F9F88","#60CA60","#2AB07F","#25AA83","#2D708E","#228D8D","#32B67A","#53C568","#60CA60","#47C06F","#3BBB75","#32648E","#32648E","#1F9F88","#1F998A","#6ECE58","#60CA60","#20938C"],"fillOpacity":[0.6,0.6,0.6,0.6,0.6,0.6,0.6,0.6,0.6,0.6,0.6,0.6,0.6,0.6,0.6,0.6,0.6,0.6,0.6,0.6,0.6,0.6,0.6,0.6,0.6,0.6,0.6,0.6,0.6,0.6,0.6,0.6,0.6,0.6,0.6,0.6,0.6,0.6,0.6,0.6,0.6,0.6,0.6,0.6,0.6]},null,null,["<html><head><link rel=\"stylesheet\" type=\"text/css\" href=\"lib/popup/popup.css\"><\/head><body><div class=\"scrollableContainer\"><table class=\"popup scrollable\" id=\"popup\"><tr class='coord'><td><\/td><td><b>Feature ID<\/b><\/td><td align='right'>733 <\/td><\/tr><tr class='alt'><td>1<\/td><td><b>Site.Site <\/b><\/td><td align='right'>7005 <\/td><\/tr><tr><td>2<\/td><td><b>Protocol <\/b><\/td><td align='right'>CABIN - Open Water <\/td><\/tr><tr class='alt'><td>3<\/td><td><b>Protocole <\/b><\/td><td align='right'>RCBA - Eaux libres <\/td><\/tr><tr><td>4<\/td><td><b>JulianDay.JourJulian <\/b><\/td><td align='right'>257 <\/td><\/tr><tr class='alt'><td>5<\/td><td><b>Year.Année <\/b><\/td><td align='right'>2005 <\/td><\/tr><tr><td>6<\/td><td><b>SiteDescription.Descriptiondusite <\/b><\/td><td align='right'> <\/td><\/tr><tr class='alt'><td>7<\/td><td><b>SampleNumber.Numérod.échantillon. <\/b><\/td><td align='right'>1 <\/td><\/tr><tr><td>8<\/td><td><b>Status.État <\/b><\/td><td align='right'>Test <\/td><\/tr><tr class='alt'><td>9<\/td><td><b>status <\/b><\/td><td align='right'>2 <\/td><\/tr><tr><td>10<\/td><td><b>QAQC <\/b><\/td><td align='right'>False <\/td><\/tr><tr class='alt'><td>11<\/td><td><b>Type.Type <\/b><\/td><td align='right'>Sediment Chemistry <\/td><\/tr><tr><td>12<\/td><td><b>Variable <\/b><\/td><td align='right'>TP <\/td><\/tr><tr class='alt'><td>13<\/td><td><b>VariableDescription <\/b><\/td><td align='right'>Total Phosphorus in sediment <\/td><\/tr><tr><td>14<\/td><td><b>VariableFr <\/b><\/td><td align='right'>PT <\/td><\/tr><tr class='alt'><td>15<\/td><td><b>DescriptiondelaVariable <\/b><\/td><td align='right'>Phosphore total dans le sédiment <\/td><\/tr><tr><td>16<\/td><td><b>Unit.Unité <\/b><\/td><td align='right'>ppm <\/td><\/tr><tr class='alt'><td>17<\/td><td><b>Value.Valeur <\/b><\/td><td align='right'>2330 <\/td><\/tr><tr><td>18<\/td><td><b>MDL <\/b><\/td><td align='right'>NA <\/td><\/tr><tr class='alt'><td>19<\/td><td><b>Computed.Calculé <\/b><\/td><td align='right'>NA <\/td><\/tr><tr><td>20<\/td><td><b>Note.Remarque <\/b><\/td><td align='right'> <\/td><\/tr><tr class='alt'><td>21<\/td><td><b>depth <\/b><\/td><td align='right'>17.6 <\/td><\/tr><tr><td>22<\/td><td><b>geometry <\/b><\/td><td align='right'>sfc_POINT <\/td><\/tr><\/table><\/div><\/body><\/html>","<html><head><link rel=\"stylesheet\" type=\"text/css\" href=\"lib/popup/popup.css\"><\/head><body><div class=\"scrollableContainer\"><table class=\"popup scrollable\" id=\"popup\"><tr class='coord'><td><\/td><td><b>Feature ID<\/b><\/td><td align='right'>949 <\/td><\/tr><tr class='alt'><td>1<\/td><td><b>Site.Site <\/b><\/td><td align='right'>7008 <\/td><\/tr><tr><td>2<\/td><td><b>Protocol <\/b><\/td><td align='right'>CABIN - Open Water <\/td><\/tr><tr class='alt'><td>3<\/td><td><b>Protocole <\/b><\/td><td align='right'>RCBA - Eaux libres <\/td><\/tr><tr><td>4<\/td><td><b>JulianDay.JourJulian <\/b><\/td><td align='right'>257 <\/td><\/tr><tr class='alt'><td>5<\/td><td><b>Year.Année <\/b><\/td><td align='right'>2005 <\/td><\/tr><tr><td>6<\/td><td><b>SiteDescription.Descriptiondusite <\/b><\/td><td align='right'> <\/td><\/tr><tr class='alt'><td>7<\/td><td><b>SampleNumber.Numérod.échantillon. <\/b><\/td><td align='right'>1 <\/td><\/tr><tr><td>8<\/td><td><b>Status.État <\/b><\/td><td align='right'>Test <\/td><\/tr><tr class='alt'><td>9<\/td><td><b>status <\/b><\/td><td align='right'>2 <\/td><\/tr><tr><td>10<\/td><td><b>QAQC <\/b><\/td><td align='right'>False <\/td><\/tr><tr class='alt'><td>11<\/td><td><b>Type.Type <\/b><\/td><td align='right'>Sediment Chemistry <\/td><\/tr><tr><td>12<\/td><td><b>Variable <\/b><\/td><td align='right'>TP <\/td><\/tr><tr class='alt'><td>13<\/td><td><b>VariableDescription <\/b><\/td><td align='right'>Total Phosphorus in sediment <\/td><\/tr><tr><td>14<\/td><td><b>VariableFr <\/b><\/td><td align='right'>PT <\/td><\/tr><tr class='alt'><td>15<\/td><td><b>DescriptiondelaVariable <\/b><\/td><td align='right'>Phosphore total dans le sédiment <\/td><\/tr><tr><td>16<\/td><td><b>Unit.Unité <\/b><\/td><td align='right'>ppm <\/td><\/tr><tr class='alt'><td>17<\/td><td><b>Value.Valeur <\/b><\/td><td align='right'>277 <\/td><\/tr><tr><td>18<\/td><td><b>MDL <\/b><\/td><td align='right'>NA <\/td><\/tr><tr class='alt'><td>19<\/td><td><b>Computed.Calculé <\/b><\/td><td align='right'>NA <\/td><\/tr><tr><td>20<\/td><td><b>Note.Remarque <\/b><\/td><td align='right'> <\/td><\/tr><tr class='alt'><td>21<\/td><td><b>depth <\/b><\/td><td align='right'>1.7 <\/td><\/tr><tr><td>22<\/td><td><b>geometry <\/b><\/td><td align='right'>sfc_POINT <\/td><\/tr><\/table><\/div><\/body><\/html>","<html><head><link rel=\"stylesheet\" type=\"text/css\" href=\"lib/popup/popup.css\"><\/head><body><div class=\"scrollableContainer\"><table class=\"popup scrollable\" id=\"popup\"><tr class='coord'><td><\/td><td><b>Feature ID<\/b><\/td><td align='right'>1003 <\/td><\/tr><tr class='alt'><td>1<\/td><td><b>Site.Site <\/b><\/td><td align='right'>7009 <\/td><\/tr><tr><td>2<\/td><td><b>Protocol <\/b><\/td><td align='right'>CABIN - Open Water <\/td><\/tr><tr class='alt'><td>3<\/td><td><b>Protocole <\/b><\/td><td align='right'>RCBA - Eaux libres <\/td><\/tr><tr><td>4<\/td><td><b>JulianDay.JourJulian <\/b><\/td><td align='right'>257 <\/td><\/tr><tr class='alt'><td>5<\/td><td><b>Year.Année <\/b><\/td><td align='right'>2005 <\/td><\/tr><tr><td>6<\/td><td><b>SiteDescription.Descriptiondusite <\/b><\/td><td align='right'> <\/td><\/tr><tr class='alt'><td>7<\/td><td><b>SampleNumber.Numérod.échantillon. <\/b><\/td><td align='right'>1 <\/td><\/tr><tr><td>8<\/td><td><b>Status.État <\/b><\/td><td align='right'>Test <\/td><\/tr><tr class='alt'><td>9<\/td><td><b>status <\/b><\/td><td align='right'>2 <\/td><\/tr><tr><td>10<\/td><td><b>QAQC <\/b><\/td><td align='right'>False <\/td><\/tr><tr class='alt'><td>11<\/td><td><b>Type.Type <\/b><\/td><td align='right'>Sediment Chemistry <\/td><\/tr><tr><td>12<\/td><td><b>Variable <\/b><\/td><td align='right'>TP <\/td><\/tr><tr class='alt'><td>13<\/td><td><b>VariableDescription <\/b><\/td><td align='right'>Total Phosphorus in sediment <\/td><\/tr><tr><td>14<\/td><td><b>VariableFr <\/b><\/td><td align='right'>PT <\/td><\/tr><tr class='alt'><td>15<\/td><td><b>DescriptiondelaVariable <\/b><\/td><td align='right'>Phosphore total dans le sédiment <\/td><\/tr><tr><td>16<\/td><td><b>Unit.Unité <\/b><\/td><td align='right'>ppm <\/td><\/tr><tr class='alt'><td>17<\/td><td><b>Value.Valeur <\/b><\/td><td align='right'>3130 <\/td><\/tr><tr><td>18<\/td><td><b>MDL <\/b><\/td><td align='right'>NA <\/td><\/tr><tr class='alt'><td>19<\/td><td><b>Computed.Calculé <\/b><\/td><td align='right'>NA <\/td><\/tr><tr><td>20<\/td><td><b>Note.Remarque <\/b><\/td><td align='right'> <\/td><\/tr><tr class='alt'><td>21<\/td><td><b>depth <\/b><\/td><td align='right'>12.8 <\/td><\/tr><tr><td>22<\/td><td><b>geometry <\/b><\/td><td align='right'>sfc_POINT <\/td><\/tr><\/table><\/div><\/body><\/html>","<html><head><link rel=\"stylesheet\" type=\"text/css\" href=\"lib/popup/popup.css\"><\/head><body><div class=\"scrollableContainer\"><table class=\"popup scrollable\" id=\"popup\"><tr class='coord'><td><\/td><td><b>Feature ID<\/b><\/td><td align='right'>1057 <\/td><\/tr><tr class='alt'><td>1<\/td><td><b>Site.Site <\/b><\/td><td align='right'>7010 <\/td><\/tr><tr><td>2<\/td><td><b>Protocol <\/b><\/td><td align='right'>CABIN - Open Water <\/td><\/tr><tr class='alt'><td>3<\/td><td><b>Protocole <\/b><\/td><td align='right'>RCBA - Eaux libres <\/td><\/tr><tr><td>4<\/td><td><b>JulianDay.JourJulian <\/b><\/td><td align='right'>257 <\/td><\/tr><tr class='alt'><td>5<\/td><td><b>Year.Année <\/b><\/td><td align='right'>2005 <\/td><\/tr><tr><td>6<\/td><td><b>SiteDescription.Descriptiondusite <\/b><\/td><td align='right'> <\/td><\/tr><tr class='alt'><td>7<\/td><td><b>SampleNumber.Numérod.échantillon. <\/b><\/td><td align='right'>1 <\/td><\/tr><tr><td>8<\/td><td><b>Status.État <\/b><\/td><td align='right'>Test <\/td><\/tr><tr class='alt'><td>9<\/td><td><b>status <\/b><\/td><td align='right'>2 <\/td><\/tr><tr><td>10<\/td><td><b>QAQC <\/b><\/td><td align='right'>False <\/td><\/tr><tr class='alt'><td>11<\/td><td><b>Type.Type <\/b><\/td><td align='right'>Sediment Chemistry <\/td><\/tr><tr><td>12<\/td><td><b>Variable <\/b><\/td><td align='right'>TP <\/td><\/tr><tr class='alt'><td>13<\/td><td><b>VariableDescription <\/b><\/td><td align='right'>Total Phosphorus in sediment <\/td><\/tr><tr><td>14<\/td><td><b>VariableFr <\/b><\/td><td align='right'>PT <\/td><\/tr><tr class='alt'><td>15<\/td><td><b>DescriptiondelaVariable <\/b><\/td><td align='right'>Phosphore total dans le sédiment <\/td><\/tr><tr><td>16<\/td><td><b>Unit.Unité <\/b><\/td><td align='right'>ppm <\/td><\/tr><tr class='alt'><td>17<\/td><td><b>Value.Valeur <\/b><\/td><td align='right'>2350 <\/td><\/tr><tr><td>18<\/td><td><b>MDL <\/b><\/td><td align='right'>NA <\/td><\/tr><tr class='alt'><td>19<\/td><td><b>Computed.Calculé <\/b><\/td><td align='right'>NA <\/td><\/tr><tr><td>20<\/td><td><b>Note.Remarque <\/b><\/td><td align='right'> <\/td><\/tr><tr class='alt'><td>21<\/td><td><b>depth <\/b><\/td><td align='right'>15.6 <\/td><\/tr><tr><td>22<\/td><td><b>geometry <\/b><\/td><td align='right'>sfc_POINT <\/td><\/tr><\/table><\/div><\/body><\/html>","<html><head><link rel=\"stylesheet\" type=\"text/css\" href=\"lib/popup/popup.css\"><\/head><body><div class=\"scrollableContainer\"><table class=\"popup scrollable\" id=\"popup\"><tr class='coord'><td><\/td><td><b>Feature ID<\/b><\/td><td align='right'>1378 <\/td><\/tr><tr class='alt'><td>1<\/td><td><b>Site.Site <\/b><\/td><td align='right'>7015 <\/td><\/tr><tr><td>2<\/td><td><b>Protocol <\/b><\/td><td align='right'>CABIN - Open Water <\/td><\/tr><tr class='alt'><td>3<\/td><td><b>Protocole <\/b><\/td><td align='right'>RCBA - Eaux libres <\/td><\/tr><tr><td>4<\/td><td><b>JulianDay.JourJulian <\/b><\/td><td align='right'>257 <\/td><\/tr><tr class='alt'><td>5<\/td><td><b>Year.Année <\/b><\/td><td align='right'>2005 <\/td><\/tr><tr><td>6<\/td><td><b>SiteDescription.Descriptiondusite <\/b><\/td><td align='right'> <\/td><\/tr><tr class='alt'><td>7<\/td><td><b>SampleNumber.Numérod.échantillon. <\/b><\/td><td align='right'>1 <\/td><\/tr><tr><td>8<\/td><td><b>Status.État <\/b><\/td><td align='right'>Test <\/td><\/tr><tr class='alt'><td>9<\/td><td><b>status <\/b><\/td><td align='right'>2 <\/td><\/tr><tr><td>10<\/td><td><b>QAQC <\/b><\/td><td align='right'>False <\/td><\/tr><tr class='alt'><td>11<\/td><td><b>Type.Type <\/b><\/td><td align='right'>Sediment Chemistry <\/td><\/tr><tr><td>12<\/td><td><b>Variable <\/b><\/td><td align='right'>TP <\/td><\/tr><tr class='alt'><td>13<\/td><td><b>VariableDescription <\/b><\/td><td align='right'>Total Phosphorus in sediment <\/td><\/tr><tr><td>14<\/td><td><b>VariableFr <\/b><\/td><td align='right'>PT <\/td><\/tr><tr class='alt'><td>15<\/td><td><b>DescriptiondelaVariable <\/b><\/td><td align='right'>Phosphore total dans le sédiment <\/td><\/tr><tr><td>16<\/td><td><b>Unit.Unité <\/b><\/td><td align='right'>ppm <\/td><\/tr><tr class='alt'><td>17<\/td><td><b>Value.Valeur <\/b><\/td><td align='right'>649 <\/td><\/tr><tr><td>18<\/td><td><b>MDL <\/b><\/td><td align='right'>NA <\/td><\/tr><tr class='alt'><td>19<\/td><td><b>Computed.Calculé <\/b><\/td><td align='right'>NA <\/td><\/tr><tr><td>20<\/td><td><b>Note.Remarque <\/b><\/td><td align='right'> <\/td><\/tr><tr class='alt'><td>21<\/td><td><b>depth <\/b><\/td><td align='right'>7.9 <\/td><\/tr><tr><td>22<\/td><td><b>geometry <\/b><\/td><td align='right'>sfc_POINT <\/td><\/tr><\/table><\/div><\/body><\/html>","<html><head><link rel=\"stylesheet\" type=\"text/css\" href=\"lib/popup/popup.css\"><\/head><body><div class=\"scrollableContainer\"><table class=\"popup scrollable\" id=\"popup\"><tr class='coord'><td><\/td><td><b>Feature ID<\/b><\/td><td align='right'>1585 <\/td><\/tr><tr class='alt'><td>1<\/td><td><b>Site.Site <\/b><\/td><td align='right'>7024 <\/td><\/tr><tr><td>2<\/td><td><b>Protocol <\/b><\/td><td align='right'>CABIN - Open Water <\/td><\/tr><tr class='alt'><td>3<\/td><td><b>Protocole <\/b><\/td><td align='right'>RCBA - Eaux libres <\/td><\/tr><tr><td>4<\/td><td><b>JulianDay.JourJulian <\/b><\/td><td align='right'>257 <\/td><\/tr><tr class='alt'><td>5<\/td><td><b>Year.Année <\/b><\/td><td align='right'>2005 <\/td><\/tr><tr><td>6<\/td><td><b>SiteDescription.Descriptiondusite <\/b><\/td><td align='right'> <\/td><\/tr><tr class='alt'><td>7<\/td><td><b>SampleNumber.Numérod.échantillon. <\/b><\/td><td align='right'>1 <\/td><\/tr><tr><td>8<\/td><td><b>Status.État <\/b><\/td><td align='right'>Test <\/td><\/tr><tr class='alt'><td>9<\/td><td><b>status <\/b><\/td><td align='right'>2 <\/td><\/tr><tr><td>10<\/td><td><b>QAQC <\/b><\/td><td align='right'>False <\/td><\/tr><tr class='alt'><td>11<\/td><td><b>Type.Type <\/b><\/td><td align='right'>Sediment Chemistry <\/td><\/tr><tr><td>12<\/td><td><b>Variable <\/b><\/td><td align='right'>TP <\/td><\/tr><tr class='alt'><td>13<\/td><td><b>VariableDescription <\/b><\/td><td align='right'>Total Phosphorus in sediment <\/td><\/tr><tr><td>14<\/td><td><b>VariableFr <\/b><\/td><td align='right'>PT <\/td><\/tr><tr class='alt'><td>15<\/td><td><b>DescriptiondelaVariable <\/b><\/td><td align='right'>Phosphore total dans le sédiment <\/td><\/tr><tr><td>16<\/td><td><b>Unit.Unité <\/b><\/td><td align='right'>ppm <\/td><\/tr><tr class='alt'><td>17<\/td><td><b>Value.Valeur <\/b><\/td><td align='right'>3430 <\/td><\/tr><tr><td>18<\/td><td><b>MDL <\/b><\/td><td align='right'>NA <\/td><\/tr><tr class='alt'><td>19<\/td><td><b>Computed.Calculé <\/b><\/td><td align='right'>NA <\/td><\/tr><tr><td>20<\/td><td><b>Note.Remarque <\/b><\/td><td align='right'> <\/td><\/tr><tr class='alt'><td>21<\/td><td><b>depth <\/b><\/td><td align='right'>9.8 <\/td><\/tr><tr><td>22<\/td><td><b>geometry <\/b><\/td><td align='right'>sfc_POINT <\/td><\/tr><\/table><\/div><\/body><\/html>","<html><head><link rel=\"stylesheet\" type=\"text/css\" href=\"lib/popup/popup.css\"><\/head><body><div class=\"scrollableContainer\"><table class=\"popup scrollable\" id=\"popup\"><tr class='coord'><td><\/td><td><b>Feature ID<\/b><\/td><td align='right'>1741 <\/td><\/tr><tr class='alt'><td>1<\/td><td><b>Site.Site <\/b><\/td><td align='right'>7031 <\/td><\/tr><tr><td>2<\/td><td><b>Protocol <\/b><\/td><td align='right'>CABIN - Open Water <\/td><\/tr><tr class='alt'><td>3<\/td><td><b>Protocole <\/b><\/td><td align='right'>RCBA - Eaux libres <\/td><\/tr><tr><td>4<\/td><td><b>JulianDay.JourJulian <\/b><\/td><td align='right'>251 <\/td><\/tr><tr class='alt'><td>5<\/td><td><b>Year.Année <\/b><\/td><td align='right'>2005 <\/td><\/tr><tr><td>6<\/td><td><b>SiteDescription.Descriptiondusite <\/b><\/td><td align='right'> <\/td><\/tr><tr class='alt'><td>7<\/td><td><b>SampleNumber.Numérod.échantillon. <\/b><\/td><td align='right'>1 <\/td><\/tr><tr><td>8<\/td><td><b>Status.État <\/b><\/td><td align='right'>Test <\/td><\/tr><tr class='alt'><td>9<\/td><td><b>status <\/b><\/td><td align='right'>2 <\/td><\/tr><tr><td>10<\/td><td><b>QAQC <\/b><\/td><td align='right'>False <\/td><\/tr><tr class='alt'><td>11<\/td><td><b>Type.Type <\/b><\/td><td align='right'>Sediment Chemistry <\/td><\/tr><tr><td>12<\/td><td><b>Variable <\/b><\/td><td align='right'>TP <\/td><\/tr><tr class='alt'><td>13<\/td><td><b>VariableDescription <\/b><\/td><td align='right'>Total Phosphorus in sediment <\/td><\/tr><tr><td>14<\/td><td><b>VariableFr <\/b><\/td><td align='right'>PT <\/td><\/tr><tr class='alt'><td>15<\/td><td><b>DescriptiondelaVariable <\/b><\/td><td align='right'>Phosphore total dans le sédiment <\/td><\/tr><tr><td>16<\/td><td><b>Unit.Unité <\/b><\/td><td align='right'>ppm <\/td><\/tr><tr class='alt'><td>17<\/td><td><b>Value.Valeur <\/b><\/td><td align='right'>1195 <\/td><\/tr><tr><td>18<\/td><td><b>MDL <\/b><\/td><td align='right'>NA <\/td><\/tr><tr class='alt'><td>19<\/td><td><b>Computed.Calculé <\/b><\/td><td align='right'>NA <\/td><\/tr><tr><td>20<\/td><td><b>Note.Remarque <\/b><\/td><td align='right'> <\/td><\/tr><tr class='alt'><td>21<\/td><td><b>depth <\/b><\/td><td align='right'>3.9 <\/td><\/tr><tr><td>22<\/td><td><b>geometry <\/b><\/td><td align='right'>sfc_POINT <\/td><\/tr><\/table><\/div><\/body><\/html>","<html><head><link rel=\"stylesheet\" type=\"text/css\" href=\"lib/popup/popup.css\"><\/head><body><div class=\"scrollableContainer\"><table class=\"popup scrollable\" id=\"popup\"><tr class='coord'><td><\/td><td><b>Feature ID<\/b><\/td><td align='right'>1846 <\/td><\/tr><tr class='alt'><td>1<\/td><td><b>Site.Site <\/b><\/td><td align='right'>7036 <\/td><\/tr><tr><td>2<\/td><td><b>Protocol <\/b><\/td><td align='right'>CABIN - Open Water <\/td><\/tr><tr class='alt'><td>3<\/td><td><b>Protocole <\/b><\/td><td align='right'>RCBA - Eaux libres <\/td><\/tr><tr><td>4<\/td><td><b>JulianDay.JourJulian <\/b><\/td><td align='right'>256 <\/td><\/tr><tr class='alt'><td>5<\/td><td><b>Year.Année <\/b><\/td><td align='right'>2005 <\/td><\/tr><tr><td>6<\/td><td><b>SiteDescription.Descriptiondusite <\/b><\/td><td align='right'> <\/td><\/tr><tr class='alt'><td>7<\/td><td><b>SampleNumber.Numérod.échantillon. <\/b><\/td><td align='right'>1 <\/td><\/tr><tr><td>8<\/td><td><b>Status.État <\/b><\/td><td align='right'>Test <\/td><\/tr><tr class='alt'><td>9<\/td><td><b>status <\/b><\/td><td align='right'>2 <\/td><\/tr><tr><td>10<\/td><td><b>QAQC <\/b><\/td><td align='right'>False <\/td><\/tr><tr class='alt'><td>11<\/td><td><b>Type.Type <\/b><\/td><td align='right'>Sediment Chemistry <\/td><\/tr><tr><td>12<\/td><td><b>Variable <\/b><\/td><td align='right'>TP <\/td><\/tr><tr class='alt'><td>13<\/td><td><b>VariableDescription <\/b><\/td><td align='right'>Total Phosphorus in sediment <\/td><\/tr><tr><td>14<\/td><td><b>VariableFr <\/b><\/td><td align='right'>PT <\/td><\/tr><tr class='alt'><td>15<\/td><td><b>DescriptiondelaVariable <\/b><\/td><td align='right'>Phosphore total dans le sédiment <\/td><\/tr><tr><td>16<\/td><td><b>Unit.Unité <\/b><\/td><td align='right'>ppm <\/td><\/tr><tr class='alt'><td>17<\/td><td><b>Value.Valeur <\/b><\/td><td align='right'>2200 <\/td><\/tr><tr><td>18<\/td><td><b>MDL <\/b><\/td><td align='right'>NA <\/td><\/tr><tr class='alt'><td>19<\/td><td><b>Computed.Calculé <\/b><\/td><td align='right'>NA <\/td><\/tr><tr><td>20<\/td><td><b>Note.Remarque <\/b><\/td><td align='right'> <\/td><\/tr><tr class='alt'><td>21<\/td><td><b>depth <\/b><\/td><td align='right'>7.5 <\/td><\/tr><tr><td>22<\/td><td><b>geometry <\/b><\/td><td align='right'>sfc_POINT <\/td><\/tr><\/table><\/div><\/body><\/html>","<html><head><link rel=\"stylesheet\" type=\"text/css\" href=\"lib/popup/popup.css\"><\/head><body><div class=\"scrollableContainer\"><table class=\"popup scrollable\" id=\"popup\"><tr class='coord'><td><\/td><td><b>Feature ID<\/b><\/td><td align='right'>1951 <\/td><\/tr><tr class='alt'><td>1<\/td><td><b>Site.Site <\/b><\/td><td align='right'>7038 <\/td><\/tr><tr><td>2<\/td><td><b>Protocol <\/b><\/td><td align='right'>CABIN - Open Water <\/td><\/tr><tr class='alt'><td>3<\/td><td><b>Protocole <\/b><\/td><td align='right'>RCBA - Eaux libres <\/td><\/tr><tr><td>4<\/td><td><b>JulianDay.JourJulian <\/b><\/td><td align='right'>251 <\/td><\/tr><tr class='alt'><td>5<\/td><td><b>Year.Année <\/b><\/td><td align='right'>2005 <\/td><\/tr><tr><td>6<\/td><td><b>SiteDescription.Descriptiondusite <\/b><\/td><td align='right'> <\/td><\/tr><tr class='alt'><td>7<\/td><td><b>SampleNumber.Numérod.échantillon. <\/b><\/td><td align='right'>1 <\/td><\/tr><tr><td>8<\/td><td><b>Status.État <\/b><\/td><td align='right'>Test <\/td><\/tr><tr class='alt'><td>9<\/td><td><b>status <\/b><\/td><td align='right'>2 <\/td><\/tr><tr><td>10<\/td><td><b>QAQC <\/b><\/td><td align='right'>False <\/td><\/tr><tr class='alt'><td>11<\/td><td><b>Type.Type <\/b><\/td><td align='right'>Sediment Chemistry <\/td><\/tr><tr><td>12<\/td><td><b>Variable <\/b><\/td><td align='right'>TP <\/td><\/tr><tr class='alt'><td>13<\/td><td><b>VariableDescription <\/b><\/td><td align='right'>Total Phosphorus in sediment <\/td><\/tr><tr><td>14<\/td><td><b>VariableFr <\/b><\/td><td align='right'>PT <\/td><\/tr><tr class='alt'><td>15<\/td><td><b>DescriptiondelaVariable <\/b><\/td><td align='right'>Phosphore total dans le sédiment <\/td><\/tr><tr><td>16<\/td><td><b>Unit.Unité <\/b><\/td><td align='right'>ppm <\/td><\/tr><tr class='alt'><td>17<\/td><td><b>Value.Valeur <\/b><\/td><td align='right'>1620 <\/td><\/tr><tr><td>18<\/td><td><b>MDL <\/b><\/td><td align='right'>NA <\/td><\/tr><tr class='alt'><td>19<\/td><td><b>Computed.Calculé <\/b><\/td><td align='right'>NA <\/td><\/tr><tr><td>20<\/td><td><b>Note.Remarque <\/b><\/td><td align='right'> <\/td><\/tr><tr class='alt'><td>21<\/td><td><b>depth <\/b><\/td><td align='right'>9.5 <\/td><\/tr><tr><td>22<\/td><td><b>geometry <\/b><\/td><td align='right'>sfc_POINT <\/td><\/tr><\/table><\/div><\/body><\/html>","<html><head><link rel=\"stylesheet\" type=\"text/css\" href=\"lib/popup/popup.css\"><\/head><body><div class=\"scrollableContainer\"><table class=\"popup scrollable\" id=\"popup\"><tr class='coord'><td><\/td><td><b>Feature ID<\/b><\/td><td align='right'>2056 <\/td><\/tr><tr class='alt'><td>1<\/td><td><b>Site.Site <\/b><\/td><td align='right'>7039 <\/td><\/tr><tr><td>2<\/td><td><b>Protocol <\/b><\/td><td align='right'>CABIN - Open Water <\/td><\/tr><tr class='alt'><td>3<\/td><td><b>Protocole <\/b><\/td><td align='right'>RCBA - Eaux libres <\/td><\/tr><tr><td>4<\/td><td><b>JulianDay.JourJulian <\/b><\/td><td align='right'>251 <\/td><\/tr><tr class='alt'><td>5<\/td><td><b>Year.Année <\/b><\/td><td align='right'>2005 <\/td><\/tr><tr><td>6<\/td><td><b>SiteDescription.Descriptiondusite <\/b><\/td><td align='right'> <\/td><\/tr><tr class='alt'><td>7<\/td><td><b>SampleNumber.Numérod.échantillon. <\/b><\/td><td align='right'>1 <\/td><\/tr><tr><td>8<\/td><td><b>Status.État <\/b><\/td><td align='right'>Test <\/td><\/tr><tr class='alt'><td>9<\/td><td><b>status <\/b><\/td><td align='right'>2 <\/td><\/tr><tr><td>10<\/td><td><b>QAQC <\/b><\/td><td align='right'>False <\/td><\/tr><tr class='alt'><td>11<\/td><td><b>Type.Type <\/b><\/td><td align='right'>Sediment Chemistry <\/td><\/tr><tr><td>12<\/td><td><b>Variable <\/b><\/td><td align='right'>TP <\/td><\/tr><tr class='alt'><td>13<\/td><td><b>VariableDescription <\/b><\/td><td align='right'>Total Phosphorus in sediment <\/td><\/tr><tr><td>14<\/td><td><b>VariableFr <\/b><\/td><td align='right'>PT <\/td><\/tr><tr class='alt'><td>15<\/td><td><b>DescriptiondelaVariable <\/b><\/td><td align='right'>Phosphore total dans le sédiment <\/td><\/tr><tr><td>16<\/td><td><b>Unit.Unité <\/b><\/td><td align='right'>ppm <\/td><\/tr><tr class='alt'><td>17<\/td><td><b>Value.Valeur <\/b><\/td><td align='right'>1930 <\/td><\/tr><tr><td>18<\/td><td><b>MDL <\/b><\/td><td align='right'>NA <\/td><\/tr><tr class='alt'><td>19<\/td><td><b>Computed.Calculé <\/b><\/td><td align='right'>NA <\/td><\/tr><tr><td>20<\/td><td><b>Note.Remarque <\/b><\/td><td align='right'> <\/td><\/tr><tr class='alt'><td>21<\/td><td><b>depth <\/b><\/td><td align='right'>9.2 <\/td><\/tr><tr><td>22<\/td><td><b>geometry <\/b><\/td><td align='right'>sfc_POINT <\/td><\/tr><\/table><\/div><\/body><\/html>","<html><head><link rel=\"stylesheet\" type=\"text/css\" href=\"lib/popup/popup.css\"><\/head><body><div class=\"scrollableContainer\"><table class=\"popup scrollable\" id=\"popup\"><tr class='coord'><td><\/td><td><b>Feature ID<\/b><\/td><td align='right'>2977 <\/td><\/tr><tr class='alt'><td>1<\/td><td><b>Site.Site <\/b><\/td><td align='right'>HH19 <\/td><\/tr><tr><td>2<\/td><td><b>Protocol <\/b><\/td><td align='right'>CABIN - Open Water <\/td><\/tr><tr class='alt'><td>3<\/td><td><b>Protocole <\/b><\/td><td align='right'>RCBA - Eaux libres <\/td><\/tr><tr><td>4<\/td><td><b>JulianDay.JourJulian <\/b><\/td><td align='right'>252 <\/td><\/tr><tr class='alt'><td>5<\/td><td><b>Year.Année <\/b><\/td><td align='right'>2005 <\/td><\/tr><tr><td>6<\/td><td><b>SiteDescription.Descriptiondusite <\/b><\/td><td align='right'> <\/td><\/tr><tr class='alt'><td>7<\/td><td><b>SampleNumber.Numérod.échantillon. <\/b><\/td><td align='right'>1 <\/td><\/tr><tr><td>8<\/td><td><b>Status.État <\/b><\/td><td align='right'>Test <\/td><\/tr><tr class='alt'><td>9<\/td><td><b>status <\/b><\/td><td align='right'>2 <\/td><\/tr><tr><td>10<\/td><td><b>QAQC <\/b><\/td><td align='right'>False <\/td><\/tr><tr class='alt'><td>11<\/td><td><b>Type.Type <\/b><\/td><td align='right'>Sediment Chemistry <\/td><\/tr><tr><td>12<\/td><td><b>Variable <\/b><\/td><td align='right'>TP <\/td><\/tr><tr class='alt'><td>13<\/td><td><b>VariableDescription <\/b><\/td><td align='right'>Total Phosphorus in sediment <\/td><\/tr><tr><td>14<\/td><td><b>VariableFr <\/b><\/td><td align='right'>PT <\/td><\/tr><tr class='alt'><td>15<\/td><td><b>DescriptiondelaVariable <\/b><\/td><td align='right'>Phosphore total dans le sédiment <\/td><\/tr><tr><td>16<\/td><td><b>Unit.Unité <\/b><\/td><td align='right'>ppm <\/td><\/tr><tr class='alt'><td>17<\/td><td><b>Value.Valeur <\/b><\/td><td align='right'>2710 <\/td><\/tr><tr><td>18<\/td><td><b>MDL <\/b><\/td><td align='right'>NA <\/td><\/tr><tr class='alt'><td>19<\/td><td><b>Computed.Calculé <\/b><\/td><td align='right'>NA <\/td><\/tr><tr><td>20<\/td><td><b>Note.Remarque <\/b><\/td><td align='right'> <\/td><\/tr><tr class='alt'><td>21<\/td><td><b>depth <\/b><\/td><td align='right'>23.2 <\/td><\/tr><tr><td>22<\/td><td><b>geometry <\/b><\/td><td align='right'>sfc_POINT <\/td><\/tr><\/table><\/div><\/body><\/html>","<html><head><link rel=\"stylesheet\" type=\"text/css\" href=\"lib/popup/popup.css\"><\/head><body><div class=\"scrollableContainer\"><table class=\"popup scrollable\" id=\"popup\"><tr class='coord'><td><\/td><td><b>Feature ID<\/b><\/td><td align='right'>3247 <\/td><\/tr><tr class='alt'><td>1<\/td><td><b>Site.Site <\/b><\/td><td align='right'>HH3 <\/td><\/tr><tr><td>2<\/td><td><b>Protocol <\/b><\/td><td align='right'>CABIN - Open Water <\/td><\/tr><tr class='alt'><td>3<\/td><td><b>Protocole <\/b><\/td><td align='right'>RCBA - Eaux libres <\/td><\/tr><tr><td>4<\/td><td><b>JulianDay.JourJulian <\/b><\/td><td align='right'>251 <\/td><\/tr><tr class='alt'><td>5<\/td><td><b>Year.Année <\/b><\/td><td align='right'>2005 <\/td><\/tr><tr><td>6<\/td><td><b>SiteDescription.Descriptiondusite <\/b><\/td><td align='right'> <\/td><\/tr><tr class='alt'><td>7<\/td><td><b>SampleNumber.Numérod.échantillon. <\/b><\/td><td align='right'>1 <\/td><\/tr><tr><td>8<\/td><td><b>Status.État <\/b><\/td><td align='right'>Test <\/td><\/tr><tr class='alt'><td>9<\/td><td><b>status <\/b><\/td><td align='right'>2 <\/td><\/tr><tr><td>10<\/td><td><b>QAQC <\/b><\/td><td align='right'>False <\/td><\/tr><tr class='alt'><td>11<\/td><td><b>Type.Type <\/b><\/td><td align='right'>Sediment Chemistry <\/td><\/tr><tr><td>12<\/td><td><b>Variable <\/b><\/td><td align='right'>TP <\/td><\/tr><tr class='alt'><td>13<\/td><td><b>VariableDescription <\/b><\/td><td align='right'>Total Phosphorus in sediment <\/td><\/tr><tr><td>14<\/td><td><b>VariableFr <\/b><\/td><td align='right'>PT <\/td><\/tr><tr class='alt'><td>15<\/td><td><b>DescriptiondelaVariable <\/b><\/td><td align='right'>Phosphore total dans le sédiment <\/td><\/tr><tr><td>16<\/td><td><b>Unit.Unité <\/b><\/td><td align='right'>ppm <\/td><\/tr><tr class='alt'><td>17<\/td><td><b>Value.Valeur <\/b><\/td><td align='right'>1990 <\/td><\/tr><tr><td>18<\/td><td><b>MDL <\/b><\/td><td align='right'>NA <\/td><\/tr><tr class='alt'><td>19<\/td><td><b>Computed.Calculé <\/b><\/td><td align='right'>NA <\/td><\/tr><tr><td>20<\/td><td><b>Note.Remarque <\/b><\/td><td align='right'> <\/td><\/tr><tr class='alt'><td>21<\/td><td><b>depth <\/b><\/td><td align='right'>12.2 <\/td><\/tr><tr><td>22<\/td><td><b>geometry <\/b><\/td><td align='right'>sfc_POINT <\/td><\/tr><\/table><\/div><\/body><\/html>","<html><head><link rel=\"stylesheet\" type=\"text/css\" href=\"lib/popup/popup.css\"><\/head><body><div class=\"scrollableContainer\"><table class=\"popup scrollable\" id=\"popup\"><tr class='coord'><td><\/td><td><b>Feature ID<\/b><\/td><td align='right'>3301 <\/td><\/tr><tr class='alt'><td>1<\/td><td><b>Site.Site <\/b><\/td><td align='right'>RR05-1A <\/td><\/tr><tr><td>2<\/td><td><b>Protocol <\/b><\/td><td align='right'>CABIN - Open Water <\/td><\/tr><tr class='alt'><td>3<\/td><td><b>Protocole <\/b><\/td><td align='right'>RCBA - Eaux libres <\/td><\/tr><tr><td>4<\/td><td><b>JulianDay.JourJulian <\/b><\/td><td align='right'>251 <\/td><\/tr><tr class='alt'><td>5<\/td><td><b>Year.Année <\/b><\/td><td align='right'>2005 <\/td><\/tr><tr><td>6<\/td><td><b>SiteDescription.Descriptiondusite <\/b><\/td><td align='right'> <\/td><\/tr><tr class='alt'><td>7<\/td><td><b>SampleNumber.Numérod.échantillon. <\/b><\/td><td align='right'>1 <\/td><\/tr><tr><td>8<\/td><td><b>Status.État <\/b><\/td><td align='right'>Test <\/td><\/tr><tr class='alt'><td>9<\/td><td><b>status <\/b><\/td><td align='right'>2 <\/td><\/tr><tr><td>10<\/td><td><b>QAQC <\/b><\/td><td align='right'>False <\/td><\/tr><tr class='alt'><td>11<\/td><td><b>Type.Type <\/b><\/td><td align='right'>Sediment Chemistry <\/td><\/tr><tr><td>12<\/td><td><b>Variable <\/b><\/td><td align='right'>TP <\/td><\/tr><tr class='alt'><td>13<\/td><td><b>VariableDescription <\/b><\/td><td align='right'>Total Phosphorus in sediment <\/td><\/tr><tr><td>14<\/td><td><b>VariableFr <\/b><\/td><td align='right'>PT <\/td><\/tr><tr class='alt'><td>15<\/td><td><b>DescriptiondelaVariable <\/b><\/td><td align='right'>Phosphore total dans le sédiment <\/td><\/tr><tr><td>16<\/td><td><b>Unit.Unité <\/b><\/td><td align='right'>ppm <\/td><\/tr><tr class='alt'><td>17<\/td><td><b>Value.Valeur <\/b><\/td><td align='right'>965 <\/td><\/tr><tr><td>18<\/td><td><b>MDL <\/b><\/td><td align='right'>NA <\/td><\/tr><tr class='alt'><td>19<\/td><td><b>Computed.Calculé <\/b><\/td><td align='right'>NA <\/td><\/tr><tr><td>20<\/td><td><b>Note.Remarque <\/b><\/td><td align='right'> <\/td><\/tr><tr class='alt'><td>21<\/td><td><b>depth <\/b><\/td><td align='right'>9 <\/td><\/tr><tr><td>22<\/td><td><b>geometry <\/b><\/td><td align='right'>sfc_POINT <\/td><\/tr><\/table><\/div><\/body><\/html>","<html><head><link rel=\"stylesheet\" type=\"text/css\" href=\"lib/popup/popup.css\"><\/head><body><div class=\"scrollableContainer\"><table class=\"popup scrollable\" id=\"popup\"><tr class='coord'><td><\/td><td><b>Feature ID<\/b><\/td><td align='right'>3355 <\/td><\/tr><tr class='alt'><td>1<\/td><td><b>Site.Site <\/b><\/td><td align='right'>RR05-2A <\/td><\/tr><tr><td>2<\/td><td><b>Protocol <\/b><\/td><td align='right'>CABIN - Open Water <\/td><\/tr><tr class='alt'><td>3<\/td><td><b>Protocole <\/b><\/td><td align='right'>RCBA - Eaux libres <\/td><\/tr><tr><td>4<\/td><td><b>JulianDay.JourJulian <\/b><\/td><td align='right'>251 <\/td><\/tr><tr class='alt'><td>5<\/td><td><b>Year.Année <\/b><\/td><td align='right'>2005 <\/td><\/tr><tr><td>6<\/td><td><b>SiteDescription.Descriptiondusite <\/b><\/td><td align='right'> <\/td><\/tr><tr class='alt'><td>7<\/td><td><b>SampleNumber.Numérod.échantillon. <\/b><\/td><td align='right'>1 <\/td><\/tr><tr><td>8<\/td><td><b>Status.État <\/b><\/td><td align='right'>Test <\/td><\/tr><tr class='alt'><td>9<\/td><td><b>status <\/b><\/td><td align='right'>2 <\/td><\/tr><tr><td>10<\/td><td><b>QAQC <\/b><\/td><td align='right'>False <\/td><\/tr><tr class='alt'><td>11<\/td><td><b>Type.Type <\/b><\/td><td align='right'>Sediment Chemistry <\/td><\/tr><tr><td>12<\/td><td><b>Variable <\/b><\/td><td align='right'>TP <\/td><\/tr><tr class='alt'><td>13<\/td><td><b>VariableDescription <\/b><\/td><td align='right'>Total Phosphorus in sediment <\/td><\/tr><tr><td>14<\/td><td><b>VariableFr <\/b><\/td><td align='right'>PT <\/td><\/tr><tr class='alt'><td>15<\/td><td><b>DescriptiondelaVariable <\/b><\/td><td align='right'>Phosphore total dans le sédiment <\/td><\/tr><tr><td>16<\/td><td><b>Unit.Unité <\/b><\/td><td align='right'>ppm <\/td><\/tr><tr class='alt'><td>17<\/td><td><b>Value.Valeur <\/b><\/td><td align='right'>1030 <\/td><\/tr><tr><td>18<\/td><td><b>MDL <\/b><\/td><td align='right'>NA <\/td><\/tr><tr class='alt'><td>19<\/td><td><b>Computed.Calculé <\/b><\/td><td align='right'>NA <\/td><\/tr><tr><td>20<\/td><td><b>Note.Remarque <\/b><\/td><td align='right'> <\/td><\/tr><tr class='alt'><td>21<\/td><td><b>depth <\/b><\/td><td align='right'>5.1 <\/td><\/tr><tr><td>22<\/td><td><b>geometry <\/b><\/td><td align='right'>sfc_POINT <\/td><\/tr><\/table><\/div><\/body><\/html>","<html><head><link rel=\"stylesheet\" type=\"text/css\" href=\"lib/popup/popup.css\"><\/head><body><div class=\"scrollableContainer\"><table class=\"popup scrollable\" id=\"popup\"><tr class='coord'><td><\/td><td><b>Feature ID<\/b><\/td><td align='right'>3409 <\/td><\/tr><tr class='alt'><td>1<\/td><td><b>Site.Site <\/b><\/td><td align='right'>RR05-2B <\/td><\/tr><tr><td>2<\/td><td><b>Protocol <\/b><\/td><td align='right'>CABIN - Open Water <\/td><\/tr><tr class='alt'><td>3<\/td><td><b>Protocole <\/b><\/td><td align='right'>RCBA - Eaux libres <\/td><\/tr><tr><td>4<\/td><td><b>JulianDay.JourJulian <\/b><\/td><td align='right'>252 <\/td><\/tr><tr class='alt'><td>5<\/td><td><b>Year.Année <\/b><\/td><td align='right'>2005 <\/td><\/tr><tr><td>6<\/td><td><b>SiteDescription.Descriptiondusite <\/b><\/td><td align='right'> <\/td><\/tr><tr class='alt'><td>7<\/td><td><b>SampleNumber.Numérod.échantillon. <\/b><\/td><td align='right'>1 <\/td><\/tr><tr><td>8<\/td><td><b>Status.État <\/b><\/td><td align='right'>Test <\/td><\/tr><tr class='alt'><td>9<\/td><td><b>status <\/b><\/td><td align='right'>2 <\/td><\/tr><tr><td>10<\/td><td><b>QAQC <\/b><\/td><td align='right'>False <\/td><\/tr><tr class='alt'><td>11<\/td><td><b>Type.Type <\/b><\/td><td align='right'>Sediment Chemistry <\/td><\/tr><tr><td>12<\/td><td><b>Variable <\/b><\/td><td align='right'>TP <\/td><\/tr><tr class='alt'><td>13<\/td><td><b>VariableDescription <\/b><\/td><td align='right'>Total Phosphorus in sediment <\/td><\/tr><tr><td>14<\/td><td><b>VariableFr <\/b><\/td><td align='right'>PT <\/td><\/tr><tr class='alt'><td>15<\/td><td><b>DescriptiondelaVariable <\/b><\/td><td align='right'>Phosphore total dans le sédiment <\/td><\/tr><tr><td>16<\/td><td><b>Unit.Unité <\/b><\/td><td align='right'>ppm <\/td><\/tr><tr class='alt'><td>17<\/td><td><b>Value.Valeur <\/b><\/td><td align='right'>1220 <\/td><\/tr><tr><td>18<\/td><td><b>MDL <\/b><\/td><td align='right'>NA <\/td><\/tr><tr class='alt'><td>19<\/td><td><b>Computed.Calculé <\/b><\/td><td align='right'>NA <\/td><\/tr><tr><td>20<\/td><td><b>Note.Remarque <\/b><\/td><td align='right'> <\/td><\/tr><tr class='alt'><td>21<\/td><td><b>depth <\/b><\/td><td align='right'>14.4 <\/td><\/tr><tr><td>22<\/td><td><b>geometry <\/b><\/td><td align='right'>sfc_POINT <\/td><\/tr><\/table><\/div><\/body><\/html>","<html><head><link rel=\"stylesheet\" type=\"text/css\" href=\"lib/popup/popup.css\"><\/head><body><div class=\"scrollableContainer\"><table class=\"popup scrollable\" id=\"popup\"><tr class='coord'><td><\/td><td><b>Feature ID<\/b><\/td><td align='right'>3463 <\/td><\/tr><tr class='alt'><td>1<\/td><td><b>Site.Site <\/b><\/td><td align='right'>RR05-2C <\/td><\/tr><tr><td>2<\/td><td><b>Protocol <\/b><\/td><td align='right'>CABIN - Open Water <\/td><\/tr><tr class='alt'><td>3<\/td><td><b>Protocole <\/b><\/td><td align='right'>RCBA - Eaux libres <\/td><\/tr><tr><td>4<\/td><td><b>JulianDay.JourJulian <\/b><\/td><td align='right'>252 <\/td><\/tr><tr class='alt'><td>5<\/td><td><b>Year.Année <\/b><\/td><td align='right'>2005 <\/td><\/tr><tr><td>6<\/td><td><b>SiteDescription.Descriptiondusite <\/b><\/td><td align='right'> <\/td><\/tr><tr class='alt'><td>7<\/td><td><b>SampleNumber.Numérod.échantillon. <\/b><\/td><td align='right'>1 <\/td><\/tr><tr><td>8<\/td><td><b>Status.État <\/b><\/td><td align='right'>Test <\/td><\/tr><tr class='alt'><td>9<\/td><td><b>status <\/b><\/td><td align='right'>2 <\/td><\/tr><tr><td>10<\/td><td><b>QAQC <\/b><\/td><td align='right'>False <\/td><\/tr><tr class='alt'><td>11<\/td><td><b>Type.Type <\/b><\/td><td align='right'>Sediment Chemistry <\/td><\/tr><tr><td>12<\/td><td><b>Variable <\/b><\/td><td align='right'>TP <\/td><\/tr><tr class='alt'><td>13<\/td><td><b>VariableDescription <\/b><\/td><td align='right'>Total Phosphorus in sediment <\/td><\/tr><tr><td>14<\/td><td><b>VariableFr <\/b><\/td><td align='right'>PT <\/td><\/tr><tr class='alt'><td>15<\/td><td><b>DescriptiondelaVariable <\/b><\/td><td align='right'>Phosphore total dans le sédiment <\/td><\/tr><tr><td>16<\/td><td><b>Unit.Unité <\/b><\/td><td align='right'>ppm <\/td><\/tr><tr class='alt'><td>17<\/td><td><b>Value.Valeur <\/b><\/td><td align='right'>1640 <\/td><\/tr><tr><td>18<\/td><td><b>MDL <\/b><\/td><td align='right'>NA <\/td><\/tr><tr class='alt'><td>19<\/td><td><b>Computed.Calculé <\/b><\/td><td align='right'>NA <\/td><\/tr><tr><td>20<\/td><td><b>Note.Remarque <\/b><\/td><td align='right'> <\/td><\/tr><tr class='alt'><td>21<\/td><td><b>depth <\/b><\/td><td align='right'>19.7 <\/td><\/tr><tr><td>22<\/td><td><b>geometry <\/b><\/td><td align='right'>sfc_POINT <\/td><\/tr><\/table><\/div><\/body><\/html>","<html><head><link rel=\"stylesheet\" type=\"text/css\" href=\"lib/popup/popup.css\"><\/head><body><div class=\"scrollableContainer\"><table class=\"popup scrollable\" id=\"popup\"><tr class='coord'><td><\/td><td><b>Feature ID<\/b><\/td><td align='right'>3517 <\/td><\/tr><tr class='alt'><td>1<\/td><td><b>Site.Site <\/b><\/td><td align='right'>RR05-2D <\/td><\/tr><tr><td>2<\/td><td><b>Protocol <\/b><\/td><td align='right'>CABIN - Open Water <\/td><\/tr><tr class='alt'><td>3<\/td><td><b>Protocole <\/b><\/td><td align='right'>RCBA - Eaux libres <\/td><\/tr><tr><td>4<\/td><td><b>JulianDay.JourJulian <\/b><\/td><td align='right'>251 <\/td><\/tr><tr class='alt'><td>5<\/td><td><b>Year.Année <\/b><\/td><td align='right'>2005 <\/td><\/tr><tr><td>6<\/td><td><b>SiteDescription.Descriptiondusite <\/b><\/td><td align='right'> <\/td><\/tr><tr class='alt'><td>7<\/td><td><b>SampleNumber.Numérod.échantillon. <\/b><\/td><td align='right'>1 <\/td><\/tr><tr><td>8<\/td><td><b>Status.État <\/b><\/td><td align='right'>Test <\/td><\/tr><tr class='alt'><td>9<\/td><td><b>status <\/b><\/td><td align='right'>2 <\/td><\/tr><tr><td>10<\/td><td><b>QAQC <\/b><\/td><td align='right'>False <\/td><\/tr><tr class='alt'><td>11<\/td><td><b>Type.Type <\/b><\/td><td align='right'>Sediment Chemistry <\/td><\/tr><tr><td>12<\/td><td><b>Variable <\/b><\/td><td align='right'>TP <\/td><\/tr><tr class='alt'><td>13<\/td><td><b>VariableDescription <\/b><\/td><td align='right'>Total Phosphorus in sediment <\/td><\/tr><tr><td>14<\/td><td><b>VariableFr <\/b><\/td><td align='right'>PT <\/td><\/tr><tr class='alt'><td>15<\/td><td><b>DescriptiondelaVariable <\/b><\/td><td align='right'>Phosphore total dans le sédiment <\/td><\/tr><tr><td>16<\/td><td><b>Unit.Unité <\/b><\/td><td align='right'>ppm <\/td><\/tr><tr class='alt'><td>17<\/td><td><b>Value.Valeur <\/b><\/td><td align='right'>2020 <\/td><\/tr><tr><td>18<\/td><td><b>MDL <\/b><\/td><td align='right'>NA <\/td><\/tr><tr class='alt'><td>19<\/td><td><b>Computed.Calculé <\/b><\/td><td align='right'>NA <\/td><\/tr><tr><td>20<\/td><td><b>Note.Remarque <\/b><\/td><td align='right'> <\/td><\/tr><tr class='alt'><td>21<\/td><td><b>depth <\/b><\/td><td align='right'>19.1 <\/td><\/tr><tr><td>22<\/td><td><b>geometry <\/b><\/td><td align='right'>sfc_POINT <\/td><\/tr><\/table><\/div><\/body><\/html>","<html><head><link rel=\"stylesheet\" type=\"text/css\" href=\"lib/popup/popup.css\"><\/head><body><div class=\"scrollableContainer\"><table class=\"popup scrollable\" id=\"popup\"><tr class='coord'><td><\/td><td><b>Feature ID<\/b><\/td><td align='right'>3571 <\/td><\/tr><tr class='alt'><td>1<\/td><td><b>Site.Site <\/b><\/td><td align='right'>RR05-2E <\/td><\/tr><tr><td>2<\/td><td><b>Protocol <\/b><\/td><td align='right'>CABIN - Open Water <\/td><\/tr><tr class='alt'><td>3<\/td><td><b>Protocole <\/b><\/td><td align='right'>RCBA - Eaux libres <\/td><\/tr><tr><td>4<\/td><td><b>JulianDay.JourJulian <\/b><\/td><td align='right'>251 <\/td><\/tr><tr class='alt'><td>5<\/td><td><b>Year.Année <\/b><\/td><td align='right'>2005 <\/td><\/tr><tr><td>6<\/td><td><b>SiteDescription.Descriptiondusite <\/b><\/td><td align='right'> <\/td><\/tr><tr class='alt'><td>7<\/td><td><b>SampleNumber.Numérod.échantillon. <\/b><\/td><td align='right'>1 <\/td><\/tr><tr><td>8<\/td><td><b>Status.État <\/b><\/td><td align='right'>Test <\/td><\/tr><tr class='alt'><td>9<\/td><td><b>status <\/b><\/td><td align='right'>2 <\/td><\/tr><tr><td>10<\/td><td><b>QAQC <\/b><\/td><td align='right'>False <\/td><\/tr><tr class='alt'><td>11<\/td><td><b>Type.Type <\/b><\/td><td align='right'>Sediment Chemistry <\/td><\/tr><tr><td>12<\/td><td><b>Variable <\/b><\/td><td align='right'>TP <\/td><\/tr><tr class='alt'><td>13<\/td><td><b>VariableDescription <\/b><\/td><td align='right'>Total Phosphorus in sediment <\/td><\/tr><tr><td>14<\/td><td><b>VariableFr <\/b><\/td><td align='right'>PT <\/td><\/tr><tr class='alt'><td>15<\/td><td><b>DescriptiondelaVariable <\/b><\/td><td align='right'>Phosphore total dans le sédiment <\/td><\/tr><tr><td>16<\/td><td><b>Unit.Unité <\/b><\/td><td align='right'>ppm <\/td><\/tr><tr class='alt'><td>17<\/td><td><b>Value.Valeur <\/b><\/td><td align='right'>2360 <\/td><\/tr><tr><td>18<\/td><td><b>MDL <\/b><\/td><td align='right'>NA <\/td><\/tr><tr class='alt'><td>19<\/td><td><b>Computed.Calculé <\/b><\/td><td align='right'>NA <\/td><\/tr><tr><td>20<\/td><td><b>Note.Remarque <\/b><\/td><td align='right'> <\/td><\/tr><tr class='alt'><td>21<\/td><td><b>depth <\/b><\/td><td align='right'>16.6 <\/td><\/tr><tr><td>22<\/td><td><b>geometry <\/b><\/td><td align='right'>sfc_POINT <\/td><\/tr><\/table><\/div><\/body><\/html>","<html><head><link rel=\"stylesheet\" type=\"text/css\" href=\"lib/popup/popup.css\"><\/head><body><div class=\"scrollableContainer\"><table class=\"popup scrollable\" id=\"popup\"><tr class='coord'><td><\/td><td><b>Feature ID<\/b><\/td><td align='right'>3733 <\/td><\/tr><tr class='alt'><td>1<\/td><td><b>Site.Site <\/b><\/td><td align='right'>RR05-2F <\/td><\/tr><tr><td>2<\/td><td><b>Protocol <\/b><\/td><td align='right'>CABIN - Open Water <\/td><\/tr><tr class='alt'><td>3<\/td><td><b>Protocole <\/b><\/td><td align='right'>RCBA - Eaux libres <\/td><\/tr><tr><td>4<\/td><td><b>JulianDay.JourJulian <\/b><\/td><td align='right'>251 <\/td><\/tr><tr class='alt'><td>5<\/td><td><b>Year.Année <\/b><\/td><td align='right'>2005 <\/td><\/tr><tr><td>6<\/td><td><b>SiteDescription.Descriptiondusite <\/b><\/td><td align='right'> <\/td><\/tr><tr class='alt'><td>7<\/td><td><b>SampleNumber.Numérod.échantillon. <\/b><\/td><td align='right'>1 <\/td><\/tr><tr><td>8<\/td><td><b>Status.État <\/b><\/td><td align='right'>Test <\/td><\/tr><tr class='alt'><td>9<\/td><td><b>status <\/b><\/td><td align='right'>2 <\/td><\/tr><tr><td>10<\/td><td><b>QAQC <\/b><\/td><td align='right'>False <\/td><\/tr><tr class='alt'><td>11<\/td><td><b>Type.Type <\/b><\/td><td align='right'>Sediment Chemistry <\/td><\/tr><tr><td>12<\/td><td><b>Variable <\/b><\/td><td align='right'>TP <\/td><\/tr><tr class='alt'><td>13<\/td><td><b>VariableDescription <\/b><\/td><td align='right'>Total Phosphorus in sediment <\/td><\/tr><tr><td>14<\/td><td><b>VariableFr <\/b><\/td><td align='right'>PT <\/td><\/tr><tr class='alt'><td>15<\/td><td><b>DescriptiondelaVariable <\/b><\/td><td align='right'>Phosphore total dans le sédiment <\/td><\/tr><tr><td>16<\/td><td><b>Unit.Unité <\/b><\/td><td align='right'>ppm <\/td><\/tr><tr class='alt'><td>17<\/td><td><b>Value.Valeur <\/b><\/td><td align='right'>2030 <\/td><\/tr><tr><td>18<\/td><td><b>MDL <\/b><\/td><td align='right'>NA <\/td><\/tr><tr class='alt'><td>19<\/td><td><b>Computed.Calculé <\/b><\/td><td align='right'>NA <\/td><\/tr><tr><td>20<\/td><td><b>Note.Remarque <\/b><\/td><td align='right'> <\/td><\/tr><tr class='alt'><td>21<\/td><td><b>depth <\/b><\/td><td align='right'>19 <\/td><\/tr><tr><td>22<\/td><td><b>geometry <\/b><\/td><td align='right'>sfc_POINT <\/td><\/tr><\/table><\/div><\/body><\/html>","<html><head><link rel=\"stylesheet\" type=\"text/css\" href=\"lib/popup/popup.css\"><\/head><body><div class=\"scrollableContainer\"><table class=\"popup scrollable\" id=\"popup\"><tr class='coord'><td><\/td><td><b>Feature ID<\/b><\/td><td align='right'>3787 <\/td><\/tr><tr class='alt'><td>1<\/td><td><b>Site.Site <\/b><\/td><td align='right'>RR05-3B <\/td><\/tr><tr><td>2<\/td><td><b>Protocol <\/b><\/td><td align='right'>CABIN - Open Water <\/td><\/tr><tr class='alt'><td>3<\/td><td><b>Protocole <\/b><\/td><td align='right'>RCBA - Eaux libres <\/td><\/tr><tr><td>4<\/td><td><b>JulianDay.JourJulian <\/b><\/td><td align='right'>252 <\/td><\/tr><tr class='alt'><td>5<\/td><td><b>Year.Année <\/b><\/td><td align='right'>2005 <\/td><\/tr><tr><td>6<\/td><td><b>SiteDescription.Descriptiondusite <\/b><\/td><td align='right'> <\/td><\/tr><tr class='alt'><td>7<\/td><td><b>SampleNumber.Numérod.échantillon. <\/b><\/td><td align='right'>1 <\/td><\/tr><tr><td>8<\/td><td><b>Status.État <\/b><\/td><td align='right'>Test <\/td><\/tr><tr class='alt'><td>9<\/td><td><b>status <\/b><\/td><td align='right'>2 <\/td><\/tr><tr><td>10<\/td><td><b>QAQC <\/b><\/td><td align='right'>False <\/td><\/tr><tr class='alt'><td>11<\/td><td><b>Type.Type <\/b><\/td><td align='right'>Sediment Chemistry <\/td><\/tr><tr><td>12<\/td><td><b>Variable <\/b><\/td><td align='right'>TP <\/td><\/tr><tr class='alt'><td>13<\/td><td><b>VariableDescription <\/b><\/td><td align='right'>Total Phosphorus in sediment <\/td><\/tr><tr><td>14<\/td><td><b>VariableFr <\/b><\/td><td align='right'>PT <\/td><\/tr><tr class='alt'><td>15<\/td><td><b>DescriptiondelaVariable <\/b><\/td><td align='right'>Phosphore total dans le sédiment <\/td><\/tr><tr><td>16<\/td><td><b>Unit.Unité <\/b><\/td><td align='right'>ppm <\/td><\/tr><tr class='alt'><td>17<\/td><td><b>Value.Valeur <\/b><\/td><td align='right'>2340 <\/td><\/tr><tr><td>18<\/td><td><b>MDL <\/b><\/td><td align='right'>NA <\/td><\/tr><tr class='alt'><td>19<\/td><td><b>Computed.Calculé <\/b><\/td><td align='right'>NA <\/td><\/tr><tr><td>20<\/td><td><b>Note.Remarque <\/b><\/td><td align='right'> <\/td><\/tr><tr class='alt'><td>21<\/td><td><b>depth <\/b><\/td><td align='right'>10.1 <\/td><\/tr><tr><td>22<\/td><td><b>geometry <\/b><\/td><td align='right'>sfc_POINT <\/td><\/tr><\/table><\/div><\/body><\/html>","<html><head><link rel=\"stylesheet\" type=\"text/css\" href=\"lib/popup/popup.css\"><\/head><body><div class=\"scrollableContainer\"><table class=\"popup scrollable\" id=\"popup\"><tr class='coord'><td><\/td><td><b>Feature ID<\/b><\/td><td align='right'>3841 <\/td><\/tr><tr class='alt'><td>1<\/td><td><b>Site.Site <\/b><\/td><td align='right'>RR05-3C <\/td><\/tr><tr><td>2<\/td><td><b>Protocol <\/b><\/td><td align='right'>CABIN - Open Water <\/td><\/tr><tr class='alt'><td>3<\/td><td><b>Protocole <\/b><\/td><td align='right'>RCBA - Eaux libres <\/td><\/tr><tr><td>4<\/td><td><b>JulianDay.JourJulian <\/b><\/td><td align='right'>252 <\/td><\/tr><tr class='alt'><td>5<\/td><td><b>Year.Année <\/b><\/td><td align='right'>2005 <\/td><\/tr><tr><td>6<\/td><td><b>SiteDescription.Descriptiondusite <\/b><\/td><td align='right'> <\/td><\/tr><tr class='alt'><td>7<\/td><td><b>SampleNumber.Numérod.échantillon. <\/b><\/td><td align='right'>1 <\/td><\/tr><tr><td>8<\/td><td><b>Status.État <\/b><\/td><td align='right'>Test <\/td><\/tr><tr class='alt'><td>9<\/td><td><b>status <\/b><\/td><td align='right'>2 <\/td><\/tr><tr><td>10<\/td><td><b>QAQC <\/b><\/td><td align='right'>False <\/td><\/tr><tr class='alt'><td>11<\/td><td><b>Type.Type <\/b><\/td><td align='right'>Sediment Chemistry <\/td><\/tr><tr><td>12<\/td><td><b>Variable <\/b><\/td><td align='right'>TP <\/td><\/tr><tr class='alt'><td>13<\/td><td><b>VariableDescription <\/b><\/td><td align='right'>Total Phosphorus in sediment <\/td><\/tr><tr><td>14<\/td><td><b>VariableFr <\/b><\/td><td align='right'>PT <\/td><\/tr><tr class='alt'><td>15<\/td><td><b>DescriptiondelaVariable <\/b><\/td><td align='right'>Phosphore total dans le sédiment <\/td><\/tr><tr><td>16<\/td><td><b>Unit.Unité <\/b><\/td><td align='right'>ppm <\/td><\/tr><tr class='alt'><td>17<\/td><td><b>Value.Valeur <\/b><\/td><td align='right'>2170 <\/td><\/tr><tr><td>18<\/td><td><b>MDL <\/b><\/td><td align='right'>NA <\/td><\/tr><tr class='alt'><td>19<\/td><td><b>Computed.Calculé <\/b><\/td><td align='right'>NA <\/td><\/tr><tr><td>20<\/td><td><b>Note.Remarque <\/b><\/td><td align='right'> <\/td><\/tr><tr class='alt'><td>21<\/td><td><b>depth <\/b><\/td><td align='right'>18.7 <\/td><\/tr><tr><td>22<\/td><td><b>geometry <\/b><\/td><td align='right'>sfc_POINT <\/td><\/tr><\/table><\/div><\/body><\/html>","<html><head><link rel=\"stylesheet\" type=\"text/css\" href=\"lib/popup/popup.css\"><\/head><body><div class=\"scrollableContainer\"><table class=\"popup scrollable\" id=\"popup\"><tr class='coord'><td><\/td><td><b>Feature ID<\/b><\/td><td align='right'>4003 <\/td><\/tr><tr class='alt'><td>1<\/td><td><b>Site.Site <\/b><\/td><td align='right'>RR05-3D <\/td><\/tr><tr><td>2<\/td><td><b>Protocol <\/b><\/td><td align='right'>CABIN - Open Water <\/td><\/tr><tr class='alt'><td>3<\/td><td><b>Protocole <\/b><\/td><td align='right'>RCBA - Eaux libres <\/td><\/tr><tr><td>4<\/td><td><b>JulianDay.JourJulian <\/b><\/td><td align='right'>252 <\/td><\/tr><tr class='alt'><td>5<\/td><td><b>Year.Année <\/b><\/td><td align='right'>2005 <\/td><\/tr><tr><td>6<\/td><td><b>SiteDescription.Descriptiondusite <\/b><\/td><td align='right'> <\/td><\/tr><tr class='alt'><td>7<\/td><td><b>SampleNumber.Numérod.échantillon. <\/b><\/td><td align='right'>1 <\/td><\/tr><tr><td>8<\/td><td><b>Status.État <\/b><\/td><td align='right'>Test <\/td><\/tr><tr class='alt'><td>9<\/td><td><b>status <\/b><\/td><td align='right'>2 <\/td><\/tr><tr><td>10<\/td><td><b>QAQC <\/b><\/td><td align='right'>False <\/td><\/tr><tr class='alt'><td>11<\/td><td><b>Type.Type <\/b><\/td><td align='right'>Sediment Chemistry <\/td><\/tr><tr><td>12<\/td><td><b>Variable <\/b><\/td><td align='right'>TP <\/td><\/tr><tr class='alt'><td>13<\/td><td><b>VariableDescription <\/b><\/td><td align='right'>Total Phosphorus in sediment <\/td><\/tr><tr><td>14<\/td><td><b>VariableFr <\/b><\/td><td align='right'>PT <\/td><\/tr><tr class='alt'><td>15<\/td><td><b>DescriptiondelaVariable <\/b><\/td><td align='right'>Phosphore total dans le sédiment <\/td><\/tr><tr><td>16<\/td><td><b>Unit.Unité <\/b><\/td><td align='right'>ppm <\/td><\/tr><tr class='alt'><td>17<\/td><td><b>Value.Valeur <\/b><\/td><td align='right'>3590 <\/td><\/tr><tr><td>18<\/td><td><b>MDL <\/b><\/td><td align='right'>NA <\/td><\/tr><tr class='alt'><td>19<\/td><td><b>Computed.Calculé <\/b><\/td><td align='right'>NA <\/td><\/tr><tr><td>20<\/td><td><b>Note.Remarque <\/b><\/td><td align='right'> <\/td><\/tr><tr class='alt'><td>21<\/td><td><b>depth <\/b><\/td><td align='right'>14.1 <\/td><\/tr><tr><td>22<\/td><td><b>geometry <\/b><\/td><td align='right'>sfc_POINT <\/td><\/tr><\/table><\/div><\/body><\/html>","<html><head><link rel=\"stylesheet\" type=\"text/css\" href=\"lib/popup/popup.css\"><\/head><body><div class=\"scrollableContainer\"><table class=\"popup scrollable\" id=\"popup\"><tr class='coord'><td><\/td><td><b>Feature ID<\/b><\/td><td align='right'>4057 <\/td><\/tr><tr class='alt'><td>1<\/td><td><b>Site.Site <\/b><\/td><td align='right'>RR05-3E <\/td><\/tr><tr><td>2<\/td><td><b>Protocol <\/b><\/td><td align='right'>CABIN - Open Water <\/td><\/tr><tr class='alt'><td>3<\/td><td><b>Protocole <\/b><\/td><td align='right'>RCBA - Eaux libres <\/td><\/tr><tr><td>4<\/td><td><b>JulianDay.JourJulian <\/b><\/td><td align='right'>252 <\/td><\/tr><tr class='alt'><td>5<\/td><td><b>Year.Année <\/b><\/td><td align='right'>2005 <\/td><\/tr><tr><td>6<\/td><td><b>SiteDescription.Descriptiondusite <\/b><\/td><td align='right'> <\/td><\/tr><tr class='alt'><td>7<\/td><td><b>SampleNumber.Numérod.échantillon. <\/b><\/td><td align='right'>1 <\/td><\/tr><tr><td>8<\/td><td><b>Status.État <\/b><\/td><td align='right'>Test <\/td><\/tr><tr class='alt'><td>9<\/td><td><b>status <\/b><\/td><td align='right'>2 <\/td><\/tr><tr><td>10<\/td><td><b>QAQC <\/b><\/td><td align='right'>False <\/td><\/tr><tr class='alt'><td>11<\/td><td><b>Type.Type <\/b><\/td><td align='right'>Sediment Chemistry <\/td><\/tr><tr><td>12<\/td><td><b>Variable <\/b><\/td><td align='right'>TP <\/td><\/tr><tr class='alt'><td>13<\/td><td><b>VariableDescription <\/b><\/td><td align='right'>Total Phosphorus in sediment <\/td><\/tr><tr><td>14<\/td><td><b>VariableFr <\/b><\/td><td align='right'>PT <\/td><\/tr><tr class='alt'><td>15<\/td><td><b>DescriptiondelaVariable <\/b><\/td><td align='right'>Phosphore total dans le sédiment <\/td><\/tr><tr><td>16<\/td><td><b>Unit.Unité <\/b><\/td><td align='right'>ppm <\/td><\/tr><tr class='alt'><td>17<\/td><td><b>Value.Valeur <\/b><\/td><td align='right'>2000 <\/td><\/tr><tr><td>18<\/td><td><b>MDL <\/b><\/td><td align='right'>NA <\/td><\/tr><tr class='alt'><td>19<\/td><td><b>Computed.Calculé <\/b><\/td><td align='right'>NA <\/td><\/tr><tr><td>20<\/td><td><b>Note.Remarque <\/b><\/td><td align='right'> <\/td><\/tr><tr class='alt'><td>21<\/td><td><b>depth <\/b><\/td><td align='right'>15.3 <\/td><\/tr><tr><td>22<\/td><td><b>geometry <\/b><\/td><td align='right'>sfc_POINT <\/td><\/tr><\/table><\/div><\/body><\/html>","<html><head><link rel=\"stylesheet\" type=\"text/css\" href=\"lib/popup/popup.css\"><\/head><body><div class=\"scrollableContainer\"><table class=\"popup scrollable\" id=\"popup\"><tr class='coord'><td><\/td><td><b>Feature ID<\/b><\/td><td align='right'>4111 <\/td><\/tr><tr class='alt'><td>1<\/td><td><b>Site.Site <\/b><\/td><td align='right'>RR05-3F <\/td><\/tr><tr><td>2<\/td><td><b>Protocol <\/b><\/td><td align='right'>CABIN - Open Water <\/td><\/tr><tr class='alt'><td>3<\/td><td><b>Protocole <\/b><\/td><td align='right'>RCBA - Eaux libres <\/td><\/tr><tr><td>4<\/td><td><b>JulianDay.JourJulian <\/b><\/td><td align='right'>252 <\/td><\/tr><tr class='alt'><td>5<\/td><td><b>Year.Année <\/b><\/td><td align='right'>2005 <\/td><\/tr><tr><td>6<\/td><td><b>SiteDescription.Descriptiondusite <\/b><\/td><td align='right'> <\/td><\/tr><tr class='alt'><td>7<\/td><td><b>SampleNumber.Numérod.échantillon. <\/b><\/td><td align='right'>1 <\/td><\/tr><tr><td>8<\/td><td><b>Status.État <\/b><\/td><td align='right'>Test <\/td><\/tr><tr class='alt'><td>9<\/td><td><b>status <\/b><\/td><td align='right'>2 <\/td><\/tr><tr><td>10<\/td><td><b>QAQC <\/b><\/td><td align='right'>False <\/td><\/tr><tr class='alt'><td>11<\/td><td><b>Type.Type <\/b><\/td><td align='right'>Sediment Chemistry <\/td><\/tr><tr><td>12<\/td><td><b>Variable <\/b><\/td><td align='right'>TP <\/td><\/tr><tr class='alt'><td>13<\/td><td><b>VariableDescription <\/b><\/td><td align='right'>Total Phosphorus in sediment <\/td><\/tr><tr><td>14<\/td><td><b>VariableFr <\/b><\/td><td align='right'>PT <\/td><\/tr><tr class='alt'><td>15<\/td><td><b>DescriptiondelaVariable <\/b><\/td><td align='right'>Phosphore total dans le sédiment <\/td><\/tr><tr><td>16<\/td><td><b>Unit.Unité <\/b><\/td><td align='right'>ppm <\/td><\/tr><tr class='alt'><td>17<\/td><td><b>Value.Valeur <\/b><\/td><td align='right'>3050 <\/td><\/tr><tr><td>18<\/td><td><b>MDL <\/b><\/td><td align='right'>NA <\/td><\/tr><tr class='alt'><td>19<\/td><td><b>Computed.Calculé <\/b><\/td><td align='right'>NA <\/td><\/tr><tr><td>20<\/td><td><b>Note.Remarque <\/b><\/td><td align='right'> <\/td><\/tr><tr class='alt'><td>21<\/td><td><b>depth <\/b><\/td><td align='right'>16.7 <\/td><\/tr><tr><td>22<\/td><td><b>geometry <\/b><\/td><td align='right'>sfc_POINT <\/td><\/tr><\/table><\/div><\/body><\/html>","<html><head><link rel=\"stylesheet\" type=\"text/css\" href=\"lib/popup/popup.css\"><\/head><body><div class=\"scrollableContainer\"><table class=\"popup scrollable\" id=\"popup\"><tr class='coord'><td><\/td><td><b>Feature ID<\/b><\/td><td align='right'>4165 <\/td><\/tr><tr class='alt'><td>1<\/td><td><b>Site.Site <\/b><\/td><td align='right'>RR05-3G <\/td><\/tr><tr><td>2<\/td><td><b>Protocol <\/b><\/td><td align='right'>CABIN - Open Water <\/td><\/tr><tr class='alt'><td>3<\/td><td><b>Protocole <\/b><\/td><td align='right'>RCBA - Eaux libres <\/td><\/tr><tr><td>4<\/td><td><b>JulianDay.JourJulian <\/b><\/td><td align='right'>252 <\/td><\/tr><tr class='alt'><td>5<\/td><td><b>Year.Année <\/b><\/td><td align='right'>2005 <\/td><\/tr><tr><td>6<\/td><td><b>SiteDescription.Descriptiondusite <\/b><\/td><td align='right'> <\/td><\/tr><tr class='alt'><td>7<\/td><td><b>SampleNumber.Numérod.échantillon. <\/b><\/td><td align='right'>1 <\/td><\/tr><tr><td>8<\/td><td><b>Status.État <\/b><\/td><td align='right'>Test <\/td><\/tr><tr class='alt'><td>9<\/td><td><b>status <\/b><\/td><td align='right'>2 <\/td><\/tr><tr><td>10<\/td><td><b>QAQC <\/b><\/td><td align='right'>False <\/td><\/tr><tr class='alt'><td>11<\/td><td><b>Type.Type <\/b><\/td><td align='right'>Sediment Chemistry <\/td><\/tr><tr><td>12<\/td><td><b>Variable <\/b><\/td><td align='right'>TP <\/td><\/tr><tr class='alt'><td>13<\/td><td><b>VariableDescription <\/b><\/td><td align='right'>Total Phosphorus in sediment <\/td><\/tr><tr><td>14<\/td><td><b>VariableFr <\/b><\/td><td align='right'>PT <\/td><\/tr><tr class='alt'><td>15<\/td><td><b>DescriptiondelaVariable <\/b><\/td><td align='right'>Phosphore total dans le sédiment <\/td><\/tr><tr><td>16<\/td><td><b>Unit.Unité <\/b><\/td><td align='right'>ppm <\/td><\/tr><tr class='alt'><td>17<\/td><td><b>Value.Valeur <\/b><\/td><td align='right'>2620 <\/td><\/tr><tr><td>18<\/td><td><b>MDL <\/b><\/td><td align='right'>NA <\/td><\/tr><tr class='alt'><td>19<\/td><td><b>Computed.Calculé <\/b><\/td><td align='right'>NA <\/td><\/tr><tr><td>20<\/td><td><b>Note.Remarque <\/b><\/td><td align='right'> <\/td><\/tr><tr class='alt'><td>21<\/td><td><b>depth <\/b><\/td><td align='right'>22.2 <\/td><\/tr><tr><td>22<\/td><td><b>geometry <\/b><\/td><td align='right'>sfc_POINT <\/td><\/tr><\/table><\/div><\/body><\/html>","<html><head><link rel=\"stylesheet\" type=\"text/css\" href=\"lib/popup/popup.css\"><\/head><body><div class=\"scrollableContainer\"><table class=\"popup scrollable\" id=\"popup\"><tr class='coord'><td><\/td><td><b>Feature ID<\/b><\/td><td align='right'>4219 <\/td><\/tr><tr class='alt'><td>1<\/td><td><b>Site.Site <\/b><\/td><td align='right'>RR05-4A <\/td><\/tr><tr><td>2<\/td><td><b>Protocol <\/b><\/td><td align='right'>CABIN - Open Water <\/td><\/tr><tr class='alt'><td>3<\/td><td><b>Protocole <\/b><\/td><td align='right'>RCBA - Eaux libres <\/td><\/tr><tr><td>4<\/td><td><b>JulianDay.JourJulian <\/b><\/td><td align='right'>250 <\/td><\/tr><tr class='alt'><td>5<\/td><td><b>Year.Année <\/b><\/td><td align='right'>2005 <\/td><\/tr><tr><td>6<\/td><td><b>SiteDescription.Descriptiondusite <\/b><\/td><td align='right'> <\/td><\/tr><tr class='alt'><td>7<\/td><td><b>SampleNumber.Numérod.échantillon. <\/b><\/td><td align='right'>1 <\/td><\/tr><tr><td>8<\/td><td><b>Status.État <\/b><\/td><td align='right'>Test <\/td><\/tr><tr class='alt'><td>9<\/td><td><b>status <\/b><\/td><td align='right'>2 <\/td><\/tr><tr><td>10<\/td><td><b>QAQC <\/b><\/td><td align='right'>False <\/td><\/tr><tr class='alt'><td>11<\/td><td><b>Type.Type <\/b><\/td><td align='right'>Sediment Chemistry <\/td><\/tr><tr><td>12<\/td><td><b>Variable <\/b><\/td><td align='right'>TP <\/td><\/tr><tr class='alt'><td>13<\/td><td><b>VariableDescription <\/b><\/td><td align='right'>Total Phosphorus in sediment <\/td><\/tr><tr><td>14<\/td><td><b>VariableFr <\/b><\/td><td align='right'>PT <\/td><\/tr><tr class='alt'><td>15<\/td><td><b>DescriptiondelaVariable <\/b><\/td><td align='right'>Phosphore total dans le sédiment <\/td><\/tr><tr><td>16<\/td><td><b>Unit.Unité <\/b><\/td><td align='right'>ppm <\/td><\/tr><tr class='alt'><td>17<\/td><td><b>Value.Valeur <\/b><\/td><td align='right'>2350 <\/td><\/tr><tr><td>18<\/td><td><b>MDL <\/b><\/td><td align='right'>NA <\/td><\/tr><tr class='alt'><td>19<\/td><td><b>Computed.Calculé <\/b><\/td><td align='right'>NA <\/td><\/tr><tr><td>20<\/td><td><b>Note.Remarque <\/b><\/td><td align='right'> <\/td><\/tr><tr class='alt'><td>21<\/td><td><b>depth <\/b><\/td><td align='right'>5.4 <\/td><\/tr><tr><td>22<\/td><td><b>geometry <\/b><\/td><td align='right'>sfc_POINT <\/td><\/tr><\/table><\/div><\/body><\/html>","<html><head><link rel=\"stylesheet\" type=\"text/css\" href=\"lib/popup/popup.css\"><\/head><body><div class=\"scrollableContainer\"><table class=\"popup scrollable\" id=\"popup\"><tr class='coord'><td><\/td><td><b>Feature ID<\/b><\/td><td align='right'>4273 <\/td><\/tr><tr class='alt'><td>1<\/td><td><b>Site.Site <\/b><\/td><td align='right'>RR05-4B <\/td><\/tr><tr><td>2<\/td><td><b>Protocol <\/b><\/td><td align='right'>CABIN - Open Water <\/td><\/tr><tr class='alt'><td>3<\/td><td><b>Protocole <\/b><\/td><td align='right'>RCBA - Eaux libres <\/td><\/tr><tr><td>4<\/td><td><b>JulianDay.JourJulian <\/b><\/td><td align='right'>255 <\/td><\/tr><tr class='alt'><td>5<\/td><td><b>Year.Année <\/b><\/td><td align='right'>2005 <\/td><\/tr><tr><td>6<\/td><td><b>SiteDescription.Descriptiondusite <\/b><\/td><td align='right'> <\/td><\/tr><tr class='alt'><td>7<\/td><td><b>SampleNumber.Numérod.échantillon. <\/b><\/td><td align='right'>1 <\/td><\/tr><tr><td>8<\/td><td><b>Status.État <\/b><\/td><td align='right'>Test <\/td><\/tr><tr class='alt'><td>9<\/td><td><b>status <\/b><\/td><td align='right'>2 <\/td><\/tr><tr><td>10<\/td><td><b>QAQC <\/b><\/td><td align='right'>False <\/td><\/tr><tr class='alt'><td>11<\/td><td><b>Type.Type <\/b><\/td><td align='right'>Sediment Chemistry <\/td><\/tr><tr><td>12<\/td><td><b>Variable <\/b><\/td><td align='right'>TP <\/td><\/tr><tr class='alt'><td>13<\/td><td><b>VariableDescription <\/b><\/td><td align='right'>Total Phosphorus in sediment <\/td><\/tr><tr><td>14<\/td><td><b>VariableFr <\/b><\/td><td align='right'>PT <\/td><\/tr><tr class='alt'><td>15<\/td><td><b>DescriptiondelaVariable <\/b><\/td><td align='right'>Phosphore total dans le sédiment <\/td><\/tr><tr><td>16<\/td><td><b>Unit.Unité <\/b><\/td><td align='right'>ppm <\/td><\/tr><tr class='alt'><td>17<\/td><td><b>Value.Valeur <\/b><\/td><td align='right'>1980 <\/td><\/tr><tr><td>18<\/td><td><b>MDL <\/b><\/td><td align='right'>NA <\/td><\/tr><tr class='alt'><td>19<\/td><td><b>Computed.Calculé <\/b><\/td><td align='right'>NA <\/td><\/tr><tr><td>20<\/td><td><b>Note.Remarque <\/b><\/td><td align='right'> <\/td><\/tr><tr class='alt'><td>21<\/td><td><b>depth <\/b><\/td><td align='right'>10.3 <\/td><\/tr><tr><td>22<\/td><td><b>geometry <\/b><\/td><td align='right'>sfc_POINT <\/td><\/tr><\/table><\/div><\/body><\/html>","<html><head><link rel=\"stylesheet\" type=\"text/css\" href=\"lib/popup/popup.css\"><\/head><body><div class=\"scrollableContainer\"><table class=\"popup scrollable\" id=\"popup\"><tr class='coord'><td><\/td><td><b>Feature ID<\/b><\/td><td align='right'>4435 <\/td><\/tr><tr class='alt'><td>1<\/td><td><b>Site.Site <\/b><\/td><td align='right'>RR05-4C <\/td><\/tr><tr><td>2<\/td><td><b>Protocol <\/b><\/td><td align='right'>CABIN - Open Water <\/td><\/tr><tr class='alt'><td>3<\/td><td><b>Protocole <\/b><\/td><td align='right'>RCBA - Eaux libres <\/td><\/tr><tr><td>4<\/td><td><b>JulianDay.JourJulian <\/b><\/td><td align='right'>255 <\/td><\/tr><tr class='alt'><td>5<\/td><td><b>Year.Année <\/b><\/td><td align='right'>2005 <\/td><\/tr><tr><td>6<\/td><td><b>SiteDescription.Descriptiondusite <\/b><\/td><td align='right'> <\/td><\/tr><tr class='alt'><td>7<\/td><td><b>SampleNumber.Numérod.échantillon. <\/b><\/td><td align='right'>1 <\/td><\/tr><tr><td>8<\/td><td><b>Status.État <\/b><\/td><td align='right'>Test <\/td><\/tr><tr class='alt'><td>9<\/td><td><b>status <\/b><\/td><td align='right'>2 <\/td><\/tr><tr><td>10<\/td><td><b>QAQC <\/b><\/td><td align='right'>False <\/td><\/tr><tr class='alt'><td>11<\/td><td><b>Type.Type <\/b><\/td><td align='right'>Sediment Chemistry <\/td><\/tr><tr><td>12<\/td><td><b>Variable <\/b><\/td><td align='right'>TP <\/td><\/tr><tr class='alt'><td>13<\/td><td><b>VariableDescription <\/b><\/td><td align='right'>Total Phosphorus in sediment <\/td><\/tr><tr><td>14<\/td><td><b>VariableFr <\/b><\/td><td align='right'>PT <\/td><\/tr><tr class='alt'><td>15<\/td><td><b>DescriptiondelaVariable <\/b><\/td><td align='right'>Phosphore total dans le sédiment <\/td><\/tr><tr><td>16<\/td><td><b>Unit.Unité <\/b><\/td><td align='right'>ppm <\/td><\/tr><tr class='alt'><td>17<\/td><td><b>Value.Valeur <\/b><\/td><td align='right'>2200 <\/td><\/tr><tr><td>18<\/td><td><b>MDL <\/b><\/td><td align='right'>NA <\/td><\/tr><tr class='alt'><td>19<\/td><td><b>Computed.Calculé <\/b><\/td><td align='right'>NA <\/td><\/tr><tr><td>20<\/td><td><b>Note.Remarque <\/b><\/td><td align='right'> <\/td><\/tr><tr class='alt'><td>21<\/td><td><b>depth <\/b><\/td><td align='right'>18.6 <\/td><\/tr><tr><td>22<\/td><td><b>geometry <\/b><\/td><td align='right'>sfc_POINT <\/td><\/tr><\/table><\/div><\/body><\/html>","<html><head><link rel=\"stylesheet\" type=\"text/css\" href=\"lib/popup/popup.css\"><\/head><body><div class=\"scrollableContainer\"><table class=\"popup scrollable\" id=\"popup\"><tr class='coord'><td><\/td><td><b>Feature ID<\/b><\/td><td align='right'>4489 <\/td><\/tr><tr class='alt'><td>1<\/td><td><b>Site.Site <\/b><\/td><td align='right'>RR05-4D <\/td><\/tr><tr><td>2<\/td><td><b>Protocol <\/b><\/td><td align='right'>CABIN - Open Water <\/td><\/tr><tr class='alt'><td>3<\/td><td><b>Protocole <\/b><\/td><td align='right'>RCBA - Eaux libres <\/td><\/tr><tr><td>4<\/td><td><b>JulianDay.JourJulian <\/b><\/td><td align='right'>255 <\/td><\/tr><tr class='alt'><td>5<\/td><td><b>Year.Année <\/b><\/td><td align='right'>2005 <\/td><\/tr><tr><td>6<\/td><td><b>SiteDescription.Descriptiondusite <\/b><\/td><td align='right'> <\/td><\/tr><tr class='alt'><td>7<\/td><td><b>SampleNumber.Numérod.échantillon. <\/b><\/td><td align='right'>1 <\/td><\/tr><tr><td>8<\/td><td><b>Status.État <\/b><\/td><td align='right'>Test <\/td><\/tr><tr class='alt'><td>9<\/td><td><b>status <\/b><\/td><td align='right'>2 <\/td><\/tr><tr><td>10<\/td><td><b>QAQC <\/b><\/td><td align='right'>False <\/td><\/tr><tr class='alt'><td>11<\/td><td><b>Type.Type <\/b><\/td><td align='right'>Sediment Chemistry <\/td><\/tr><tr><td>12<\/td><td><b>Variable <\/b><\/td><td align='right'>TP <\/td><\/tr><tr class='alt'><td>13<\/td><td><b>VariableDescription <\/b><\/td><td align='right'>Total Phosphorus in sediment <\/td><\/tr><tr><td>14<\/td><td><b>VariableFr <\/b><\/td><td align='right'>PT <\/td><\/tr><tr class='alt'><td>15<\/td><td><b>DescriptiondelaVariable <\/b><\/td><td align='right'>Phosphore total dans le sédiment <\/td><\/tr><tr><td>16<\/td><td><b>Unit.Unité <\/b><\/td><td align='right'>ppm <\/td><\/tr><tr class='alt'><td>17<\/td><td><b>Value.Valeur <\/b><\/td><td align='right'>2870 <\/td><\/tr><tr><td>18<\/td><td><b>MDL <\/b><\/td><td align='right'>NA <\/td><\/tr><tr class='alt'><td>19<\/td><td><b>Computed.Calculé <\/b><\/td><td align='right'>NA <\/td><\/tr><tr><td>20<\/td><td><b>Note.Remarque <\/b><\/td><td align='right'> <\/td><\/tr><tr class='alt'><td>21<\/td><td><b>depth <\/b><\/td><td align='right'>15.6 <\/td><\/tr><tr><td>22<\/td><td><b>geometry <\/b><\/td><td align='right'>sfc_POINT <\/td><\/tr><\/table><\/div><\/body><\/html>","<html><head><link rel=\"stylesheet\" type=\"text/css\" href=\"lib/popup/popup.css\"><\/head><body><div class=\"scrollableContainer\"><table class=\"popup scrollable\" id=\"popup\"><tr class='coord'><td><\/td><td><b>Feature ID<\/b><\/td><td align='right'>4543 <\/td><\/tr><tr class='alt'><td>1<\/td><td><b>Site.Site <\/b><\/td><td align='right'>RR05-4E <\/td><\/tr><tr><td>2<\/td><td><b>Protocol <\/b><\/td><td align='right'>CABIN - Open Water <\/td><\/tr><tr class='alt'><td>3<\/td><td><b>Protocole <\/b><\/td><td align='right'>RCBA - Eaux libres <\/td><\/tr><tr><td>4<\/td><td><b>JulianDay.JourJulian <\/b><\/td><td align='right'>255 <\/td><\/tr><tr class='alt'><td>5<\/td><td><b>Year.Année <\/b><\/td><td align='right'>2005 <\/td><\/tr><tr><td>6<\/td><td><b>SiteDescription.Descriptiondusite <\/b><\/td><td align='right'> <\/td><\/tr><tr class='alt'><td>7<\/td><td><b>SampleNumber.Numérod.échantillon. <\/b><\/td><td align='right'>1 <\/td><\/tr><tr><td>8<\/td><td><b>Status.État <\/b><\/td><td align='right'>Test <\/td><\/tr><tr class='alt'><td>9<\/td><td><b>status <\/b><\/td><td align='right'>2 <\/td><\/tr><tr><td>10<\/td><td><b>QAQC <\/b><\/td><td align='right'>False <\/td><\/tr><tr class='alt'><td>11<\/td><td><b>Type.Type <\/b><\/td><td align='right'>Sediment Chemistry <\/td><\/tr><tr><td>12<\/td><td><b>Variable <\/b><\/td><td align='right'>TP <\/td><\/tr><tr class='alt'><td>13<\/td><td><b>VariableDescription <\/b><\/td><td align='right'>Total Phosphorus in sediment <\/td><\/tr><tr><td>14<\/td><td><b>VariableFr <\/b><\/td><td align='right'>PT <\/td><\/tr><tr class='alt'><td>15<\/td><td><b>DescriptiondelaVariable <\/b><\/td><td align='right'>Phosphore total dans le sédiment <\/td><\/tr><tr><td>16<\/td><td><b>Unit.Unité <\/b><\/td><td align='right'>ppm <\/td><\/tr><tr class='alt'><td>17<\/td><td><b>Value.Valeur <\/b><\/td><td align='right'>2410 <\/td><\/tr><tr><td>18<\/td><td><b>MDL <\/b><\/td><td align='right'>NA <\/td><\/tr><tr class='alt'><td>19<\/td><td><b>Computed.Calculé <\/b><\/td><td align='right'>NA <\/td><\/tr><tr><td>20<\/td><td><b>Note.Remarque <\/b><\/td><td align='right'> <\/td><\/tr><tr class='alt'><td>21<\/td><td><b>depth <\/b><\/td><td align='right'>19.8 <\/td><\/tr><tr><td>22<\/td><td><b>geometry <\/b><\/td><td align='right'>sfc_POINT <\/td><\/tr><\/table><\/div><\/body><\/html>","<html><head><link rel=\"stylesheet\" type=\"text/css\" href=\"lib/popup/popup.css\"><\/head><body><div class=\"scrollableContainer\"><table class=\"popup scrollable\" id=\"popup\"><tr class='coord'><td><\/td><td><b>Feature ID<\/b><\/td><td align='right'>4597 <\/td><\/tr><tr class='alt'><td>1<\/td><td><b>Site.Site <\/b><\/td><td align='right'>RR05-4F <\/td><\/tr><tr><td>2<\/td><td><b>Protocol <\/b><\/td><td align='right'>CABIN - Open Water <\/td><\/tr><tr class='alt'><td>3<\/td><td><b>Protocole <\/b><\/td><td align='right'>RCBA - Eaux libres <\/td><\/tr><tr><td>4<\/td><td><b>JulianDay.JourJulian <\/b><\/td><td align='right'>252 <\/td><\/tr><tr class='alt'><td>5<\/td><td><b>Year.Année <\/b><\/td><td align='right'>2005 <\/td><\/tr><tr><td>6<\/td><td><b>SiteDescription.Descriptiondusite <\/b><\/td><td align='right'> <\/td><\/tr><tr class='alt'><td>7<\/td><td><b>SampleNumber.Numérod.échantillon. <\/b><\/td><td align='right'>1 <\/td><\/tr><tr><td>8<\/td><td><b>Status.État <\/b><\/td><td align='right'>Test <\/td><\/tr><tr class='alt'><td>9<\/td><td><b>status <\/b><\/td><td align='right'>2 <\/td><\/tr><tr><td>10<\/td><td><b>QAQC <\/b><\/td><td align='right'>False <\/td><\/tr><tr class='alt'><td>11<\/td><td><b>Type.Type <\/b><\/td><td align='right'>Sediment Chemistry <\/td><\/tr><tr><td>12<\/td><td><b>Variable <\/b><\/td><td align='right'>TP <\/td><\/tr><tr class='alt'><td>13<\/td><td><b>VariableDescription <\/b><\/td><td align='right'>Total Phosphorus in sediment <\/td><\/tr><tr><td>14<\/td><td><b>VariableFr <\/b><\/td><td align='right'>PT <\/td><\/tr><tr class='alt'><td>15<\/td><td><b>DescriptiondelaVariable <\/b><\/td><td align='right'>Phosphore total dans le sédiment <\/td><\/tr><tr><td>16<\/td><td><b>Unit.Unité <\/b><\/td><td align='right'>ppm <\/td><\/tr><tr class='alt'><td>17<\/td><td><b>Value.Valeur <\/b><\/td><td align='right'>2370 <\/td><\/tr><tr><td>18<\/td><td><b>MDL <\/b><\/td><td align='right'>NA <\/td><\/tr><tr class='alt'><td>19<\/td><td><b>Computed.Calculé <\/b><\/td><td align='right'>NA <\/td><\/tr><tr><td>20<\/td><td><b>Note.Remarque <\/b><\/td><td align='right'> <\/td><\/tr><tr class='alt'><td>21<\/td><td><b>depth <\/b><\/td><td align='right'>22 <\/td><\/tr><tr><td>22<\/td><td><b>geometry <\/b><\/td><td align='right'>sfc_POINT <\/td><\/tr><\/table><\/div><\/body><\/html>","<html><head><link rel=\"stylesheet\" type=\"text/css\" href=\"lib/popup/popup.css\"><\/head><body><div class=\"scrollableContainer\"><table class=\"popup scrollable\" id=\"popup\"><tr class='coord'><td><\/td><td><b>Feature ID<\/b><\/td><td align='right'>4651 <\/td><\/tr><tr class='alt'><td>1<\/td><td><b>Site.Site <\/b><\/td><td align='right'>RR05-5A <\/td><\/tr><tr><td>2<\/td><td><b>Protocol <\/b><\/td><td align='right'>CABIN - Open Water <\/td><\/tr><tr class='alt'><td>3<\/td><td><b>Protocole <\/b><\/td><td align='right'>RCBA - Eaux libres <\/td><\/tr><tr><td>4<\/td><td><b>JulianDay.JourJulian <\/b><\/td><td align='right'>250 <\/td><\/tr><tr class='alt'><td>5<\/td><td><b>Year.Année <\/b><\/td><td align='right'>2005 <\/td><\/tr><tr><td>6<\/td><td><b>SiteDescription.Descriptiondusite <\/b><\/td><td align='right'> <\/td><\/tr><tr class='alt'><td>7<\/td><td><b>SampleNumber.Numérod.échantillon. <\/b><\/td><td align='right'>1 <\/td><\/tr><tr><td>8<\/td><td><b>Status.État <\/b><\/td><td align='right'>Test <\/td><\/tr><tr class='alt'><td>9<\/td><td><b>status <\/b><\/td><td align='right'>2 <\/td><\/tr><tr><td>10<\/td><td><b>QAQC <\/b><\/td><td align='right'>False <\/td><\/tr><tr class='alt'><td>11<\/td><td><b>Type.Type <\/b><\/td><td align='right'>Sediment Chemistry <\/td><\/tr><tr><td>12<\/td><td><b>Variable <\/b><\/td><td align='right'>TP <\/td><\/tr><tr class='alt'><td>13<\/td><td><b>VariableDescription <\/b><\/td><td align='right'>Total Phosphorus in sediment <\/td><\/tr><tr><td>14<\/td><td><b>VariableFr <\/b><\/td><td align='right'>PT <\/td><\/tr><tr class='alt'><td>15<\/td><td><b>DescriptiondelaVariable <\/b><\/td><td align='right'>Phosphore total dans le sédiment <\/td><\/tr><tr><td>16<\/td><td><b>Unit.Unité <\/b><\/td><td align='right'>ppm <\/td><\/tr><tr class='alt'><td>17<\/td><td><b>Value.Valeur <\/b><\/td><td align='right'>1410 <\/td><\/tr><tr><td>18<\/td><td><b>MDL <\/b><\/td><td align='right'>NA <\/td><\/tr><tr class='alt'><td>19<\/td><td><b>Computed.Calculé <\/b><\/td><td align='right'>NA <\/td><\/tr><tr><td>20<\/td><td><b>Note.Remarque <\/b><\/td><td align='right'> <\/td><\/tr><tr class='alt'><td>21<\/td><td><b>depth <\/b><\/td><td align='right'>5.6 <\/td><\/tr><tr><td>22<\/td><td><b>geometry <\/b><\/td><td align='right'>sfc_POINT <\/td><\/tr><\/table><\/div><\/body><\/html>","<html><head><link rel=\"stylesheet\" type=\"text/css\" href=\"lib/popup/popup.css\"><\/head><body><div class=\"scrollableContainer\"><table class=\"popup scrollable\" id=\"popup\"><tr class='coord'><td><\/td><td><b>Feature ID<\/b><\/td><td align='right'>4705 <\/td><\/tr><tr class='alt'><td>1<\/td><td><b>Site.Site <\/b><\/td><td align='right'>RR05-5B <\/td><\/tr><tr><td>2<\/td><td><b>Protocol <\/b><\/td><td align='right'>CABIN - Open Water <\/td><\/tr><tr class='alt'><td>3<\/td><td><b>Protocole <\/b><\/td><td align='right'>RCBA - Eaux libres <\/td><\/tr><tr><td>4<\/td><td><b>JulianDay.JourJulian <\/b><\/td><td align='right'>255 <\/td><\/tr><tr class='alt'><td>5<\/td><td><b>Year.Année <\/b><\/td><td align='right'>2005 <\/td><\/tr><tr><td>6<\/td><td><b>SiteDescription.Descriptiondusite <\/b><\/td><td align='right'> <\/td><\/tr><tr class='alt'><td>7<\/td><td><b>SampleNumber.Numérod.échantillon. <\/b><\/td><td align='right'>1 <\/td><\/tr><tr><td>8<\/td><td><b>Status.État <\/b><\/td><td align='right'>Test <\/td><\/tr><tr class='alt'><td>9<\/td><td><b>status <\/b><\/td><td align='right'>2 <\/td><\/tr><tr><td>10<\/td><td><b>QAQC <\/b><\/td><td align='right'>False <\/td><\/tr><tr class='alt'><td>11<\/td><td><b>Type.Type <\/b><\/td><td align='right'>Sediment Chemistry <\/td><\/tr><tr><td>12<\/td><td><b>Variable <\/b><\/td><td align='right'>TP <\/td><\/tr><tr class='alt'><td>13<\/td><td><b>VariableDescription <\/b><\/td><td align='right'>Total Phosphorus in sediment <\/td><\/tr><tr><td>14<\/td><td><b>VariableFr <\/b><\/td><td align='right'>PT <\/td><\/tr><tr class='alt'><td>15<\/td><td><b>DescriptiondelaVariable <\/b><\/td><td align='right'>Phosphore total dans le sédiment <\/td><\/tr><tr><td>16<\/td><td><b>Unit.Unité <\/b><\/td><td align='right'>ppm <\/td><\/tr><tr class='alt'><td>17<\/td><td><b>Value.Valeur <\/b><\/td><td align='right'>1870 <\/td><\/tr><tr><td>18<\/td><td><b>MDL <\/b><\/td><td align='right'>NA <\/td><\/tr><tr class='alt'><td>19<\/td><td><b>Computed.Calculé <\/b><\/td><td align='right'>NA <\/td><\/tr><tr><td>20<\/td><td><b>Note.Remarque <\/b><\/td><td align='right'> <\/td><\/tr><tr class='alt'><td>21<\/td><td><b>depth <\/b><\/td><td align='right'>8.9 <\/td><\/tr><tr><td>22<\/td><td><b>geometry <\/b><\/td><td align='right'>sfc_POINT <\/td><\/tr><\/table><\/div><\/body><\/html>","<html><head><link rel=\"stylesheet\" type=\"text/css\" href=\"lib/popup/popup.css\"><\/head><body><div class=\"scrollableContainer\"><table class=\"popup scrollable\" id=\"popup\"><tr class='coord'><td><\/td><td><b>Feature ID<\/b><\/td><td align='right'>4759 <\/td><\/tr><tr class='alt'><td>1<\/td><td><b>Site.Site <\/b><\/td><td align='right'>RR05-5C <\/td><\/tr><tr><td>2<\/td><td><b>Protocol <\/b><\/td><td align='right'>CABIN - Open Water <\/td><\/tr><tr class='alt'><td>3<\/td><td><b>Protocole <\/b><\/td><td align='right'>RCBA - Eaux libres <\/td><\/tr><tr><td>4<\/td><td><b>JulianDay.JourJulian <\/b><\/td><td align='right'>255 <\/td><\/tr><tr class='alt'><td>5<\/td><td><b>Year.Année <\/b><\/td><td align='right'>2005 <\/td><\/tr><tr><td>6<\/td><td><b>SiteDescription.Descriptiondusite <\/b><\/td><td align='right'> <\/td><\/tr><tr class='alt'><td>7<\/td><td><b>SampleNumber.Numérod.échantillon. <\/b><\/td><td align='right'>1 <\/td><\/tr><tr><td>8<\/td><td><b>Status.État <\/b><\/td><td align='right'>Test <\/td><\/tr><tr class='alt'><td>9<\/td><td><b>status <\/b><\/td><td align='right'>2 <\/td><\/tr><tr><td>10<\/td><td><b>QAQC <\/b><\/td><td align='right'>False <\/td><\/tr><tr class='alt'><td>11<\/td><td><b>Type.Type <\/b><\/td><td align='right'>Sediment Chemistry <\/td><\/tr><tr><td>12<\/td><td><b>Variable <\/b><\/td><td align='right'>TP <\/td><\/tr><tr class='alt'><td>13<\/td><td><b>VariableDescription <\/b><\/td><td align='right'>Total Phosphorus in sediment <\/td><\/tr><tr><td>14<\/td><td><b>VariableFr <\/b><\/td><td align='right'>PT <\/td><\/tr><tr class='alt'><td>15<\/td><td><b>DescriptiondelaVariable <\/b><\/td><td align='right'>Phosphore total dans le sédiment <\/td><\/tr><tr><td>16<\/td><td><b>Unit.Unité <\/b><\/td><td align='right'>ppm <\/td><\/tr><tr class='alt'><td>17<\/td><td><b>Value.Valeur <\/b><\/td><td align='right'>2520 <\/td><\/tr><tr><td>18<\/td><td><b>MDL <\/b><\/td><td align='right'>NA <\/td><\/tr><tr class='alt'><td>19<\/td><td><b>Computed.Calculé <\/b><\/td><td align='right'>NA <\/td><\/tr><tr><td>20<\/td><td><b>Note.Remarque <\/b><\/td><td align='right'> <\/td><\/tr><tr class='alt'><td>21<\/td><td><b>depth <\/b><\/td><td align='right'>17.3 <\/td><\/tr><tr><td>22<\/td><td><b>geometry <\/b><\/td><td align='right'>sfc_POINT <\/td><\/tr><\/table><\/div><\/body><\/html>","<html><head><link rel=\"stylesheet\" type=\"text/css\" href=\"lib/popup/popup.css\"><\/head><body><div class=\"scrollableContainer\"><table class=\"popup scrollable\" id=\"popup\"><tr class='coord'><td><\/td><td><b>Feature ID<\/b><\/td><td align='right'>4921 <\/td><\/tr><tr class='alt'><td>1<\/td><td><b>Site.Site <\/b><\/td><td align='right'>RR05-5D <\/td><\/tr><tr><td>2<\/td><td><b>Protocol <\/b><\/td><td align='right'>CABIN - Open Water <\/td><\/tr><tr class='alt'><td>3<\/td><td><b>Protocole <\/b><\/td><td align='right'>RCBA - Eaux libres <\/td><\/tr><tr><td>4<\/td><td><b>JulianDay.JourJulian <\/b><\/td><td align='right'>255 <\/td><\/tr><tr class='alt'><td>5<\/td><td><b>Year.Année <\/b><\/td><td align='right'>2005 <\/td><\/tr><tr><td>6<\/td><td><b>SiteDescription.Descriptiondusite <\/b><\/td><td align='right'> <\/td><\/tr><tr class='alt'><td>7<\/td><td><b>SampleNumber.Numérod.échantillon. <\/b><\/td><td align='right'>1 <\/td><\/tr><tr><td>8<\/td><td><b>Status.État <\/b><\/td><td align='right'>Test <\/td><\/tr><tr class='alt'><td>9<\/td><td><b>status <\/b><\/td><td align='right'>2 <\/td><\/tr><tr><td>10<\/td><td><b>QAQC <\/b><\/td><td align='right'>False <\/td><\/tr><tr class='alt'><td>11<\/td><td><b>Type.Type <\/b><\/td><td align='right'>Sediment Chemistry <\/td><\/tr><tr><td>12<\/td><td><b>Variable <\/b><\/td><td align='right'>TP <\/td><\/tr><tr class='alt'><td>13<\/td><td><b>VariableDescription <\/b><\/td><td align='right'>Total Phosphorus in sediment <\/td><\/tr><tr><td>14<\/td><td><b>VariableFr <\/b><\/td><td align='right'>PT <\/td><\/tr><tr class='alt'><td>15<\/td><td><b>DescriptiondelaVariable <\/b><\/td><td align='right'>Phosphore total dans le sédiment <\/td><\/tr><tr><td>16<\/td><td><b>Unit.Unité <\/b><\/td><td align='right'>ppm <\/td><\/tr><tr class='alt'><td>17<\/td><td><b>Value.Valeur <\/b><\/td><td align='right'>2745 <\/td><\/tr><tr><td>18<\/td><td><b>MDL <\/b><\/td><td align='right'>NA <\/td><\/tr><tr class='alt'><td>19<\/td><td><b>Computed.Calculé <\/b><\/td><td align='right'>NA <\/td><\/tr><tr><td>20<\/td><td><b>Note.Remarque <\/b><\/td><td align='right'> <\/td><\/tr><tr class='alt'><td>21<\/td><td><b>depth <\/b><\/td><td align='right'>22.9 <\/td><\/tr><tr><td>22<\/td><td><b>geometry <\/b><\/td><td align='right'>sfc_POINT <\/td><\/tr><\/table><\/div><\/body><\/html>","<html><head><link rel=\"stylesheet\" type=\"text/css\" href=\"lib/popup/popup.css\"><\/head><body><div class=\"scrollableContainer\"><table class=\"popup scrollable\" id=\"popup\"><tr class='coord'><td><\/td><td><b>Feature ID<\/b><\/td><td align='right'>4975 <\/td><\/tr><tr class='alt'><td>1<\/td><td><b>Site.Site <\/b><\/td><td align='right'>RR05-5E <\/td><\/tr><tr><td>2<\/td><td><b>Protocol <\/b><\/td><td align='right'>CABIN - Open Water <\/td><\/tr><tr class='alt'><td>3<\/td><td><b>Protocole <\/b><\/td><td align='right'>RCBA - Eaux libres <\/td><\/tr><tr><td>4<\/td><td><b>JulianDay.JourJulian <\/b><\/td><td align='right'>255 <\/td><\/tr><tr class='alt'><td>5<\/td><td><b>Year.Année <\/b><\/td><td align='right'>2005 <\/td><\/tr><tr><td>6<\/td><td><b>SiteDescription.Descriptiondusite <\/b><\/td><td align='right'> <\/td><\/tr><tr class='alt'><td>7<\/td><td><b>SampleNumber.Numérod.échantillon. <\/b><\/td><td align='right'>1 <\/td><\/tr><tr><td>8<\/td><td><b>Status.État <\/b><\/td><td align='right'>Test <\/td><\/tr><tr class='alt'><td>9<\/td><td><b>status <\/b><\/td><td align='right'>2 <\/td><\/tr><tr><td>10<\/td><td><b>QAQC <\/b><\/td><td align='right'>False <\/td><\/tr><tr class='alt'><td>11<\/td><td><b>Type.Type <\/b><\/td><td align='right'>Sediment Chemistry <\/td><\/tr><tr><td>12<\/td><td><b>Variable <\/b><\/td><td align='right'>TP <\/td><\/tr><tr class='alt'><td>13<\/td><td><b>VariableDescription <\/b><\/td><td align='right'>Total Phosphorus in sediment <\/td><\/tr><tr><td>14<\/td><td><b>VariableFr <\/b><\/td><td align='right'>PT <\/td><\/tr><tr class='alt'><td>15<\/td><td><b>DescriptiondelaVariable <\/b><\/td><td align='right'>Phosphore total dans le sédiment <\/td><\/tr><tr><td>16<\/td><td><b>Unit.Unité <\/b><\/td><td align='right'>ppm <\/td><\/tr><tr class='alt'><td>17<\/td><td><b>Value.Valeur <\/b><\/td><td align='right'>2910 <\/td><\/tr><tr><td>18<\/td><td><b>MDL <\/b><\/td><td align='right'>NA <\/td><\/tr><tr class='alt'><td>19<\/td><td><b>Computed.Calculé <\/b><\/td><td align='right'>NA <\/td><\/tr><tr><td>20<\/td><td><b>Note.Remarque <\/b><\/td><td align='right'> <\/td><\/tr><tr class='alt'><td>21<\/td><td><b>depth <\/b><\/td><td align='right'>23.4 <\/td><\/tr><tr><td>22<\/td><td><b>geometry <\/b><\/td><td align='right'>sfc_POINT <\/td><\/tr><\/table><\/div><\/body><\/html>","<html><head><link rel=\"stylesheet\" type=\"text/css\" href=\"lib/popup/popup.css\"><\/head><body><div class=\"scrollableContainer\"><table class=\"popup scrollable\" id=\"popup\"><tr class='coord'><td><\/td><td><b>Feature ID<\/b><\/td><td align='right'>5029 <\/td><\/tr><tr class='alt'><td>1<\/td><td><b>Site.Site <\/b><\/td><td align='right'>RR05-5F <\/td><\/tr><tr><td>2<\/td><td><b>Protocol <\/b><\/td><td align='right'>CABIN - Open Water <\/td><\/tr><tr class='alt'><td>3<\/td><td><b>Protocole <\/b><\/td><td align='right'>RCBA - Eaux libres <\/td><\/tr><tr><td>4<\/td><td><b>JulianDay.JourJulian <\/b><\/td><td align='right'>255 <\/td><\/tr><tr class='alt'><td>5<\/td><td><b>Year.Année <\/b><\/td><td align='right'>2005 <\/td><\/tr><tr><td>6<\/td><td><b>SiteDescription.Descriptiondusite <\/b><\/td><td align='right'> <\/td><\/tr><tr class='alt'><td>7<\/td><td><b>SampleNumber.Numérod.échantillon. <\/b><\/td><td align='right'>1 <\/td><\/tr><tr><td>8<\/td><td><b>Status.État <\/b><\/td><td align='right'>Test <\/td><\/tr><tr class='alt'><td>9<\/td><td><b>status <\/b><\/td><td align='right'>2 <\/td><\/tr><tr><td>10<\/td><td><b>QAQC <\/b><\/td><td align='right'>False <\/td><\/tr><tr class='alt'><td>11<\/td><td><b>Type.Type <\/b><\/td><td align='right'>Sediment Chemistry <\/td><\/tr><tr><td>12<\/td><td><b>Variable <\/b><\/td><td align='right'>TP <\/td><\/tr><tr class='alt'><td>13<\/td><td><b>VariableDescription <\/b><\/td><td align='right'>Total Phosphorus in sediment <\/td><\/tr><tr><td>14<\/td><td><b>VariableFr <\/b><\/td><td align='right'>PT <\/td><\/tr><tr class='alt'><td>15<\/td><td><b>DescriptiondelaVariable <\/b><\/td><td align='right'>Phosphore total dans le sédiment <\/td><\/tr><tr><td>16<\/td><td><b>Unit.Unité <\/b><\/td><td align='right'>ppm <\/td><\/tr><tr class='alt'><td>17<\/td><td><b>Value.Valeur <\/b><\/td><td align='right'>2720 <\/td><\/tr><tr><td>18<\/td><td><b>MDL <\/b><\/td><td align='right'>NA <\/td><\/tr><tr class='alt'><td>19<\/td><td><b>Computed.Calculé <\/b><\/td><td align='right'>NA <\/td><\/tr><tr><td>20<\/td><td><b>Note.Remarque <\/b><\/td><td align='right'> <\/td><\/tr><tr class='alt'><td>21<\/td><td><b>depth <\/b><\/td><td align='right'>23.4 <\/td><\/tr><tr><td>22<\/td><td><b>geometry <\/b><\/td><td align='right'>sfc_POINT <\/td><\/tr><\/table><\/div><\/body><\/html>","<html><head><link rel=\"stylesheet\" type=\"text/css\" href=\"lib/popup/popup.css\"><\/head><body><div class=\"scrollableContainer\"><table class=\"popup scrollable\" id=\"popup\"><tr class='coord'><td><\/td><td><b>Feature ID<\/b><\/td><td align='right'>5059 <\/td><\/tr><tr class='alt'><td>1<\/td><td><b>Site.Site <\/b><\/td><td align='right'>RR05-5G <\/td><\/tr><tr><td>2<\/td><td><b>Protocol <\/b><\/td><td align='right'>CABIN - Open Water <\/td><\/tr><tr class='alt'><td>3<\/td><td><b>Protocole <\/b><\/td><td align='right'>RCBA - Eaux libres <\/td><\/tr><tr><td>4<\/td><td><b>JulianDay.JourJulian <\/b><\/td><td align='right'>256 <\/td><\/tr><tr class='alt'><td>5<\/td><td><b>Year.Année <\/b><\/td><td align='right'>2005 <\/td><\/tr><tr><td>6<\/td><td><b>SiteDescription.Descriptiondusite <\/b><\/td><td align='right'> <\/td><\/tr><tr class='alt'><td>7<\/td><td><b>SampleNumber.Numérod.échantillon. <\/b><\/td><td align='right'>1 <\/td><\/tr><tr><td>8<\/td><td><b>Status.État <\/b><\/td><td align='right'>Test <\/td><\/tr><tr class='alt'><td>9<\/td><td><b>status <\/b><\/td><td align='right'>2 <\/td><\/tr><tr><td>10<\/td><td><b>QAQC <\/b><\/td><td align='right'>False <\/td><\/tr><tr class='alt'><td>11<\/td><td><b>Type.Type <\/b><\/td><td align='right'>Sediment Chemistry <\/td><\/tr><tr><td>12<\/td><td><b>Variable <\/b><\/td><td align='right'>TP <\/td><\/tr><tr class='alt'><td>13<\/td><td><b>VariableDescription <\/b><\/td><td align='right'>Total Phosphorus in sediment <\/td><\/tr><tr><td>14<\/td><td><b>VariableFr <\/b><\/td><td align='right'>PT <\/td><\/tr><tr class='alt'><td>15<\/td><td><b>DescriptiondelaVariable <\/b><\/td><td align='right'>Phosphore total dans le sédiment <\/td><\/tr><tr><td>16<\/td><td><b>Unit.Unité <\/b><\/td><td align='right'>ppm <\/td><\/tr><tr class='alt'><td>17<\/td><td><b>Value.Valeur <\/b><\/td><td align='right'>2590 <\/td><\/tr><tr><td>18<\/td><td><b>MDL <\/b><\/td><td align='right'>NA <\/td><\/tr><tr class='alt'><td>19<\/td><td><b>Computed.Calculé <\/b><\/td><td align='right'>NA <\/td><\/tr><tr><td>20<\/td><td><b>Note.Remarque <\/b><\/td><td align='right'> <\/td><\/tr><tr class='alt'><td>21<\/td><td><b>depth <\/b><\/td><td align='right'>22.2 <\/td><\/tr><tr><td>22<\/td><td><b>geometry <\/b><\/td><td align='right'>sfc_POINT <\/td><\/tr><\/table><\/div><\/body><\/html>","<html><head><link rel=\"stylesheet\" type=\"text/css\" href=\"lib/popup/popup.css\"><\/head><body><div class=\"scrollableContainer\"><table class=\"popup scrollable\" id=\"popup\"><tr class='coord'><td><\/td><td><b>Feature ID<\/b><\/td><td align='right'>5137 <\/td><\/tr><tr class='alt'><td>1<\/td><td><b>Site.Site <\/b><\/td><td align='right'>RR05-6A <\/td><\/tr><tr><td>2<\/td><td><b>Protocol <\/b><\/td><td align='right'>CABIN - Open Water <\/td><\/tr><tr class='alt'><td>3<\/td><td><b>Protocole <\/b><\/td><td align='right'>RCBA - Eaux libres <\/td><\/tr><tr><td>4<\/td><td><b>JulianDay.JourJulian <\/b><\/td><td align='right'>256 <\/td><\/tr><tr class='alt'><td>5<\/td><td><b>Year.Année <\/b><\/td><td align='right'>2005 <\/td><\/tr><tr><td>6<\/td><td><b>SiteDescription.Descriptiondusite <\/b><\/td><td align='right'> <\/td><\/tr><tr class='alt'><td>7<\/td><td><b>SampleNumber.Numérod.échantillon. <\/b><\/td><td align='right'>1 <\/td><\/tr><tr><td>8<\/td><td><b>Status.État <\/b><\/td><td align='right'>Test <\/td><\/tr><tr class='alt'><td>9<\/td><td><b>status <\/b><\/td><td align='right'>2 <\/td><\/tr><tr><td>10<\/td><td><b>QAQC <\/b><\/td><td align='right'>False <\/td><\/tr><tr class='alt'><td>11<\/td><td><b>Type.Type <\/b><\/td><td align='right'>Sediment Chemistry <\/td><\/tr><tr><td>12<\/td><td><b>Variable <\/b><\/td><td align='right'>TP <\/td><\/tr><tr class='alt'><td>13<\/td><td><b>VariableDescription <\/b><\/td><td align='right'>Total Phosphorus in sediment <\/td><\/tr><tr><td>14<\/td><td><b>VariableFr <\/b><\/td><td align='right'>PT <\/td><\/tr><tr class='alt'><td>15<\/td><td><b>DescriptiondelaVariable <\/b><\/td><td align='right'>Phosphore total dans le sédiment <\/td><\/tr><tr><td>16<\/td><td><b>Unit.Unité <\/b><\/td><td align='right'>ppm <\/td><\/tr><tr class='alt'><td>17<\/td><td><b>Value.Valeur <\/b><\/td><td align='right'>1290 <\/td><\/tr><tr><td>18<\/td><td><b>MDL <\/b><\/td><td align='right'>NA <\/td><\/tr><tr class='alt'><td>19<\/td><td><b>Computed.Calculé <\/b><\/td><td align='right'>NA <\/td><\/tr><tr><td>20<\/td><td><b>Note.Remarque <\/b><\/td><td align='right'> <\/td><\/tr><tr class='alt'><td>21<\/td><td><b>depth <\/b><\/td><td align='right'>8.5 <\/td><\/tr><tr><td>22<\/td><td><b>geometry <\/b><\/td><td align='right'>sfc_POINT <\/td><\/tr><\/table><\/div><\/body><\/html>","<html><head><link rel=\"stylesheet\" type=\"text/css\" href=\"lib/popup/popup.css\"><\/head><body><div class=\"scrollableContainer\"><table class=\"popup scrollable\" id=\"popup\"><tr class='coord'><td><\/td><td><b>Feature ID<\/b><\/td><td align='right'>5191 <\/td><\/tr><tr class='alt'><td>1<\/td><td><b>Site.Site <\/b><\/td><td align='right'>RR05-6B <\/td><\/tr><tr><td>2<\/td><td><b>Protocol <\/b><\/td><td align='right'>CABIN - Open Water <\/td><\/tr><tr class='alt'><td>3<\/td><td><b>Protocole <\/b><\/td><td align='right'>RCBA - Eaux libres <\/td><\/tr><tr><td>4<\/td><td><b>JulianDay.JourJulian <\/b><\/td><td align='right'>256 <\/td><\/tr><tr class='alt'><td>5<\/td><td><b>Year.Année <\/b><\/td><td align='right'>2005 <\/td><\/tr><tr><td>6<\/td><td><b>SiteDescription.Descriptiondusite <\/b><\/td><td align='right'> <\/td><\/tr><tr class='alt'><td>7<\/td><td><b>SampleNumber.Numérod.échantillon. <\/b><\/td><td align='right'>1 <\/td><\/tr><tr><td>8<\/td><td><b>Status.État <\/b><\/td><td align='right'>Test <\/td><\/tr><tr class='alt'><td>9<\/td><td><b>status <\/b><\/td><td align='right'>2 <\/td><\/tr><tr><td>10<\/td><td><b>QAQC <\/b><\/td><td align='right'>False <\/td><\/tr><tr class='alt'><td>11<\/td><td><b>Type.Type <\/b><\/td><td align='right'>Sediment Chemistry <\/td><\/tr><tr><td>12<\/td><td><b>Variable <\/b><\/td><td align='right'>TP <\/td><\/tr><tr class='alt'><td>13<\/td><td><b>VariableDescription <\/b><\/td><td align='right'>Total Phosphorus in sediment <\/td><\/tr><tr><td>14<\/td><td><b>VariableFr <\/b><\/td><td align='right'>PT <\/td><\/tr><tr class='alt'><td>15<\/td><td><b>DescriptiondelaVariable <\/b><\/td><td align='right'>Phosphore total dans le sédiment <\/td><\/tr><tr><td>16<\/td><td><b>Unit.Unité <\/b><\/td><td align='right'>ppm <\/td><\/tr><tr class='alt'><td>17<\/td><td><b>Value.Valeur <\/b><\/td><td align='right'>1240 <\/td><\/tr><tr><td>18<\/td><td><b>MDL <\/b><\/td><td align='right'>NA <\/td><\/tr><tr class='alt'><td>19<\/td><td><b>Computed.Calculé <\/b><\/td><td align='right'>NA <\/td><\/tr><tr><td>20<\/td><td><b>Note.Remarque <\/b><\/td><td align='right'> <\/td><\/tr><tr class='alt'><td>21<\/td><td><b>depth <\/b><\/td><td align='right'>8.5 <\/td><\/tr><tr><td>22<\/td><td><b>geometry <\/b><\/td><td align='right'>sfc_POINT <\/td><\/tr><\/table><\/div><\/body><\/html>","<html><head><link rel=\"stylesheet\" type=\"text/css\" href=\"lib/popup/popup.css\"><\/head><body><div class=\"scrollableContainer\"><table class=\"popup scrollable\" id=\"popup\"><tr class='coord'><td><\/td><td><b>Feature ID<\/b><\/td><td align='right'>5245 <\/td><\/tr><tr class='alt'><td>1<\/td><td><b>Site.Site <\/b><\/td><td align='right'>RR05-6C <\/td><\/tr><tr><td>2<\/td><td><b>Protocol <\/b><\/td><td align='right'>CABIN - Open Water <\/td><\/tr><tr class='alt'><td>3<\/td><td><b>Protocole <\/b><\/td><td align='right'>RCBA - Eaux libres <\/td><\/tr><tr><td>4<\/td><td><b>JulianDay.JourJulian <\/b><\/td><td align='right'>256 <\/td><\/tr><tr class='alt'><td>5<\/td><td><b>Year.Année <\/b><\/td><td align='right'>2005 <\/td><\/tr><tr><td>6<\/td><td><b>SiteDescription.Descriptiondusite <\/b><\/td><td align='right'> <\/td><\/tr><tr class='alt'><td>7<\/td><td><b>SampleNumber.Numérod.échantillon. <\/b><\/td><td align='right'>1 <\/td><\/tr><tr><td>8<\/td><td><b>Status.État <\/b><\/td><td align='right'>Test <\/td><\/tr><tr class='alt'><td>9<\/td><td><b>status <\/b><\/td><td align='right'>2 <\/td><\/tr><tr><td>10<\/td><td><b>QAQC <\/b><\/td><td align='right'>False <\/td><\/tr><tr class='alt'><td>11<\/td><td><b>Type.Type <\/b><\/td><td align='right'>Sediment Chemistry <\/td><\/tr><tr><td>12<\/td><td><b>Variable <\/b><\/td><td align='right'>TP <\/td><\/tr><tr class='alt'><td>13<\/td><td><b>VariableDescription <\/b><\/td><td align='right'>Total Phosphorus in sediment <\/td><\/tr><tr><td>14<\/td><td><b>VariableFr <\/b><\/td><td align='right'>PT <\/td><\/tr><tr class='alt'><td>15<\/td><td><b>DescriptiondelaVariable <\/b><\/td><td align='right'>Phosphore total dans le sédiment <\/td><\/tr><tr><td>16<\/td><td><b>Unit.Unité <\/b><\/td><td align='right'>ppm <\/td><\/tr><tr class='alt'><td>17<\/td><td><b>Value.Valeur <\/b><\/td><td align='right'>2180 <\/td><\/tr><tr><td>18<\/td><td><b>MDL <\/b><\/td><td align='right'>NA <\/td><\/tr><tr class='alt'><td>19<\/td><td><b>Computed.Calculé <\/b><\/td><td align='right'>NA <\/td><\/tr><tr><td>20<\/td><td><b>Note.Remarque <\/b><\/td><td align='right'> <\/td><\/tr><tr class='alt'><td>21<\/td><td><b>depth <\/b><\/td><td align='right'>24.7 <\/td><\/tr><tr><td>22<\/td><td><b>geometry <\/b><\/td><td align='right'>sfc_POINT <\/td><\/tr><\/table><\/div><\/body><\/html>","<html><head><link rel=\"stylesheet\" type=\"text/css\" href=\"lib/popup/popup.css\"><\/head><body><div class=\"scrollableContainer\"><table class=\"popup scrollable\" id=\"popup\"><tr class='coord'><td><\/td><td><b>Feature ID<\/b><\/td><td align='right'>5299 <\/td><\/tr><tr class='alt'><td>1<\/td><td><b>Site.Site <\/b><\/td><td align='right'>RR05-6D <\/td><\/tr><tr><td>2<\/td><td><b>Protocol <\/b><\/td><td align='right'>CABIN - Open Water <\/td><\/tr><tr class='alt'><td>3<\/td><td><b>Protocole <\/b><\/td><td align='right'>RCBA - Eaux libres <\/td><\/tr><tr><td>4<\/td><td><b>JulianDay.JourJulian <\/b><\/td><td align='right'>256 <\/td><\/tr><tr class='alt'><td>5<\/td><td><b>Year.Année <\/b><\/td><td align='right'>2005 <\/td><\/tr><tr><td>6<\/td><td><b>SiteDescription.Descriptiondusite <\/b><\/td><td align='right'> <\/td><\/tr><tr class='alt'><td>7<\/td><td><b>SampleNumber.Numérod.échantillon. <\/b><\/td><td align='right'>1 <\/td><\/tr><tr><td>8<\/td><td><b>Status.État <\/b><\/td><td align='right'>Test <\/td><\/tr><tr class='alt'><td>9<\/td><td><b>status <\/b><\/td><td align='right'>2 <\/td><\/tr><tr><td>10<\/td><td><b>QAQC <\/b><\/td><td align='right'>False <\/td><\/tr><tr class='alt'><td>11<\/td><td><b>Type.Type <\/b><\/td><td align='right'>Sediment Chemistry <\/td><\/tr><tr><td>12<\/td><td><b>Variable <\/b><\/td><td align='right'>TP <\/td><\/tr><tr class='alt'><td>13<\/td><td><b>VariableDescription <\/b><\/td><td align='right'>Total Phosphorus in sediment <\/td><\/tr><tr><td>14<\/td><td><b>VariableFr <\/b><\/td><td align='right'>PT <\/td><\/tr><tr class='alt'><td>15<\/td><td><b>DescriptiondelaVariable <\/b><\/td><td align='right'>Phosphore total dans le sédiment <\/td><\/tr><tr><td>16<\/td><td><b>Unit.Unité <\/b><\/td><td align='right'>ppm <\/td><\/tr><tr class='alt'><td>17<\/td><td><b>Value.Valeur <\/b><\/td><td align='right'>2110 <\/td><\/tr><tr><td>18<\/td><td><b>MDL <\/b><\/td><td align='right'>NA <\/td><\/tr><tr class='alt'><td>19<\/td><td><b>Computed.Calculé <\/b><\/td><td align='right'>NA <\/td><\/tr><tr><td>20<\/td><td><b>Note.Remarque <\/b><\/td><td align='right'> <\/td><\/tr><tr class='alt'><td>21<\/td><td><b>depth <\/b><\/td><td align='right'>22.3 <\/td><\/tr><tr><td>22<\/td><td><b>geometry <\/b><\/td><td align='right'>sfc_POINT <\/td><\/tr><\/table><\/div><\/body><\/html>","<html><head><link rel=\"stylesheet\" type=\"text/css\" href=\"lib/popup/popup.css\"><\/head><body><div class=\"scrollableContainer\"><table class=\"popup scrollable\" id=\"popup\"><tr class='coord'><td><\/td><td><b>Feature ID<\/b><\/td><td align='right'>5353 <\/td><\/tr><tr class='alt'><td>1<\/td><td><b>Site.Site <\/b><\/td><td align='right'>RR05-6E <\/td><\/tr><tr><td>2<\/td><td><b>Protocol <\/b><\/td><td align='right'>CABIN - Open Water <\/td><\/tr><tr class='alt'><td>3<\/td><td><b>Protocole <\/b><\/td><td align='right'>RCBA - Eaux libres <\/td><\/tr><tr><td>4<\/td><td><b>JulianDay.JourJulian <\/b><\/td><td align='right'>256 <\/td><\/tr><tr class='alt'><td>5<\/td><td><b>Year.Année <\/b><\/td><td align='right'>2005 <\/td><\/tr><tr><td>6<\/td><td><b>SiteDescription.Descriptiondusite <\/b><\/td><td align='right'> <\/td><\/tr><tr class='alt'><td>7<\/td><td><b>SampleNumber.Numérod.échantillon. <\/b><\/td><td align='right'>1 <\/td><\/tr><tr><td>8<\/td><td><b>Status.État <\/b><\/td><td align='right'>Test <\/td><\/tr><tr class='alt'><td>9<\/td><td><b>status <\/b><\/td><td align='right'>2 <\/td><\/tr><tr><td>10<\/td><td><b>QAQC <\/b><\/td><td align='right'>False <\/td><\/tr><tr class='alt'><td>11<\/td><td><b>Type.Type <\/b><\/td><td align='right'>Sediment Chemistry <\/td><\/tr><tr><td>12<\/td><td><b>Variable <\/b><\/td><td align='right'>TP <\/td><\/tr><tr class='alt'><td>13<\/td><td><b>VariableDescription <\/b><\/td><td align='right'>Total Phosphorus in sediment <\/td><\/tr><tr><td>14<\/td><td><b>VariableFr <\/b><\/td><td align='right'>PT <\/td><\/tr><tr class='alt'><td>15<\/td><td><b>DescriptiondelaVariable <\/b><\/td><td align='right'>Phosphore total dans le sédiment <\/td><\/tr><tr><td>16<\/td><td><b>Unit.Unité <\/b><\/td><td align='right'>ppm <\/td><\/tr><tr class='alt'><td>17<\/td><td><b>Value.Valeur <\/b><\/td><td align='right'>2940 <\/td><\/tr><tr><td>18<\/td><td><b>MDL <\/b><\/td><td align='right'>NA <\/td><\/tr><tr class='alt'><td>19<\/td><td><b>Computed.Calculé <\/b><\/td><td align='right'>NA <\/td><\/tr><tr><td>20<\/td><td><b>Note.Remarque <\/b><\/td><td align='right'> <\/td><\/tr><tr class='alt'><td>21<\/td><td><b>depth <\/b><\/td><td align='right'>23.3 <\/td><\/tr><tr><td>22<\/td><td><b>geometry <\/b><\/td><td align='right'>sfc_POINT <\/td><\/tr><\/table><\/div><\/body><\/html>","<html><head><link rel=\"stylesheet\" type=\"text/css\" href=\"lib/popup/popup.css\"><\/head><body><div class=\"scrollableContainer\"><table class=\"popup scrollable\" id=\"popup\"><tr class='coord'><td><\/td><td><b>Feature ID<\/b><\/td><td align='right'>5407 <\/td><\/tr><tr class='alt'><td>1<\/td><td><b>Site.Site <\/b><\/td><td align='right'>RR05-6F <\/td><\/tr><tr><td>2<\/td><td><b>Protocol <\/b><\/td><td align='right'>CABIN - Open Water <\/td><\/tr><tr class='alt'><td>3<\/td><td><b>Protocole <\/b><\/td><td align='right'>RCBA - Eaux libres <\/td><\/tr><tr><td>4<\/td><td><b>JulianDay.JourJulian <\/b><\/td><td align='right'>256 <\/td><\/tr><tr class='alt'><td>5<\/td><td><b>Year.Année <\/b><\/td><td align='right'>2005 <\/td><\/tr><tr><td>6<\/td><td><b>SiteDescription.Descriptiondusite <\/b><\/td><td align='right'> <\/td><\/tr><tr class='alt'><td>7<\/td><td><b>SampleNumber.Numérod.échantillon. <\/b><\/td><td align='right'>1 <\/td><\/tr><tr><td>8<\/td><td><b>Status.État <\/b><\/td><td align='right'>Test <\/td><\/tr><tr class='alt'><td>9<\/td><td><b>status <\/b><\/td><td align='right'>2 <\/td><\/tr><tr><td>10<\/td><td><b>QAQC <\/b><\/td><td align='right'>False <\/td><\/tr><tr class='alt'><td>11<\/td><td><b>Type.Type <\/b><\/td><td align='right'>Sediment Chemistry <\/td><\/tr><tr><td>12<\/td><td><b>Variable <\/b><\/td><td align='right'>TP <\/td><\/tr><tr class='alt'><td>13<\/td><td><b>VariableDescription <\/b><\/td><td align='right'>Total Phosphorus in sediment <\/td><\/tr><tr><td>14<\/td><td><b>VariableFr <\/b><\/td><td align='right'>PT <\/td><\/tr><tr class='alt'><td>15<\/td><td><b>DescriptiondelaVariable <\/b><\/td><td align='right'>Phosphore total dans le sédiment <\/td><\/tr><tr><td>16<\/td><td><b>Unit.Unité <\/b><\/td><td align='right'>ppm <\/td><\/tr><tr class='alt'><td>17<\/td><td><b>Value.Valeur <\/b><\/td><td align='right'>2880 <\/td><\/tr><tr><td>18<\/td><td><b>MDL <\/b><\/td><td align='right'>NA <\/td><\/tr><tr class='alt'><td>19<\/td><td><b>Computed.Calculé <\/b><\/td><td align='right'>NA <\/td><\/tr><tr><td>20<\/td><td><b>Note.Remarque <\/b><\/td><td align='right'> <\/td><\/tr><tr class='alt'><td>21<\/td><td><b>depth <\/b><\/td><td align='right'>22.3 <\/td><\/tr><tr><td>22<\/td><td><b>geometry <\/b><\/td><td align='right'>sfc_POINT <\/td><\/tr><\/table><\/div><\/body><\/html>","<html><head><link rel=\"stylesheet\" type=\"text/css\" href=\"lib/popup/popup.css\"><\/head><body><div class=\"scrollableContainer\"><table class=\"popup scrollable\" id=\"popup\"><tr class='coord'><td><\/td><td><b>Feature ID<\/b><\/td><td align='right'>6109 <\/td><\/tr><tr class='alt'><td>1<\/td><td><b>Site.Site <\/b><\/td><td align='right'>RR74(2005) <\/td><\/tr><tr><td>2<\/td><td><b>Protocol <\/b><\/td><td align='right'>CABIN - Open Water <\/td><\/tr><tr class='alt'><td>3<\/td><td><b>Protocole <\/b><\/td><td align='right'>RCBA - Eaux libres <\/td><\/tr><tr><td>4<\/td><td><b>JulianDay.JourJulian <\/b><\/td><td align='right'>250 <\/td><\/tr><tr class='alt'><td>5<\/td><td><b>Year.Année <\/b><\/td><td align='right'>2005 <\/td><\/tr><tr><td>6<\/td><td><b>SiteDescription.Descriptiondusite <\/b><\/td><td align='right'> <\/td><\/tr><tr class='alt'><td>7<\/td><td><b>SampleNumber.Numérod.échantillon. <\/b><\/td><td align='right'>1 <\/td><\/tr><tr><td>8<\/td><td><b>Status.État <\/b><\/td><td align='right'>Test <\/td><\/tr><tr class='alt'><td>9<\/td><td><b>status <\/b><\/td><td align='right'>2 <\/td><\/tr><tr><td>10<\/td><td><b>QAQC <\/b><\/td><td align='right'>False <\/td><\/tr><tr class='alt'><td>11<\/td><td><b>Type.Type <\/b><\/td><td align='right'>Sediment Chemistry <\/td><\/tr><tr><td>12<\/td><td><b>Variable <\/b><\/td><td align='right'>TP <\/td><\/tr><tr class='alt'><td>13<\/td><td><b>VariableDescription <\/b><\/td><td align='right'>Total Phosphorus in sediment <\/td><\/tr><tr><td>14<\/td><td><b>VariableFr <\/b><\/td><td align='right'>PT <\/td><\/tr><tr class='alt'><td>15<\/td><td><b>DescriptiondelaVariable <\/b><\/td><td align='right'>Phosphore total dans le sédiment <\/td><\/tr><tr><td>16<\/td><td><b>Unit.Unité <\/b><\/td><td align='right'>ppm <\/td><\/tr><tr class='alt'><td>17<\/td><td><b>Value.Valeur <\/b><\/td><td align='right'>1980 <\/td><\/tr><tr><td>18<\/td><td><b>MDL <\/b><\/td><td align='right'>NA <\/td><\/tr><tr class='alt'><td>19<\/td><td><b>Computed.Calculé <\/b><\/td><td align='right'>NA <\/td><\/tr><tr><td>20<\/td><td><b>Note.Remarque <\/b><\/td><td align='right'> <\/td><\/tr><tr class='alt'><td>21<\/td><td><b>depth <\/b><\/td><td align='right'>4.9 <\/td><\/tr><tr><td>22<\/td><td><b>geometry <\/b><\/td><td align='right'>sfc_POINT <\/td><\/tr><\/table><\/div><\/body><\/html>"],{"maxWidth":800,"minWidth":50,"autoPan":true,"keepInView":false,"closeButton":true,"closeOnClick":true,"className":""},["2330","277","3130","2350","649","3430","1195","2200","1620","1930","2710","1990","965","1030","1220","1640","2020","2360","2030","2340","2170","3590","2000","3050","2620","2350","1980","2200","2870","2410","2370","1410","1870","2520","2745","2910","2720","2590","1290","1240","2180","2110","2940","2880","1980"],{"interactive":false,"permanent":false,"direction":"auto","opacity":1,"offset":[0,0],"textsize":"10px","textOnly":false,"className":"","sticky":true},null]},{"method":"addScaleBar","args":[{"maxWidth":100,"metric":true,"imperial":true,"updateWhenIdle":true,"position":"bottomleft"}]},{"method":"addHomeButton","args":[-79.882028961,43.2744748053999,-79.8021296293333,43.3064166664999,"Zoom to tpSP - Value.Valeur","<strong> tpSP - Value.Valeur <\/strong>","bottomright"]},{"method":"addLayersControl","args":[["CartoDB.Positron","CartoDB.DarkMatter","OpenStreetMap","Esri.WorldImagery","OpenTopoMap"],"tpSP - Value.Valeur",{"collapsed":true,"autoZIndex":true,"position":"topleft"}]},{"method":"addLegend","args":[{"colors":["#440154 , #481A6C 6.73105946272261%, #3E4989 21.8231210383338%, #2D718E 36.9151826139451%, #20958B 52.0072441895563%, #37B977 67.0993057651675%, #88D548 82.1913673407788%, #ECE51C 97.28342891639%, #FDE725 "],"labels":["500","1,000","1,500","2,000","2,500","3,000","3,500"],"na_color":null,"na_label":"NA","opacity":1,"position":"topright","type":"numeric","title":"tpSP - Value.Valeur","extra":{"p_1":0.0673105946272261,"p_n":0.9728342891639},"layerId":null,"className":"info legend","group":"tpSP - Value.Valeur"}]}],"limits":{"lat":[43.2744748053999,43.3064166664999],"lng":[-79.882028961,-79.8021296293333]}},"evals":[],"jsHooks":{"render":[{"code":"function(el, x, data) {\n return (\n function(el, x, data) {\n // get the leaflet map\n var map = this; //HTMLWidgets.find('#' + el.id);\n // we need a new div element because we have to handle\n // the mouseover output separately\n // debugger;\n function addElement () {\n // generate new div Element\n var newDiv = $(document.createElement('div'));\n // append at end of leaflet htmlwidget container\n $(el).append(newDiv);\n //provide ID and style\n newDiv.addClass('lnlt');\n newDiv.css({\n 'position': 'relative',\n 'bottomleft': '0px',\n 'background-color': 'rgba(255, 255, 255, 0.7)',\n 'box-shadow': '0 0 2px #bbb',\n 'background-clip': 'padding-box',\n 'margin': '0',\n 'padding-left': '5px',\n 'color': '#333',\n 'font': '9px/1.5 \"Helvetica Neue\", Arial, Helvetica, sans-serif',\n 'z-index': '700',\n });\n return newDiv;\n }\n\n\n // check for already existing lnlt class to not duplicate\n var lnlt = $(el).find('.lnlt');\n\n if(!lnlt.length) {\n lnlt = addElement();\n\n // grab the special div we generated in the beginning\n // and put the mousmove output there\n\n map.on('mousemove', function (e) {\n if (e.originalEvent.ctrlKey) {\n if (document.querySelector('.lnlt') === null) lnlt = addElement();\n lnlt.text(\n ' lon: ' + (e.latlng.lng).toFixed(5) +\n ' | lat: ' + (e.latlng.lat).toFixed(5) +\n ' | zoom: ' + map.getZoom() +\n ' | x: ' + L.CRS.EPSG3857.project(e.latlng).x.toFixed(0) +\n ' | y: ' + L.CRS.EPSG3857.project(e.latlng).y.toFixed(0) +\n ' | epsg: 3857 ' +\n ' | proj4: +proj=merc +a=6378137 +b=6378137 +lat_ts=0.0 +lon_0=0.0 +x_0=0.0 +y_0=0 +k=1.0 +units=m +nadgrids=@null +no_defs ');\n } else {\n if (document.querySelector('.lnlt') === null) lnlt = addElement();\n lnlt.text(\n ' lon: ' + (e.latlng.lng).toFixed(5) +\n ' | lat: ' + (e.latlng.lat).toFixed(5) +\n ' | zoom: ' + map.getZoom() + ' ');\n }\n });\n\n // remove the lnlt div when mouse leaves map\n map.on('mouseout', function (e) {\n var strip = document.querySelector('.lnlt');\n strip.remove();\n });\n\n };\n\n //$(el).keypress(67, function(e) {\n map.on('preclick', function(e) {\n if (e.originalEvent.ctrlKey) {\n if (document.querySelector('.lnlt') === null) lnlt = addElement();\n lnlt.text(\n ' lon: ' + (e.latlng.lng).toFixed(5) +\n ' | lat: ' + (e.latlng.lat).toFixed(5) +\n ' | zoom: ' + map.getZoom() + ' ');\n var txt = document.querySelector('.lnlt').textContent;\n console.log(txt);\n //txt.innerText.focus();\n //txt.select();\n setClipboardText('\"' + txt + '\"');\n }\n });\n\n //map.on('click', function (e) {\n // var txt = document.querySelector('.lnlt').textContent;\n // console.log(txt);\n // //txt.innerText.focus();\n // //txt.select();\n // setClipboardText(txt);\n //});\n\n function setClipboardText(text){\n var id = 'mycustom-clipboard-textarea-hidden-id';\n var existsTextarea = document.getElementById(id);\n\n if(!existsTextarea){\n console.log('Creating textarea');\n var textarea = document.createElement('textarea');\n textarea.id = id;\n // Place in top-left corner of screen regardless of scroll position.\n textarea.style.position = 'fixed';\n textarea.style.top = 0;\n textarea.style.left = 0;\n\n // Ensure it has a small width and height. Setting to 1px / 1em\n // doesn't work as this gives a negative w/h on some browsers.\n textarea.style.width = '1px';\n textarea.style.height = '1px';\n\n // We don't need padding, reducing the size if it does flash render.\n textarea.style.padding = 0;\n\n // Clean up any borders.\n textarea.style.border = 'none';\n textarea.style.outline = 'none';\n textarea.style.boxShadow = 'none';\n\n // Avoid flash of white box if rendered for any reason.\n textarea.style.background = 'transparent';\n document.querySelector('body').appendChild(textarea);\n console.log('The textarea now exists :)');\n existsTextarea = document.getElementById(id);\n }else{\n console.log('The textarea already exists :3')\n }\n\n existsTextarea.value = text;\n existsTextarea.select();\n\n try {\n var status = document.execCommand('copy');\n if(!status){\n console.error('Cannot copy text');\n }else{\n console.log('The text is now on the clipboard');\n }\n } catch (err) {\n console.log('Unable to copy.');\n }\n }\n\n\n }\n ).call(this.getMap(), el, x, data);\n}","data":null}]}}</script> ## Step 1 - Let's think of what we are measuring - Do we know how it should vary in space (from the litterature) ? - Are there some particularities of the sampling we need to account for ? - ... --- # Fitting a model variogram in practice ## Step 2 - Choosing the right model variogram Let's look at the empirical variogram <img src="index_files/figure-html/unnamed-chunk-22-1.png" style="display: block; margin: auto;" /> We also need to think about: - The property of the variable we are modelling - The reasons **why** we want to model it For this example, we will use the **exponential** model variogram. --- # Fitting a model variogram in practice ## .small[Step 3 - Choosing the way to fit the model variogram] Always keep in mind : - The property of the variable we are modelling - The reasons **why** we want to model it Let's use REML ! --- # Fitting a model variogram in practice ## Step 4 - Selecting good starting values ```r modelIni <- vgm(psill = 5.5e5, model = "Exp", range = 400, nugget = 100) plot(varioCloud, model = modelIni, lwd = 3) ``` <img src="index_files/figure-html/unnamed-chunk-23-1.png" style="display: block; margin: auto;" /> --- # Fitting a model variogram in practice ## Step 5 - Fitting the model variogram ```r tpDF <- data.frame(x = coordinates(tpSP)[,1], y = coordinates(tpSP)[,2], tpSP@data) modelVario <- fit.variogram.reml(Value.Valeur ~ 1, ~ x + y, data = tpDF, model =modelIni) ``` --- # Fitting a model variogram in practice ## Step 6 - Visualization <img src="index_files/figure-html/unnamed-chunk-25-1.png" style="display: block; margin: auto;" /> --- class: inverse, center, middle # Spatial kriging --- # Definition .content-box-green[ **Kriging** A form of linear interpolation that guaranties the minimum variance in the estimation. It is also known as *Gaussian process regression*. ] ## Types of kriging There are three different form of kriging - Simple kriging - Ordinary kriging - Universal kriging --- # .footnotesize[General mathematical definition of kriging] `$$\widehat{Z}(\mathbf{s}_\alpha, t_\phi) = \mathbf{X}(\mathbf{s}_\alpha, t_\phi)\widehat{\boldsymbol\beta} + \boldsymbol{v}\mathbf{V}^{-1}(Z(\mathbf{s}, t) - \mathbf{X}\widehat{\boldsymbol\beta})$$` where - `\(Z(\mathbf{s}, t)\)` the values at all sampled locations in space and through time - `\(\widehat{Z}(\mathbf{s}_\alpha, t_\phi)\)` is the kriging estimation at location `\(\mathbf{s}_\alpha\)` at time `\(t_\phi\)` - `\(\mathbf{X}(\mathbf{s}_\alpha, t_\phi)\)` is an explanatory variable gathered at location `\(\mathbf{s}_\alpha\)` at time `\(t_\phi\)` - `\(\widehat{\boldsymbol\beta}\)` is an *estimated* regression parameter - `\(\boldsymbol{v}\)` is a vector of *estimated* covariance of - `\(Z(\mathbf{s}_\alpha, t_\phi)\)` the value at location `\(\mathbf{s}_\alpha\)` at time `\(t_\phi\)` - `\(Z(\mathbf{s}, t)\)` the values at all sampled locations - `\(\mathbf{V}^{-1}\)` is the inverse of covariance matrix obtained from the model variogram --- # Simple kriging `$$\widehat{Z}(\mathbf{s}_\alpha, t_\phi) = \mathbf{X}(\mathbf{s}_\alpha, t_\phi)\widehat{\boldsymbol\beta} + \boldsymbol{v}\mathbf{V}^{-1}(Z(\mathbf{s}, t) - \mathbf{X}\widehat{\boldsymbol\beta})$$` In the previous equation, if `\(\widehat{\boldsymbol\beta}\)` is known and it represents, we have a **simple kriging**. The reason for this terminology is that many aspects of the equation above simplifies `$$\begin{align} \widehat{Z}(\mathbf{s}_\alpha, t_\phi) &= \mathbf{X}(\mathbf{s}_\alpha, t_\phi)\widehat{\boldsymbol\beta} + \boldsymbol{v}\mathbf{V}^{-1}(Z(\mathbf{s}, t) - \mathbf{X}\widehat{\boldsymbol\beta})\\ &= \widehat{\boldsymbol\beta} + \boldsymbol{v}\mathbf{V}^{-1}(Z(\mathbf{s}, t) - \widehat{\boldsymbol\beta})\\&= \text{constant}_1 + \boldsymbol{v}\mathbf{V}^{-1}\text{constant}_2 \end{align}$$` In short, in simple kriging, we make the interpolation using solely a weighted covariance. --- # Ordinary kriging `$$\widehat{Z}(\mathbf{s}_\alpha, t_\phi) = \mathbf{X}(\mathbf{s}_\alpha, t_\phi)\widehat{\boldsymbol\beta} + \boldsymbol{v}\mathbf{V}^{-1}(Z(\mathbf{s}, t) - \mathbf{X}\widehat{\boldsymbol\beta})$$` In ordinary kriging, we also assume that there is only a single regression parameter `\(\widehat{\boldsymbol\beta}\)` that accounts for the model intercept, but it is estimated. `$$\begin{align} \widehat{Z}(\mathbf{s}_\alpha, t_\phi) &= \mathbf{X}(\mathbf{s}_\alpha, t_\phi)\widehat{\boldsymbol\beta} + \boldsymbol{v}\mathbf{V}^{-1}(Z(\mathbf{s}, t) - \mathbf{X}\widehat{\boldsymbol\beta})\\ &= \widehat{\boldsymbol\beta} + \boldsymbol{v}\mathbf{V}^{-1}(Z(\mathbf{s}, t) - \widehat{\boldsymbol\beta})\\ \end{align}$$` --- # Universal kriging `$$\widehat{Z}(\mathbf{s}_\alpha, t_\phi) = \mathbf{X}(\mathbf{s}_\alpha, t_\phi)\widehat{\boldsymbol\beta} + \boldsymbol{v}\mathbf{V}^{-1}(Z(\mathbf{s}, t) - \mathbf{X}\widehat{\boldsymbol\beta})$$` In universal kriging, `\(\mathbf{X}(\mathbf{s}_\alpha, t_\phi)\)` and `\(\mathbf{X}\)` can represent one (or a few explanatory) and as such `\(\widehat{\boldsymbol\beta}\)` will represent at least two regression parameters (the intercept and one or a few "slopes"), all of which are estimated. This is known as *universal* kriging because it is very flexible and thus more universal. --- # .footnotesize[How to perform a kriging interpolation ?] ## Step 1 - Build model variogram We need to use everything we learned on the variogram because kriging relies on the model variogram. <img src="index_files/figure-html/unnamed-chunk-26-1.png" style="display: block; margin: auto;" /> --- # .footnotesize[How to perform a kriging interpolation ?] ## Step 2 - Define a grid ```r library(sf) library(raster) lake <- st_read("../data/raw/hamilton_harbor.gdb", layer="waterbody_2", quiet = TRUE) # Align the projections lake <- st_transform(lake, st_crs(tpSP)) # Create the reference grid for model projection (using the lake extent) r_ref <- raster(lake,res=100) r_ref ``` ``` ## class : RasterLayer ## dimensions : 82, 148, 12136 (nrow, ncol, ncell) ## resolution : 100, 100 (x, y) ## extent : 1341058, 1355858, 11862377, 11870577 (xmin, xmax, ymin, ymax) ## crs : +proj=lcc +lat_1=44.5 +lat_2=53.5 +lat_0=0 +lon_0=-85 +x_0=930000 +y_0=6430000 +ellps=GRS80 +towgs84=0,0,0,0,0,0,0 +units=m +no_defs ``` As for inverse distance weighting, we build a grid of `\(100 \times 100\)` m. --- # .footnotesize[How to perform a kriging interpolation ?] ## Step 3 - Interpolate ! ### Simple kriging ```r # Simple kriging skModel <- gstat(formula = Value.Valeur ~ 1, location = tpSP, model = modelVario, beta = 2) # Build interpolation map skMap <- interpolate(object = r_ref, model = skModel, debug = 0) ``` --- # .footnotesize[How to perform a kriging interpolation ?] ## Step 3 - Interpolate ! ### Ordinary kriging ```r # Ordinary kriging okModel <- gstat(formula = Value.Valeur ~ 1, location = tpSP, model = modelVario) # Build interpolation map okMap <- interpolate(object = r_ref, model = okModel, debug = 0) ``` --- # .footnotesize[How to perform a kriging interpolation ?] ## Step 4 - Visualize ### Simple kriging <div id="htmlwidget-661b64918289b38cb588" style="width:100%;height:55%;" class="leaflet html-widget"></div> <script type="application/json" data-for="htmlwidget-661b64918289b38cb588">{"x":{"options":{"minZoom":1,"maxZoom":100,"crs":{"crsClass":"L.CRS.EPSG3857","code":null,"proj4def":null,"projectedBounds":null,"options":{}},"preferCanvas":false,"bounceAtZoomLimits":false,"maxBounds":[[[-90,-370]],[[90,370]]]},"calls":[{"method":"addProviderTiles","args":["CartoDB.Positron",1,"CartoDB.Positron",{"errorTileUrl":"","noWrap":false,"detectRetina":false}]},{"method":"addProviderTiles","args":["CartoDB.DarkMatter",2,"CartoDB.DarkMatter",{"errorTileUrl":"","noWrap":false,"detectRetina":false}]},{"method":"addProviderTiles","args":["OpenStreetMap",3,"OpenStreetMap",{"errorTileUrl":"","noWrap":false,"detectRetina":false}]},{"method":"addProviderTiles","args":["Esri.WorldImagery",4,"Esri.WorldImagery",{"errorTileUrl":"","noWrap":false,"detectRetina":false}]},{"method":"addProviderTiles","args":["OpenTopoMap",5,"OpenTopoMap",{"errorTileUrl":"","noWrap":false,"detectRetina":false}]},{"method":"addRasterImage","args":["data:image/png;base64,iVBORw0KGgoAAAANSUhEUgAAAJAAAABFCAYAAACltW8kAAAWzklEQVR4nO2de4xc133fP79zzr13HvskJdKuEgeNDQcoCvS/Av0r/wWQtFxRD8eKFMFy7QgOVEGQK6g11Opq7BhuBdWuKsSyXbn1A0ktW5Yocin9Z6B/BgiaJk4auHXt2DVF8bXvmbmvc07/OHdmZ5fLfZBLkVLmS1zscudxZ+Z85vc+M/KjH/3oWcZ632vu9k+nAAtvvdw5yPs1B3lnY90YHbv9kXT0/x53RVAGIF2NtrtPGVug9662gjOQx70r51946+WOelfONNa7KkEhvDtLOwbofax3A6IxQO9zXW+IxgC9hyWiENl9Ca8nROMs7CbUfXNPpqOB8A8Xvrxj6i2i8H7nwFlQ1yW4HgN0E+njxz6XAihRgMLVUAyA2gqSoPHY8HttiXYC6XpANAboBuqB+WdSQaHQWEqMJPUCRzhvEXFYX6JE4XwA6dWF568IEexujQ4aojFAN0gPzj+baiICQAo9shQOhxeHw6JlAyaP5b65J1PnS2ADlhsJ0TiIfpf14Pyz6UPzX0gjEmKaJDSJadFgYtMR1383JETSQEuEoFGieO30Cx2AE6df7Axcl6A3nWcvwfVB6KYA6FrK6+8lPTT/hVQTDeFIfJOWn6TtJmi79vBo+hYtP0lSA2ZIwiEJighgCJFiIxPbCtFOOqjMbNzKuE76zPyLKdTuCEtJDkBEQuQTImISHxN5g0Ghawic91gcJZZSSgopKaWgJKckx1Licfzpyc8PY6F77nw8dbih2xp1Z7tlZ9fiyhbeerkzjoEOWI8eeyk1GBIauPqflWpoHSIf0/AJDZ/QlIhEKYxSRCIAWO8pvadwltwb+mgUCmTjHJaSB+afSUchUiiccFlMdL3joTFAB6THjn09BWj4hMhHaBQeTyEV1lucOJRXRBiaPqalIlpa0TaKhoaoBqTyQmahbxU9q9FOoZwKwYYMLJrD4oYQiWi8t1cN0bVoDNAB6LFjX08VCuM1iY+JMTSVofQO7RUWh/MejSIRQ0sb2loxHQtTEUwaR0N7RDyFU6yVitVSiAoNFTjrcb62Z+JQKArADQCpLZT3m4HZK0TXYoXGAF2D/vWd302dOOI6HTdeo1GYOp5RQCQa5QVBMKJoKD2E53DiuTWpuCUpmIpzlHi6ZcSFvEGSRYBQeYX1BuscFoulwotFY4YAvbrwfOe+uSdTBJQPVurdgmgM0FXoS3M/SC2eCI3zClPHN1IPUjg8Zb1QCkGJrmFSNJSiZYRJA7Ox5YPNPh+aXuLIoUWMsVxamqGxfBjvJ8hdRGaFwilyr4l8RCUWh6OiQo1kXYNi43YQXU+NAdqH3vz9E+mZHkwaQ+Ec2gll7Z48HggQbZUCtIRgOVFCrKBpPG1jmW1kHD18idv+yU/QjYLkb36TXpGwmCc0CkNDC5ESEqcpfThygf968qlNFenvn3qu87vHnkq3QhQe0/WzQjdFHei9oJ/84ffSWHs+POmZiYW20bS0pimaRDRRfRhRw3EuBWgELSHLikTQCiIFWsBIiHtE+U3nEjxGPFo8Wgi3E0GjiHzE104+tm1z9funnusoCWcX0VesER1kkXEM0B6k/81/SqfjgtuaBbH2zMQwGUHbKJpa09CahtJEooaHrg8zWHwRlGxk495D6RS9MubS0gzn/ubDnPvLj3Lxwi2s5U1yq/E1VyKgRYhFoVE8NfftbQuvD8w/kyoi9gLRlbTfAuPYhe2gI8/9UXro1kt0j0zQjAvOrs6guhNATIhuQImQW6g8OC/bOoDgwjYg8h5yJ3QrzaWsgTDLetZEK0e3SFjMmnQrTekDbkrASHCDkQ9B+dN3/kn6xdMPdgAemX8hLejxpyc/37n/2NNpaHmAHXFVW13XQcVHY4C20TuPfyf9yOHzHP3IWab+0d9x2Craf/UR7C8U/Soid4rSRdh6gbUI1gvWMQTI+Q23pGRwvfoyoHLQrRQiEaVTLOUNlHhKp+hWhq7VlE7wPlgtI0KsFIpQHuj6kqfmvp2WVBgxIC0Avnfqi50H5p9JrQfB7RgPHYTGAG3Rn33qh+lvTjoacUHz1iX0R6chy2n+Yp12I6NtSlo6pq811od4J3dgPTgPnvBz4Ky8Z5NV0hIuLz1kVgBN5QSjQqbmgMIpMivYmsFIgfWCJ1SccdAmIveq7uULWd0qCWdWaAk9M+vLDYiEPVmh/QTT7/sY6P5jT++5Ufvq751Ig3VQ9PKEtTNHyP/Mkv9FTH9lgspqRDyRcsTK0dKOtvFMRp6pCGZimIngUByOmRim6nippaGhN6yQdZA76FlhrVKsl5q1StOtNMUIPKYOuhsamlpoG8WE0bS1YUJFTEgybI08MffNFOBPTj7bGezMUNsEzPtpuu6m97UF+vixz6V7DQpfuvv19JZEKKzQrSIWu5PEZz7I+upkKPB1W6z1m1QuxD6xDu9Qozy+dmUiYdUHZ7ReKL1QOiGzQuWC5bFucDngwHvBKdDiUTKImQDlUQhGoFLh+t4zcp+KnnUoC3jIJOfJuW+lzy883NFEeHF1MdEdqNsa1XseoHvnPpteaWb4lVNf2tM23n9/7NV00ujgVpywWhrO99pYp5jotTHKUlhDv4zJbXj3JsoRDYAZpty+/j0Q4hAKq0NMU2m6laJnhZINGLwEt+Xr+o2WDZAArPM4ZJiROYILLJzQryCuVIiBKvDek0sBhC77qBXy6G3d2LXqpgZo/o7PpLBhckUUJ06/uAmK3QbOd9JTc99OEx/RkijEJS7EJeuVxqgID/QqQ6TCC269wnqFVo5GDYpRjkRbYm2JdYVWDqMsur5Nv4xZzloh25II0PQQvNscG4kEV9XSwT3qujbkvQxjqwFcAKUT1ipNXISKU+UNReUoqAD47sl/23lo/guppdzxNbjWOOimBggu99f33Pl4+trpFzr3zT2Zaon2bGW26om5b6bRyNO33geXU0PUrzRaPM4LDV0NF1QNwfHEytKMCtpJRruREUUlSjmiqCRKSrSpyLpNzl28BZjFeqFyQunVMIMTAhiR8jS0YyKqmDAVibZ1rUgPrxspR9NUxLrCOsXFrAkkFFbRt6FOZPzG6+WwKNE4X9ZAjIy9HlA29p4aKLvnzsdTVWcXStRwOu97p764L4iemPtmqhAiH5FgaIihpTVto5iMYNLAVOyYNJa2qWiaikg5IuUQQhBttKUV5Uw2+0xPrTF5aBkdl3gn6MgSTXYxE33yxSnO/Z/f4JfnPsCv1qY5nyUsl5p+JVS1W0oUtI1jJrYcTnJubXVpRTmV06wXCVll8ASQpxt9Dk+uIuL52YWj/HRlml/1Is5lcKmoWHEZfcn5ysKnOhCKi9aXWF/ifMl2g2dXcmm7WaCbdm/8XXc8mt51x6OXZU8i4d0VKq0aJXrf8PzLuf+ShltrFKFLPqjTbJwHFCGmCRmXpWlKmqZkIs6ZSDImkz6TzT6Tk+tMzKzQmF2lcSgcyS3LRIdXUdMZUbtP0siJavemxA+DbL/lnFo8TVNxuL3Gr3/gHWbb6zRNSaQcetD2EI82liTJw9+VZ/ThC4KTjYUfHTq7HrppXdgbb/7xpid+79xnUy0G5x3fP/Xcnl6UF+56LX38jXs2XTfytQULCKJERirFG+4kVmExJ6KSqTijERVE2qKUQytHZCqajYxmq0fczjCtDACJPCqqEOOQOkOzVejah3gmWJ5BMAwhoK6c1C5UUVSGftakqAyV0xROUzpF6cJ95GVE6TQX+i3WS01moXR+OA7rcHxm/sV00DOz/vI46KCyspsWoK3SYhA0ry7sDs9X7349HbQOvnr36ynAYllSeRdGMPBDgAwyhMdIcCcBHstUVHCo2eXQxBrNRoZSbpiyG2OJ4gITV4i2eC+IDtC40uAWI2wR0Tt3iNW1SbpFQmY1havjIBeCdk/IwLTUQXGeoFZnWepNUDrFehnTq8ywrbFSxEDoo62Wmku5pltB5jy5t1QSZobKkcLiqwvPd+6d++x12bhwUwI02i3+3WNPDTOxvdR0Xrr79TQSoR2FRcks9CpPWxsyaymRYZvBDJueEloFGmLtaWnHpKmYSnIOT65y5APnaUx2cVZR5QlVEV42pR1Kb7yTVTMHp7CrLbLFKdYXZ1henubS2hQreUK3MmRWkTsoHOT1TW2dyjsUpYtZqzSJ2si2CidUXobBtPXh730LayWslo6+rSioKKWkkmrYuhhoMK24VVcb/wyf856u9S5pEPeMpuoBHI2WaFie30mREqbqivBsHCrELSMkSkiUIqonBsPYxUaTc1DxDbM6lnZUMpn0mZpco3VohdZtF5j40Dmah5eJmzlKb36BRTtEO1AOVxrKfoP1tQlWum2WsxarZUzugvvK7ODw9K1nvfKslbCUw8VMONs3nOlFnOlFnO0bzmWai7niYiacHx5wIYPFwrFWVXR9SS4FJQU27OnY9PheO/1CZzSAPijdlBZoVKEQptFEaAyPzL+QDnY2/IeFfz4E7St3vZaGIfVQ9o91CFaTug1Q1jGGQ4GrpwXr+GfQ7Y4EGtrR0pZ2VNBKckxUIcai2jnSdpheg8zVXXLtUKZCRaH24ksTDqvxXtDaUlrDWhGzVhoU8Dvfubvz8r0n0syG3Re+toaFEzIRenYjFoON3pr3UPkwtma9p3Th9rm3ZDU8meSUErb/VOTcf+zpdLsk4yCr0jdNGn/XHY+mIqE1ONg0B2Enp0KjMUQkaCIS3yDyEW2f0BBDpBRtXY+KRtA2nkbtAjIndCuhW8J65cmcp3LBwCvAKEVLh/R9NoajjZJ/0Opz2+Qyt8ysMD2zTPvQKvH0Os4q1s4cIes2aU11aUyvEU30UUkJdeHQ9RN6F2ZZuzjD4vIMv1i8lf/XbZNZxT99+b7h83rx+Gtp6TzWe3Lv6k0XISPUstlZh0q1rwHyVHisd1Q4SqmGlqeUnJx+sEC+xNVWaDTpuOuOR9Pd0nfYmwu7afaFDeAZaPRDBDQRoeJz+Ya8SDRRDUBDC20T4GkbT1wvKJWiVEKuwkiEEY8VQXmPyOVRlRAKdrGpiEyJKE/ZTyj7CXmvycrSNM1mxsQHLxAfXQbl8bnBdhv40lBlMdlamzPnjvJ3K4c432+wVBjKzUOHPHZiIzv8/NwraeV9sIheNl3XjcDi8WFTjzishIC5oqKUDbc1gMfjwk6ObTKw3bSfsdYbYoGO3f5IunVKbmB9RPQw4xpUmT85/1za9G0S3wjwoGlJREtrIiU0tTBhYCKC6cgyFVmaJlRr1yvNYmFYLoTVMgTUhXPYQSCtFA0lTEbCoRiONCpua/W4bWqFo7OLtCe6iPJUhaGyhigqueUjvyT57Toe+/k58l8eoliZAEA3c87/3w/xP372Yf52ZYr1UtGt4GPfO37V9Zgn576V+npH2CBAtoOfNTTD32t4Bj+9t5ssOmy0iK41gL4hFuhKnyw6kNQJ9qhtaPlJDIbExzSImNARiRIaShHrMCrRNNTjFY7ZJOdwo0/pFGe7E6xXGiUb4+6OjT6Ur1sY1ofxiswp1sqYlaxJsjaJ8woljrKs60ftUNuRIof1HsXZKdbP3srq4jTGVCjtWF6ZIrcG64XMXRs8AM8vPDy8/SPzL6SeYHl8vc3HYUegsTjvhvA4HMfvfCwdTUzes83UATxbh7pHrc9gnlfJRk8n9jERZghPSyuaWmjUMzYhUPbEOriuWFmmGj3yKiLqt4b34wFPCFwHqbwlBKWFFTIF3UpYVYYka6KAvIowymKdonKapfUJiiJi5u2l4N7ymDKPKKuIbq8VrF7WxHohUnWL/QD1jZOPXwbj/ceeTn09srEVnu1gOfXWNzoH9RHBNzSN32mwadQCfWXhU50JGrRV2NE5EwuHEjiceGZiz0TkaOhQ7rde6FURZ1ZneHt9itUy7K3KbSjcVXU2Y/H1+5aQzThPZmuASs1iHnMxa3KpN8FSb4LVrMVK1uTs+jT/68yH+PO//sf89d/+Fu+8cwTvFXFcUFaGrAjWa60+rz3ArPmB+WfSB+efvWzhS98n9LsqnC+3hWfgtgY69dY3tsnO9v9grztAu7msUQ3c16j1GSgi7ICYjoXZGI40LEcbFbcmJZPGEg+yLqtYzGPe7rU502tyITeslqHoVjhH4RwljtJbSm/5V6fu6zx58t6O9Z7KQa+CtRqi5SJmtYjJancEYXD+fL/JXy3N8pOlw7y9MsvaehslnpmpVaZaPdbKmMXCsFaGQuZByfqSyueb/nbf3JOp93YTOKPwvPHmH3eu1zDZ3O2fTq8rQKPw7Br7jECzXcX5cwsf67RNyLQOJxW/3urzGxNrHG32mIpLIlVbH6tYLg3nMsP5zLCUbwTPmXXkNTiDnGWgx9+4p7NWWdbKUNTrWUXPKjKrcT5MG07EOVNxjhDqSueziJ+uTPPjs7/Gr84dwVpNFIWsp3AhrnroB9cW/4zqlVNf6mwdX3l14fmOw20CZ7TbPn/HZ9KTb36tc/LNr+34OK52b/xwpa72Q57mbv90OnqMXjYwk3u1QoMpOghzvZc9WAmxzqSxHG2t8w9vOc+R9jotHQp5pRO6VfhggqVCWMphuYC10tG1lq6ryH1FiaWQikKqTXusPnvy3o6tB8tu/+7xzj/75r2d33rp/s6t//HhTuU0kbY0TADEe1gtFT/vRvzF4iR/eeED/OTtX+N/n72N1SKmsEJxgO5rp17WAJpRcPZidQbrcy0f76K2W/j9aPQLOBbeerlztff3w4Uvd3abLvzED453hEEWJXgvlDZ0q3Mn9K3QrWC1CMdK6VmpLF1b0XcBnC+efrCTS8HzCw93nl94uPPcwic2nfNfnLi788lXN6zGwu+fSAFmv/zJzo8vHuFnK7N89KX7O91KsVbBSgGXcvj5esz/XJzlx4uz/LIXs1wGd3gQOn7nY+mVellbtXWKwXu34xt4u1hoPzrQOtBWcK7U/BRRDEzqXXc8mm590gAPz38p/dbJz1329//+8GupVnAkKWhHJZnVLOUxi4VmtRSWi9DT6tVV576tyL2lc/r3rtmVvPXQiVSL53e+c3fn6/ecSBXwB68d73z7YyfSSG2MZ5QOulVoNTyxZZxkr9qaem/9/0CD4Hiri9oOmp1guVojsmsMtNWibPf7fq3O6JPdDh6A7eAB+O1v3dPJrHAxj/jpaptfrDd5JzMsFcJaCYXzLBaOP3z97s4Tb9zTWabPqvR49NhL1zzOcPt3j3dWihBMdyvLep1ifeIHxzsPvHK8cz6znM8sF/OKrrVXDQ9sNJSP3/nYZQ3m3XQli7OfhGav2tECbYVipy8r2w6gg/5ys6069eCJdNDd7lawWlpWbEFOxb87/VAH4PFj/zkNRTfHV089emCP5/Nzr6QAzyx8/LL7TO/8b6nD84XTDxzI+QaB8F6vvxMoV/ousauxQAtvvdzZF0CDG+3l+tcbnu30R3PfT0tvNwF0I/TYsa+nxpvhXPL10gCU7VzTKESjhcOD/DK6XQEavePdwLkRwPx9104ADS4fXLZXb7IfiC4bqr/SjXc72RieG6f9wDO6Tlcqv+x3LW+aeaCxDk6j8GzVThZmAM9erdBNu61nrL1rP+n6fsDY6/nHAL3HtVsh8GoLu3uFaAzQ3yMtvPVyZz/WZS/XvSkB2m5X6lhXp+0g2Ckp2q/FuikBulJ1eqyr024Q7WSZdrNC4yxsrD3pSkXlm9ICjXXz6UqWaAzQWHvWdhCNARprR+3WnRgDNNauGh3b2XrZOIgea1/a2lcbW6CxdtVOFmgM0Fi7amBttguixy5srGvS2AKNtat2am38f3HOh2bzJ3hlAAAAAElFTkSuQmCC",[[43.3207276157612,-79.9424152836876],[43.2513087548675,-79.759062442887]],0.8,null,"skMapMask","skMapMask"]},{"method":"addControl","args":["","topright","imageValues","info legend"]},{"method":"addLegend","args":[{"colors":["#000004 , #0B0723 6.09185815189234%, #3A0963 18.1679279520449%, #6C186E 30.2439977521975%, #9D2964 42.3200675523501%, #CB4149 54.3961373525027%, #ED6826 66.4722071526552%, #FB9E07 78.5482769528078%, #F5D949 90.6243467529604%, #FCFFA4 "],"labels":["0","500","1000","1500","2000","2500","3000","3500"],"na_color":"#BEBEBE","na_label":"NA","opacity":1,"position":"topright","type":"numeric","title":"skMapMask","extra":{"p_1":0.0609185815189234,"p_n":0.906243467529604},"layerId":null,"className":"info legend","group":"skMapMask"}]},{"method":"addLayersControl","args":[["CartoDB.Positron","CartoDB.DarkMatter","OpenStreetMap","Esri.WorldImagery","OpenTopoMap"],"skMapMask",{"collapsed":true,"autoZIndex":true,"position":"topleft"}]},{"method":"addScaleBar","args":[{"maxWidth":100,"metric":true,"imperial":true,"updateWhenIdle":true,"position":"bottomleft"}]},{"method":"addHomeButton","args":[-79.9436885673043,43.2452685884441,-79.755242592037,43.3277656827117,"Zoom to skMapMask","<strong> skMapMask <\/strong>","bottomright"]}],"limits":{"lat":[43.2513087548675,43.3207276157612],"lng":[-79.9424152836876,-79.759062442887]}},"evals":[],"jsHooks":{"render":[{"code":"function(el, x, data) {\n return (function(el, x, data) {\n var map = this;\n map.on(\"mousemove\", function (e) {\n rasterPicker.pick(e, x, null, \"Layer \");\n });\n }).call(this.getMap(), el, x, data);\n}","data":null},{"code":"function(el, x, data) {\n return (\n function(el, x, data) {\n // get the leaflet map\n var map = this; //HTMLWidgets.find('#' + el.id);\n // we need a new div element because we have to handle\n // the mouseover output separately\n // debugger;\n function addElement () {\n // generate new div Element\n var newDiv = $(document.createElement('div'));\n // append at end of leaflet htmlwidget container\n $(el).append(newDiv);\n //provide ID and style\n newDiv.addClass('lnlt');\n newDiv.css({\n 'position': 'relative',\n 'bottomleft': '0px',\n 'background-color': 'rgba(255, 255, 255, 0.7)',\n 'box-shadow': '0 0 2px #bbb',\n 'background-clip': 'padding-box',\n 'margin': '0',\n 'padding-left': '5px',\n 'color': '#333',\n 'font': '9px/1.5 \"Helvetica Neue\", Arial, Helvetica, sans-serif',\n 'z-index': '700',\n });\n return newDiv;\n }\n\n\n // check for already existing lnlt class to not duplicate\n var lnlt = $(el).find('.lnlt');\n\n if(!lnlt.length) {\n lnlt = addElement();\n\n // grab the special div we generated in the beginning\n // and put the mousmove output there\n\n map.on('mousemove', function (e) {\n if (e.originalEvent.ctrlKey) {\n if (document.querySelector('.lnlt') === null) lnlt = addElement();\n lnlt.text(\n ' lon: ' + (e.latlng.lng).toFixed(5) +\n ' | lat: ' + (e.latlng.lat).toFixed(5) +\n ' | zoom: ' + map.getZoom() +\n ' | x: ' + L.CRS.EPSG3857.project(e.latlng).x.toFixed(0) +\n ' | y: ' + L.CRS.EPSG3857.project(e.latlng).y.toFixed(0) +\n ' | epsg: 3857 ' +\n ' | proj4: +proj=merc +a=6378137 +b=6378137 +lat_ts=0.0 +lon_0=0.0 +x_0=0.0 +y_0=0 +k=1.0 +units=m +nadgrids=@null +no_defs ');\n } else {\n if (document.querySelector('.lnlt') === null) lnlt = addElement();\n lnlt.text(\n ' lon: ' + (e.latlng.lng).toFixed(5) +\n ' | lat: ' + (e.latlng.lat).toFixed(5) +\n ' | zoom: ' + map.getZoom() + ' ');\n }\n });\n\n // remove the lnlt div when mouse leaves map\n map.on('mouseout', function (e) {\n var strip = document.querySelector('.lnlt');\n strip.remove();\n });\n\n };\n\n //$(el).keypress(67, function(e) {\n map.on('preclick', function(e) {\n if (e.originalEvent.ctrlKey) {\n if (document.querySelector('.lnlt') === null) lnlt = addElement();\n lnlt.text(\n ' lon: ' + (e.latlng.lng).toFixed(5) +\n ' | lat: ' + (e.latlng.lat).toFixed(5) +\n ' | zoom: ' + map.getZoom() + ' ');\n var txt = document.querySelector('.lnlt').textContent;\n console.log(txt);\n //txt.innerText.focus();\n //txt.select();\n setClipboardText('\"' + txt + '\"');\n }\n });\n\n //map.on('click', function (e) {\n // var txt = document.querySelector('.lnlt').textContent;\n // console.log(txt);\n // //txt.innerText.focus();\n // //txt.select();\n // setClipboardText(txt);\n //});\n\n function setClipboardText(text){\n var id = 'mycustom-clipboard-textarea-hidden-id';\n var existsTextarea = document.getElementById(id);\n\n if(!existsTextarea){\n console.log('Creating textarea');\n var textarea = document.createElement('textarea');\n textarea.id = id;\n // Place in top-left corner of screen regardless of scroll position.\n textarea.style.position = 'fixed';\n textarea.style.top = 0;\n textarea.style.left = 0;\n\n // Ensure it has a small width and height. Setting to 1px / 1em\n // doesn't work as this gives a negative w/h on some browsers.\n textarea.style.width = '1px';\n textarea.style.height = '1px';\n\n // We don't need padding, reducing the size if it does flash render.\n textarea.style.padding = 0;\n\n // Clean up any borders.\n textarea.style.border = 'none';\n textarea.style.outline = 'none';\n textarea.style.boxShadow = 'none';\n\n // Avoid flash of white box if rendered for any reason.\n textarea.style.background = 'transparent';\n document.querySelector('body').appendChild(textarea);\n console.log('The textarea now exists :)');\n existsTextarea = document.getElementById(id);\n }else{\n console.log('The textarea already exists :3')\n }\n\n existsTextarea.value = text;\n existsTextarea.select();\n\n try {\n var status = document.execCommand('copy');\n if(!status){\n console.error('Cannot copy text');\n }else{\n console.log('The text is now on the clipboard');\n }\n } catch (err) {\n console.log('Unable to copy.');\n }\n }\n\n\n }\n ).call(this.getMap(), el, x, data);\n}","data":null}]}}</script> --- # .footnotesize[How to perform a kriging interpolation ?] ## Step 4 - Visualize ### Ordinary kriging <div id="htmlwidget-01af1712517b7786b920" style="width:100%;height:55%;" class="leaflet html-widget"></div> <script type="application/json" data-for="htmlwidget-01af1712517b7786b920">{"x":{"options":{"minZoom":1,"maxZoom":100,"crs":{"crsClass":"L.CRS.EPSG3857","code":null,"proj4def":null,"projectedBounds":null,"options":{}},"preferCanvas":false,"bounceAtZoomLimits":false,"maxBounds":[[[-90,-370]],[[90,370]]]},"calls":[{"method":"addProviderTiles","args":["CartoDB.Positron",1,"CartoDB.Positron",{"errorTileUrl":"","noWrap":false,"detectRetina":false}]},{"method":"addProviderTiles","args":["CartoDB.DarkMatter",2,"CartoDB.DarkMatter",{"errorTileUrl":"","noWrap":false,"detectRetina":false}]},{"method":"addProviderTiles","args":["OpenStreetMap",3,"OpenStreetMap",{"errorTileUrl":"","noWrap":false,"detectRetina":false}]},{"method":"addProviderTiles","args":["Esri.WorldImagery",4,"Esri.WorldImagery",{"errorTileUrl":"","noWrap":false,"detectRetina":false}]},{"method":"addProviderTiles","args":["OpenTopoMap",5,"OpenTopoMap",{"errorTileUrl":"","noWrap":false,"detectRetina":false}]},{"method":"addRasterImage","args":["data:image/png;base64,iVBORw0KGgoAAAANSUhEUgAAAJAAAABFCAYAAACltW8kAAARPElEQVR4nO2dXYwk11mGn/NTP9090zu79iYrcBRBcgNY4YIIEXEDV1yBFCUkJEgJEKQ4IiS2A4Qktmt74yAlxD+bYONAHKFEiBiEEglxARcWN4irIECYKMIIkXjtxPbuzu70THdVnR8uTlVNdW/3zPRuz886/Uql7umpqe6u89b7vd/3nVMjnn322fOs8JpH/NDjGUBx4d7BMo+rl3mwFY4HNTnamEeUWfseFLOOKVYKdPviVsiwDBQX7h3I4/wAK9z+WBFohVvCikAr3BJWBFrhlrDKwk4g5ANfzAQeKTwA5ac/utTUe5lYEegEwX3iyUxJB2Ly9cOq4SwDKwIdIy595GtZqiyxMsTKErUMRa0+onoESLPHsvHgvhNFohWBjgnP3fNMtqYlVjq8F3i/KzuCXfLIFoEgkKi1I85PydURY2Wijxh/9+vfzJ59/zey3Epyq7BOTJCgJk37sb0B1Co0Htw3kDNIdpQ4EQQ67orqUeHzv/K32fdHsFkKhkZReoGrDI8QHiUdSrjwKB1SuhvIM02iGsdFolUr45DwV+/+ZrZt4HppuWpzhmLEthxylzvHGzsJb+h6XpeWnE5y+nFOLypIdIlWFlURp0Yd3tpKtZN9rCFQO6wdZUhbtTIOAf/4vm9kf/Nr38xGFkbWUXqPxTGU17juXyb3BldxQwlPJF0w0MoQ6d1NK9uQqVaidrjqDh6ZqdpHrUQrE70kfOdDX8+uFBGFUwwNbBaWsbM4IEJxhz3LWV7HnbrDegQ97ehqQ0eXdKKCbpKTRGUgiwwkcFbivcC68Ogqsy0JStMdPJK1leg4sCLQEnDpI1/LIALAehhZz2U7RiPpyoiuVEQyIZWSjRjOJo5+ZFiLSvrJmH5nh046Jo5LhHDhOE5hjcI6BQask0jAehHC2x6hSgp/ZKFsRaBbgPvEk9mojFEiDuFIeGIJPS2403UA6CpJqqCroKOhHznuSIL3OZ3usN7ZYX19SHdtGx2VAFijMUVEKWKEqUJSRSIhfFChFknGg/sGE+k9R0eiFYFuAv2HP5eVRjOWMUo6EmUprKKjLaecABQ9LfEetIRUQao8PW1Z15aNOOd0OmItHdFfG9I/vUnnjmuopMTmEeV2B7HdacKWdA4nZOODHEzUjY4TKwItgDc99fFsZ7tLqSO8F0TOYJ3EOklHl9T2NZaeU1FI0WtlSpWjow09bejHOWvxmF46ptMbkW4MSe96FZE47JWKOKXGGoUyCid3yeOr8DV86PcmvM9xqdAqCzsg3vLMPZnSht7aNnFcEGlDrA2JLkl0SVcHT3MqKjmdFNyZlJxNCu6Iw88bcUE/KkLKHud0kpw4LtBRiYwMSB8uZ1nVfORk3ac21gDXH/iDmcb5ONocKwIdAD/3T+/KVFKSdMdIZYnjgqQiUVSRqBMV9CqCbMQFG0nOqepxIw6vr8cFnaggjQq0skgV2hhmHGNeXcf8oIsddrBFhLcS7+XMULXxmc/OTOE75x/NxFQaf9hp/SqE7YGf/9YvZ3KtxG0oUu0ortZ9K4l1isiqZoBlVUnWUmH9btpdtyOUcERVvaeu70BlmHdScBKhLN6qQKgiqtL43Wu8rkh7L+g//LmsVqK6JrRz/mODzvlHj7SqvyLQDPzM378/S85cR54ziLMbKGMQL26jS4XNI2ypiYxq6jQQCKSdJVLBE3kmm6MNwaoCoRAe7wTWKPKdFGs0Qji8lzgrGwLVtR/vJvtleMH6p/84A/Bit582On//oHP+0aytXIfphVYEmsLdf/nhjA1AW0Qnwm2cQZgScXUbGVlkZJDKIqVDa4v3IfWW0uEqQz3demg3RWsiCRmUxJowBM6q8JoLhHFWYqyeIGkb09nYcfXCXvMeSD7wxQNL+pue+njmncAbhc9j/LUC+cILiJdewm+DN+F0CekrElmUtkRRSRQZ4qgkjQs6SU4ah+pyt3qeRCVx1aKofYr3AmslZRlhSk2Zh0dTRhirGzJNfJ8pMrYbrWsXPp9BUKGj8kKvaQItQp4ffSzLakWwRYQZdjCvrGEvecwLErvZw44TXKmbcCKVQ9Uk0mUw10lOkuSk6Zg0HZNU2VYgWYnSwTxDIJBzVcgyOlSfncJa2ZAneKlJH3QQEh0VbvsQJj71J5n/zIdnpq/u4d89UFp79rOfyXwUwoY1mnKUhr8vNXLYAelwpcblMdZovJeIKt1W2iK92/089YBWabd3gSTWaKyVSB9CXY1aYbwXCD+pErvhyeGkhN23Cf2w1nM7I8zVhvswcaIJFD14ceJqcl5gH/7IBCnmkecg6A4eybSyWCWRTmGMrgjggBRnFbI2vFVxz9mgGBBC2e7sweBrpHQhvCkH0uOtxNZhqdAYW3meGSQKx/E3PA+tCwcKnJcIglcSVaN1el/YNdM3e24OitsuhKkHvpBBCE/+k0/c9AmKHryY1SGiNq3WKozVlHkctlFCOUopRwlmHNTHWdUcIxDFoqMSHRviNCfqjInXd4hPDUk3tkg2toh7I3QVvpS0jUo5L5utjelZiO1NSYtWBq1NFUJ3p3pM4yjaHbfVhDL1wBeyOj2u6ywA4o9+ZyEV8p98ItPSEtXZVJVaa2XR2qB0GCSlLSoyE/WX+r2h8iOqUhxtUHWWlhTobo6IDL7UFNd6FNfWyHdSinES/I5VOB+8Th3upHCVgrkm9W57oYZElYcqS40xGmNV8FK1p/KimXA23d5YZjp/YieURQ9ezKbD1zwsSh7zh38alIcg/67ajFVhM1WYctWgVMXCWVdzIJBFJwU6LVBpjkwKVFogkgLZKRAVAYGmKFgb44YcbrLOI4VHSrtw5jTrM7bbG4dRCzqxHmh6MV0dugS+8UH7nY5v3/NM9hNPvXviOIXVRFUYqZ1oPcBO+LA5ibUeKSe9SV2ngSkVigyqkzf71BvSg6sbo7rJtpybzLJqdXFeInxQHtGaQDa9X/3cOjU3TB3VZLMTS6B5mDbRs/DcPc9kxkmUEPznB/86i6TjdJKjhCdWAuklwu02KdtGVEqHtQqlbPWaC6FMmwlT7KzEISeIJHQgpssjzE6CNwqzk5IPu+SjlCKPg88yunnPmhQSGnOOASfkDWl8O9zVBGxUdIpIbWLN6tQvCyeeQHUoc/vqTcB3PvT1zHrJjg3zcVLliCSMjSbVppnZJ4SfSIupXhNWoaq1WqFg6FBxiU5zpHLYPMI7gSkjvKUJcUJ6VFrgraLc7jC6vMHWZh9rgum2LrQ+Zg14PU2jyfaquT8wSQTvRfOZ67+vj7VLtqOdJ3SiPFC9vOdW1oIr4bFOMLaBRLmTGB+SbVd5H0eY3Wd9GFDjVNgqM1o/QigWRp0xyZnrJHduEq2NkMqFvpUL2RtOgnSI2DQ1o3wnZTjscX24xvXhGts7nYnjN8a3an/Y1vPGj1nV/G56cy0iTpNnPy+0TJx4BapRZyV1Jua9mKgBbd7/laxwCiUiIunpKof1kEiHFn5Cv3xFKO8FFom3u4MAQYmsDYohhAseZ22E7BnKrW5TTJQqhDZZGWVfaHyhcWU4rVpZxkVMYTQegTaa4sK9g+jBi9msinKtQvX3nQU3rUgwkzzeiyNZCn1i0vj24sL2TQRmFRNrArnKAxinKJ2ksJrCSsZWU1RXpxKeRFm0dMTSomWYWtEMVHXcemFfrML8nm6Ss9bbZu3UFp1TQ6L1bVypuXbp9Yy2O/T6Q7obW+i1HVRcNhPA7E7K9stnuPrKGTa31tkadyisxjhJ/5EPNN+r/r7tNfDtes50L2sabZWZRZ422iRa5iLO4sK9gxOhQNNfKn7o8awm0bQXCEoEiDD4vpprE5hgkEKhpCd1YUqpxCMEKOHQVeXYedGsajDtaRfWN2FDCk+SFFijKbZTiu2UfKfD5ctnSJOc/o+8QnzuCkJ63CjG7oQ+mRnH7Fzv8d2XX88Lwz6OoILWC/qt79i+SNLssWb6Rbs9sRdmKdH08+n9DgPHokAHvQrqk9zef3qqRKjkisbTNJkJ3GAq66u78UJeYL3AOoGtMh0lwtzlU+mIM2tbnOpfR2mLNSF70tpw9s3fI/0FD1Lhn3+Z/Lt3Mt5cB0DHJZeefyP/8n8/zv9sdehqTz8yvOVL77qllsus16fJMsv7OC9uuC3MslToWBToVj98rUiqqQw7hAgz/5QP2RNVtyEQZGqODkBFrNJJjAtGu7BhrboSnm7Vr9IypPJKuuYYve5OSKeLHLZ3KF7a4PqLZ7n66hmiqEQqx9WtdQqr8EBhBW/5ys2TByaXMc/qb82rBdUXT1vRl40jJdDNkmduRVZ4RG1+p251Uptu4xRW7GZcNMoF3kPpJGOrGJaaHSuxHtZ1CDkewbiM0crivaB0CrXVJ88TTl+6ilSWYpRQFDGl0QxHHZyTXBt3Kb04YOFhMYzO338DEWbVePYKXcWFewfLUqETlcbPw3hw36AxmdVa8Xqrp4nWd7Sot/Zacik8kvqxFcoIIcw4ydgKrhaCV8aCy7lis4i4kidcHne5MupxedTl1VGX722d4t9ffAP//Nzd/Ot//SQvfP9cyHiSnLyMGOYpV/OUkVFoEZRyWUizx7L9CoJuTi1omjDLUqRDJ9AyVac9JVRNkacm0/T9cna72Lu3SgnHD4P75iffM/jpP/vVgUNgXXhdiDC/ZmwVI6PZLsOad1+FvR+MUv7tSp9vb25waWuDza11nJecXhuyno4YlhFjK4iVJ1aHO9U0zR7LatLMIs5h3hYvfujx7FAJ1CbPIkSaRZ7R+fsH7brJNHmmZ+bVaN+sslahWdMffvEv3j64q2c5lzrWI9coh/Wi8UZrUVimo6VHCtgsFc9fX+NbL93F//7gHNZJ1rs7nIoL+pGlpyxve/odSxvA8eC+wXRdZ786T+1/DotIDYFuVinihx7P2lv7d7OyqINi3ompB7+eftEmzzyvdMOcmir1V8Lx/Y9+tflsb3v6HYNYeWLpeOuX3zn4qafePXjzk+8ZvOmJ9w5SZViLc04nI9a1qXwSvDhS/Mdmwn9f2+DS1Tu4fL1PLyo4m+ZsxOWiX3suDuMmXMsglZw18Df7IWpzdjPHq6+SvaYw1Mt59yuyzYMUnuSzHxwA9B/5wODs478xOHfxfRMn8W1Pv2Pws19+Z/NaTbCNR39rkJuI0il+7In3Djra0lGeroKehtwJrow7XB31sE6SKENHm5v6nNNY5HzOIsVef3+rJFpqHehmvui8FHNeGb5eldme5FWn2LPupdPUfA44P3ovXP/Y05kQnvXP//bguXueybwX3P2ldw3+4X3fyO6ILWfTnK4u0a1lyKcf/c2bet/owYtZuyc47zzNuwXwIv/BZ97+B8G+HmhaUWY9X1R1plVr1j7zQtjmpz4+qMlRV42nm4lCeIoL9w7qARD4hVZozEP/kQ8M6prLWnWjBIBf+urbB2/98jsHulptWjVbbpo8sNtQrls5iyjFvLE4jDC4pwItkvotyvhloP/w55p5zcDEHJuagNGDF7NlqlCNOrRNh0CYVKplvNeihcD9iLJomNvrOAsRaN6bz9r/OO6q3l7Se5w35N75/T/PvBf0lkSgedjrDvbTY3GQsVmURPsSqH3g/YhzEm/D/1rHfv8CoT0uB40mi1qRCQ8074/3e7MVeY4Pi5Cnve+88suiY3li5gOtsDzsFREOktIvMlvituiFrTAfh/EPdxdRoRWBbnPsN9i3Utg9yH4rAv0QYdGe2EH2PZEE+mH55ytHgVkk2CvELapYJ5JAq6xuudiPRHsp035jscrCVjgQ5pn1E6lAK5w8zFOiFYFWODBmkWhFoBX2xH7diRWBVtgX7Wk7079bmegVFsJ0X22lQCvsi70UaEWgFfZFrTazTPQqhK1wS1gp0Ar7Yq/Wxv8Dnf/6XbnW5wkAAAAASUVORK5CYII=",[[43.3207276157612,-79.9424152836876],[43.2513087548675,-79.759062442887]],0.8,null,"okMapMask","okMapMask"]},{"method":"addControl","args":["","topright","imageValues","info legend"]},{"method":"addLegend","args":[{"colors":["#000004 , #010107 1.0256857209626%, #260C51 13.8089770522798%, #5D126E 26.5922683835971%, #912568 39.3755597149143%, #C33B4F 52.1588510462315%, #EA622A 64.9421423775487%, #FB9906 77.725433708866%, #F5D948 90.5087250401832%, #FCFFA4 "],"labels":["0","500","1000","1500","2000","2500","3000","3500"],"na_color":"#BEBEBE","na_label":"NA","opacity":1,"position":"topright","type":"numeric","title":"okMapMask","extra":{"p_1":0.010256857209626,"p_n":0.905087250401832},"layerId":null,"className":"info legend","group":"okMapMask"}]},{"method":"addLayersControl","args":[["CartoDB.Positron","CartoDB.DarkMatter","OpenStreetMap","Esri.WorldImagery","OpenTopoMap"],"okMapMask",{"collapsed":true,"autoZIndex":true,"position":"topleft"}]},{"method":"addScaleBar","args":[{"maxWidth":100,"metric":true,"imperial":true,"updateWhenIdle":true,"position":"bottomleft"}]},{"method":"addHomeButton","args":[-79.9436885673043,43.2452685884441,-79.755242592037,43.3277656827117,"Zoom to okMapMask","<strong> okMapMask <\/strong>","bottomright"]}],"limits":{"lat":[43.2513087548675,43.3207276157612],"lng":[-79.9424152836876,-79.759062442887]}},"evals":[],"jsHooks":{"render":[{"code":"function(el, x, data) {\n return (function(el, x, data) {\n var map = this;\n map.on(\"mousemove\", function (e) {\n rasterPicker.pick(e, x, null, \"Layer \");\n });\n }).call(this.getMap(), el, x, data);\n}","data":null},{"code":"function(el, x, data) {\n return (\n function(el, x, data) {\n // get the leaflet map\n var map = this; //HTMLWidgets.find('#' + el.id);\n // we need a new div element because we have to handle\n // the mouseover output separately\n // debugger;\n function addElement () {\n // generate new div Element\n var newDiv = $(document.createElement('div'));\n // append at end of leaflet htmlwidget container\n $(el).append(newDiv);\n //provide ID and style\n newDiv.addClass('lnlt');\n newDiv.css({\n 'position': 'relative',\n 'bottomleft': '0px',\n 'background-color': 'rgba(255, 255, 255, 0.7)',\n 'box-shadow': '0 0 2px #bbb',\n 'background-clip': 'padding-box',\n 'margin': '0',\n 'padding-left': '5px',\n 'color': '#333',\n 'font': '9px/1.5 \"Helvetica Neue\", Arial, Helvetica, sans-serif',\n 'z-index': '700',\n });\n return newDiv;\n }\n\n\n // check for already existing lnlt class to not duplicate\n var lnlt = $(el).find('.lnlt');\n\n if(!lnlt.length) {\n lnlt = addElement();\n\n // grab the special div we generated in the beginning\n // and put the mousmove output there\n\n map.on('mousemove', function (e) {\n if (e.originalEvent.ctrlKey) {\n if (document.querySelector('.lnlt') === null) lnlt = addElement();\n lnlt.text(\n ' lon: ' + (e.latlng.lng).toFixed(5) +\n ' | lat: ' + (e.latlng.lat).toFixed(5) +\n ' | zoom: ' + map.getZoom() +\n ' | x: ' + L.CRS.EPSG3857.project(e.latlng).x.toFixed(0) +\n ' | y: ' + L.CRS.EPSG3857.project(e.latlng).y.toFixed(0) +\n ' | epsg: 3857 ' +\n ' | proj4: +proj=merc +a=6378137 +b=6378137 +lat_ts=0.0 +lon_0=0.0 +x_0=0.0 +y_0=0 +k=1.0 +units=m +nadgrids=@null +no_defs ');\n } else {\n if (document.querySelector('.lnlt') === null) lnlt = addElement();\n lnlt.text(\n ' lon: ' + (e.latlng.lng).toFixed(5) +\n ' | lat: ' + (e.latlng.lat).toFixed(5) +\n ' | zoom: ' + map.getZoom() + ' ');\n }\n });\n\n // remove the lnlt div when mouse leaves map\n map.on('mouseout', function (e) {\n var strip = document.querySelector('.lnlt');\n strip.remove();\n });\n\n };\n\n //$(el).keypress(67, function(e) {\n map.on('preclick', function(e) {\n if (e.originalEvent.ctrlKey) {\n if (document.querySelector('.lnlt') === null) lnlt = addElement();\n lnlt.text(\n ' lon: ' + (e.latlng.lng).toFixed(5) +\n ' | lat: ' + (e.latlng.lat).toFixed(5) +\n ' | zoom: ' + map.getZoom() + ' ');\n var txt = document.querySelector('.lnlt').textContent;\n console.log(txt);\n //txt.innerText.focus();\n //txt.select();\n setClipboardText('\"' + txt + '\"');\n }\n });\n\n //map.on('click', function (e) {\n // var txt = document.querySelector('.lnlt').textContent;\n // console.log(txt);\n // //txt.innerText.focus();\n // //txt.select();\n // setClipboardText(txt);\n //});\n\n function setClipboardText(text){\n var id = 'mycustom-clipboard-textarea-hidden-id';\n var existsTextarea = document.getElementById(id);\n\n if(!existsTextarea){\n console.log('Creating textarea');\n var textarea = document.createElement('textarea');\n textarea.id = id;\n // Place in top-left corner of screen regardless of scroll position.\n textarea.style.position = 'fixed';\n textarea.style.top = 0;\n textarea.style.left = 0;\n\n // Ensure it has a small width and height. Setting to 1px / 1em\n // doesn't work as this gives a negative w/h on some browsers.\n textarea.style.width = '1px';\n textarea.style.height = '1px';\n\n // We don't need padding, reducing the size if it does flash render.\n textarea.style.padding = 0;\n\n // Clean up any borders.\n textarea.style.border = 'none';\n textarea.style.outline = 'none';\n textarea.style.boxShadow = 'none';\n\n // Avoid flash of white box if rendered for any reason.\n textarea.style.background = 'transparent';\n document.querySelector('body').appendChild(textarea);\n console.log('The textarea now exists :)');\n existsTextarea = document.getElementById(id);\n }else{\n console.log('The textarea already exists :3')\n }\n\n existsTextarea.value = text;\n existsTextarea.select();\n\n try {\n var status = document.execCommand('copy');\n if(!status){\n console.error('Cannot copy text');\n }else{\n console.log('The text is now on the clipboard');\n }\n } catch (err) {\n console.log('Unable to copy.');\n }\n }\n\n\n }\n ).call(this.getMap(), el, x, data);\n}","data":null}]}}</script>